
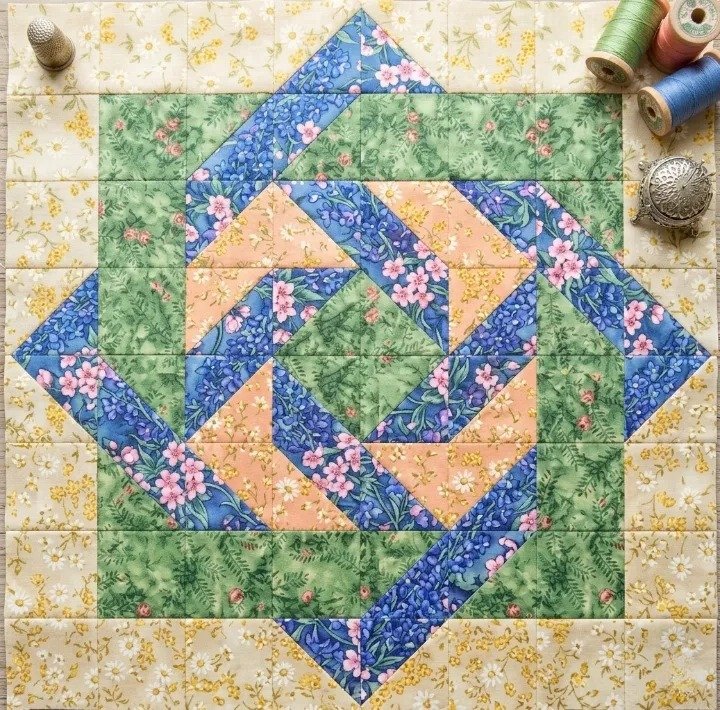
Slip Knot – Quilt Block Pattern is a visually striking and meaningful quilting design that transforms simple fabric pieces into an intricate, interwoven illusion. If you are looking for a quilt block that combines elegance, geometry, and a sense of movement, learning the Slip Knot – Quilt Block Pattern is a perfect choice. This pattern is inspired by the idea of a knot—symbolizing connection, unity, and continuity—which makes it not only beautiful but also meaningful in many quilting projects.
One of the most fascinating aspects of the Slip Knot – Quilt Block Pattern is how it creates the illusion of overlapping fabric strips without actually weaving them. Through careful placement of colors, shapes, and seams, the block appears to twist and loop like a real knot. This optical effect makes it a favorite among quilters who enjoy designs that look complex but are built from manageable steps.
Another reason why the Slip Knot – Quilt Block Pattern is so popular is its versatility. It can be used as a standalone decorative block, repeated across a quilt for a cohesive pattern, or combined with other blocks for a more intricate layout. Whether you prefer bold contrasts or subtle tones, this pattern allows you to customize your quilt to reflect your personal style.
Materials and Fabric Selection for Slip Knot – Quilt Block Pattern
Before starting your Slip Knot – Quilt Block Pattern, it is essential to gather all the necessary materials. Choosing the right fabrics and tools will play a major role in achieving a clean and professional result.
Cotton fabric is the most recommended option for quilting projects. It is durable, easy to sew, and available in a wide range of colors and prints. For this pattern, selecting fabrics with strong contrast is especially important to highlight the knot illusion.
You will typically need at least two main fabrics: one for the “knot” and one for the background. The contrast between these fabrics creates the visual effect of overlapping loops. You can also introduce a third fabric to add depth and dimension.
Consider using solid fabrics for a clean and modern look, or subtle prints to add texture without distracting from the design. Avoid overly busy patterns, as they can reduce the clarity of the knot effect.
In addition to fabric, you will need batting and backing if you plan to incorporate the block into a full quilt.
Essential tools include a rotary cutter, cutting mat, quilting ruler, pins or clips, thread, and an iron for pressing seams. A sewing machine is highly recommended for accuracy and efficiency.
Pre-washing your fabrics is an important step. This prevents shrinkage and color bleeding, ensuring your quilt maintains its quality over time.
Taking the time to prepare your materials properly will make the process of creating the Slip Knot – Quilt Block Pattern smoother and more enjoyable.
Cutting Techniques and Fabric Preparation
Accurate cutting is one of the most critical steps in the Slip Knot – Quilt Block Pattern. Precision ensures that all pieces align correctly and the knot illusion is maintained.
Start by determining the finished size of your block. Common sizes include 10-inch or 12-inch blocks, but you can adjust the dimensions based on your project.
Cut your fabric into strips, rectangles, and squares according to your pattern design. Consistency in measurements is essential for proper assembly.
Many versions of the Slip Knot – Quilt Block Pattern rely on strip piecing. This technique involves sewing long strips together and then cutting them into smaller units, which helps maintain accuracy.
Use a rotary cutter and quilting ruler to achieve clean and precise cuts. Always double-check your measurements before cutting to avoid mistakes.
Label your pieces if necessary to keep track of their placement within the block.
Lay out all your pieces on a flat surface or design board. This allows you to visualize the pattern and make adjustments before sewing.
Taking your time during the cutting stage will significantly improve the final outcome of your Slip Knot – Quilt Block Pattern.
Sewing and Constructing the Slip Knot Block
Now it’s time to assemble your Slip Knot – Quilt Block Pattern. This is where the magic happens and the knot illusion begins to take shape.
Start by sewing smaller units together. Combine strips and rectangles to create elongated sections that will form the loops of the knot.
Use a consistent seam allowance, typically ¼ inch, to ensure accuracy. Press each seam carefully after sewing to keep your work neat and flat.
As you assemble the units, pay close attention to the orientation of each piece. The placement is crucial for creating the illusion of overlapping fabric.
Join the smaller units into larger sections, aligning edges carefully. This step requires patience and precision, as even small misalignments can affect the final design.
Continue assembling the sections until the full block is complete.
Press the final seams thoroughly to achieve a polished and professional appearance.
At this stage, your Slip Knot – Quilt Block Pattern will clearly display its intricate and woven look.
Layout Variations and Design Possibilities
One of the most exciting aspects of the Slip Knot – Quilt Block Pattern is exploring different layout possibilities.
You can use a single block as a focal point in a quilt or repeat the block multiple times to create a continuous pattern.
Rotating the blocks in different directions can produce dynamic visual effects and add movement to your quilt.
Experiment with color placement to enhance the illusion of depth and layering. High contrast creates a bold look, while similar tones produce a more subtle effect.
You can also combine this block with other quilt patterns to create a more complex and personalized design.
Using gradient fabrics or color transitions can add an extra layer of sophistication to your quilt.
These variations allow you to make your Slip Knot – Quilt Block Pattern truly unique and reflective of your style.
Quilting and Finishing Techniques
Once your block or quilt top is complete, the next step in the Slip Knot – Quilt Block Pattern is quilting and finishing.
Create a quilt sandwich by layering the backing fabric, batting, and quilt top. Smooth out any wrinkles and secure the layers with pins or clips.
Choose a quilting style that complements the design. Straight-line quilting works well for geometric patterns, while free-motion quilting can add texture and creativity.
Take your time during quilting, as this step enhances both durability and visual appeal.
After quilting, trim any excess fabric and prepare the edges for binding.
Attach the binding around the edges, folding it neatly and stitching it securely. This gives your quilt a clean and finished look.
Once the binding is complete, your Slip Knot – Quilt Block Pattern is ready to be used or displayed.
Tips for a Professional and High-Quality Result
When working on the Slip Knot – Quilt Block Pattern, there are several tips that can help you achieve a professional-quality result.
Maintain consistent seam allowances throughout the project to ensure accurate assembly.
Press your seams after each step to improve the overall appearance.
Choose high-contrast fabrics to highlight the knot design effectively.
Take your time with cutting and measuring for precise results.
Use high-quality materials for durability and longevity.
Be patient during assembly, as alignment is key to achieving the desired effect.
Don’t be afraid to experiment with colors and layouts to create a unique design.
FAQ About Slip Knot – Quilt Block Pattern
Is the Slip Knot – Quilt Block Pattern suitable for beginners?
Yes, with careful attention to detail, beginners can successfully create this block.
How long does it take to make one block?
It usually takes 1 to 2 hours depending on your experience level.
What type of fabric is best?
Cotton fabric is ideal because it is easy to work with and durable.
Do I need a sewing machine?
A sewing machine is recommended but not required.
Can I customize the colors?
Yes, color selection plays a major role in the final appearance.
Can I use this block in a full quilt?
Absolutely, it works beautifully as part of a larger quilt design.
Conclusion
The Slip Knot – Quilt Block Pattern is a creative and visually impressive quilting project that combines simple techniques with a sophisticated final result. Throughout this guide, you learned how to select materials, cut fabric accurately, assemble the block, explore layout variations, and finish your quilt with professional techniques.
By practicing the Slip Knot – Quilt Block Pattern, you can improve your quilting skills while creating a unique and meaningful design. This pattern is perfect for quilts, decorative pieces, or creative projects.

