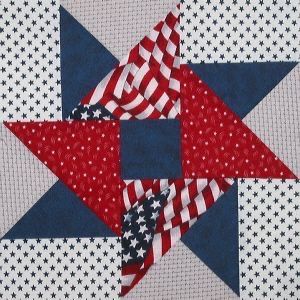
The Spinning Star Quilt Block – Step by Step Tutorial is a fantastic guide for quilters of all levels who want to create a stunning geometric block that looks intricate but is simple to assemble. This block is popular because of its dynamic star-like appearance, which adds movement and depth to any quilt project. Whether you are a beginner or an experienced quilter, learning how to make this block can elevate your quilting skills while providing a versatile design option for various projects.
One of the great things about the Spinning Star Quilt Block is that it can be made using basic shapes like squares and triangles, which are pieced together to form the star pattern. By mastering the cutting, piecing, and pressing techniques, you will achieve a professional-looking block that fits perfectly into larger quilt tops. This tutorial will explain everything step by step, from selecting fabrics to sewing the pieces together and finishing the block neatly.
In this guide, you will learn exactly how to cut and assemble each piece, what measurements to use, and how to create sharp points for a clean and precise finish. The instructions are designed to be clear and easy to follow, ensuring you can create a block that looks polished and beautiful. By the end of this Spinning Star Quilt Block – Step by Step Tutorial, you will feel confident in your ability to create not just one block, but multiple blocks that can be combined into a full quilt.
Materials and Cutting Instructions
To create the Spinning Star Quilt Block, you will need a few basic materials. Choose high-quality cotton fabric in three to four contrasting colors to highlight the star design. Solid fabrics or small prints work well because they allow the star shape to stand out clearly.
You will also need a rotary cutter, cutting mat, and quilting ruler to ensure precise cuts. Accurate cutting is essential for achieving sharp points and proper alignment of the block pieces. Make sure your sewing machine is set to a ¼-inch seam allowance, as this is the standard for quilting.
For a 12-inch finished block, cut the following pieces: four 4½-inch squares of background fabric, four 4½-inch squares of star fabric, and eight 4½-inch squares of contrasting fabric for the star tips. These pieces will be trimmed into half-square triangles as part of the assembly process.
To make half-square triangles (HSTs), pair one background square with one star-tip square, place them right sides together, draw a diagonal line, and sew ¼ inch on each side of the line. Cut along the line and press open. Repeat this process until you have the required number of HSTs.
Having all pieces prepared before sewing makes the assembly process smooth and efficient. Organize your fabric pieces in labeled stacks to avoid confusion while working on the Spinning Star Quilt Block – Step by Step Tutorial.
Assembling the Spinning Star Design
Once all your pieces are cut and pressed, it is time to lay out the Spinning Star Quilt Block design. Arrange the half-square triangles and squares on a flat surface to visualize the final block before sewing.
Start by placing the squares in a 4×4 grid. The half-square triangles should be positioned so that they form the spinning star shape, with the background squares filling the negative space. This layout stage is crucial to ensure that the star points are correctly oriented.
Sew the pieces together row by row. After each row is completed, press the seams in alternating directions to reduce bulk and allow for better nesting when joining rows. Proper pressing ensures that the points align perfectly.
Once all four rows are completed, join them together to finish the block. Pin at each seam intersection to prevent shifting, and sew carefully to maintain straight lines and accurate points.
Press the entire block flat and trim any uneven edges to achieve a perfect 12½-inch unfinished block size. This step is important for ensuring that the block fits seamlessly with others in a quilt.
Repeat these steps as many times as needed to create additional blocks for a larger quilt or wall hanging. The Spinning Star Quilt Block – Step by Step Tutorial allows for endless color combinations and creative layouts.
Tips for Perfect Points and Professional Finishing
Achieving sharp points in your Spinning Star Quilt Block requires attention to detail during both cutting and sewing. Always double-check your measurements before cutting to avoid small discrepancies that can affect the final result.
When sewing, use a ¼-inch quilting foot to maintain consistent seam allowances. A scant ¼-inch seam is often recommended to account for fabric bulk. Test on a scrap piece of fabric before starting your project.
Pressing seams open or to one side can make a big difference. For this block, pressing seams to one side and nesting them when joining rows will help achieve perfect intersections. Use steam lightly to prevent stretching.
Trimming your half-square triangles before assembly ensures that all pieces are the same size. Even small inaccuracies can add up when piecing multiple units together.
Choose thread colors that blend well with your fabrics. Neutral colors like beige, gray, or white are versatile options. Proper thread tension also helps achieve neat stitches without puckering.
Finally, take your time when sewing and assembling the block. Quilting is not about speed; precision will give you a beautiful and professional-looking Spinning Star Quilt Block – Step by Step Tutorial result.
Creative Variations and Project Ideas
The Spinning Star Quilt Block is versatile and can be used in many quilting projects. By changing the fabric colors, you can create blocks with completely different effects, from bold modern designs to traditional looks.
Experiment with scrappy fabrics to create a more dynamic star design. This approach adds visual interest and is a great way to use leftover fabric pieces.
You can also adjust the block size by increasing or decreasing the square measurements. Smaller blocks are ideal for table runners and pillow covers, while larger blocks work well for bed quilts.
Combine the spinning star blocks with other quilt blocks to create a sampler quilt. This method allows you to practice different techniques while producing a unique finished quilt.
For a festive look, use seasonal colors to create themed projects, such as holiday table runners or wall hangings. The Spinning Star Quilt Block – Step by Step Tutorial can be adapted for any occasion.
Adding sashing or borders around each block can further enhance the design, making each star stand out individually.
FAQ – Spinning Star Quilt Block
1. What size is best for a Spinning Star Quilt Block?
A common finished size is 12 inches, but you can resize by adjusting the square measurements while maintaining consistent seam allowances.
2. Do I need special tools to make this block?
No special tools are required, but a rotary cutter, ruler, and cutting mat help achieve accurate cuts and sharp points.
3. Is this block suitable for beginners?
Yes, the Spinning Star Quilt Block – Step by Step Tutorial is beginner-friendly because it uses simple squares and half-square triangles.
4. Can I use scraps to make this block?
Absolutely! Scraps are perfect for this design, especially if you want a colorful and unique look.
5. How do I make sure my points align perfectly?
Accurate cutting, consistent seam allowances, and careful pressing are key. Pinning at seam intersections helps prevent shifting.
6. What projects can I make with this block?
You can use it for quilts, table runners, pillow covers, wall hangings, or any patchwork project you like.
Conclusion
The Spinning Star Quilt Block – Step by Step Tutorial is a wonderful pattern that combines simplicity with stunning visual impact. By following the instructions carefully, you can create blocks that look professional and fit perfectly into larger quilting projects.
This tutorial has covered everything from cutting instructions and piecing techniques to pressing tips and creative variations. With practice, you will gain confidence and enjoy experimenting with colors and layouts.
We would love to know your thoughts! Leave a sincere opinion and share any suggestions you might have for future quilting tutorials. Your feedback helps us create more helpful and inspiring content for quilters like you.


