The Sunbonnet Sue appliqué pattern is one of the most beloved and iconic images in traditional quilting. With her large bonnet, hidden face, and vintage charm, Sunbonnet Sue has appeared in thousands of quilts across generations. Whether you’re new to quilting or a seasoned needleworker, this quilt pattern is the perfect way to add a nostalgic touch to your next project.
The simplicity of the Sunbonnet Sue quilt pattern makes it especially appealing for beginners who want to practice basic appliqué techniques. It’s also incredibly versatile. You can incorporate this pattern into baby quilts, wall hangings, pillows, and more. The design allows for creative freedom with fabric choices, decorative stitches, and even hand embroidery.
In this article, you’ll learn everything you need to make your very own Sunbonnet Sue appliqué block. We’ll walk through the materials, fabric cuts, assembly instructions, and stitching tips. By the end, you’ll have a beautiful quilt block and the knowledge to create many more.
What Is the Sunbonnet Sue Quilt Pattern?
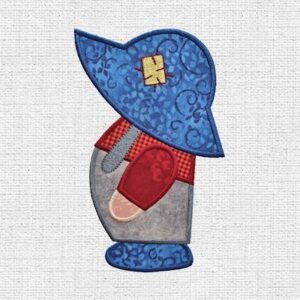
The Sunbonnet Sue quilt pattern features a girl in a large bonnet and a dress, usually facing sideways or downward. Her face is hidden, and her body is composed of a few basic shapes, making it ideal for appliqué quilting.
This classic quilt pattern originated in the late 19th century and gained popularity in the early 1900s through children’s books and quilting circles. Over the decades, it became a favorite among quilters for its charm, simplicity, and storybook appeal.
The applique method used in this pattern involves sewing fabric pieces onto a base block using either hand stitching or machine sewing. The basic design can be dressed up with additional details like hand-stitched flowers, baskets, or even little pets beside Sue.
To begin, you’ll need a few essential supplies: fabric scraps, fusible webbing, thread, scissors, and a base quilt block. You’ll also want to prepare a printable or hand-drawn Sunbonnet Sue template, which we’ll describe later.
Because it’s so modular, the Sunbonnet Sue can be repeated across a quilt or featured as a single accent block. It’s often used in sampler quilts or themed quilts for children. The simplicity of the design also allows for endless creativity with color schemes and fabric textures.
Whether you’re making a full-size quilt or just a decorative panel, this quilt pattern adapts well to any project. It’s no wonder it remains a staple in the quilting world.
Materials and Fabric Cuts
Before starting your Sunbonnet Sue appliqué pattern, gather your materials. Using the right fabrics and tools will help you achieve clean lines and professional-looking results.
You’ll need a variety of cotton fabric scraps in different colors or prints. Use solid fabric or tiny prints for Sue’s dress, hat, arm, and shoe. You’ll also need a light-colored quilt block base, preferably 10” x 10”, which allows enough space for the full appliqué design.
For fusible appliqué, prepare fusible webbing such as HeatnBond or Wonder Under. This will help keep the pieces in place before stitching. A pair of sharp fabric scissors is crucial for accurate cutting. An iron and ironing board will also be necessary.
Below are the recommended fabric cuts and dimensions for each Sunbonnet Sue piece:
-
Bonnet: 4” x 4” (cut into a semicircle or hat shape)
-
Face (optional): 1.5” x 1.5” circle
-
Arm: 1” x 2”
-
Dress: 4” x 5” (A-line shape)
-
Shoe: 1” x 1.5” (oval or boot shape)
-
Base Block: 10” x 10” cotton fabric square
After cutting your pieces, trace them onto the fusible web using your Sunbonnet Sue template. Cut out the shapes again, this time with the fusible web attached. Be sure to follow the manufacturer’s instructions for ironing them onto the fabric.
Remember to reverse your pattern pieces before tracing if your template is directional. This ensures that Sue faces the correct direction once attached to the block.
How to Assemble Your Appliqué Block
Now that all your pieces are ready, it’s time to assemble your Sunbonnet Sue appliqué block. This part of the process allows for creative choices in positioning and layering.
Start by laying out your base quilt block on a flat surface. Position the dress piece first, centering it horizontally and placing it about 1.5” from the bottom of the block. Then, add the bonnet slightly overlapping the top of the dress.
Next, position the arm extending from the middle side of the dress and attach the shoe at the bottom corner. Make sure everything fits nicely before fusing the pieces in place with an iron.
Once you’re satisfied with the layout, follow the fusible web instructions to permanently adhere the fabric pieces to the quilt block. Usually, this requires a medium-heat iron with no steam. Press each piece for about 10 seconds.
After fusing, secure each fabric piece using either a blanket stitch, zigzag stitch, or raw edge stitch around the appliqué. You can do this by hand for a traditional look or use a sewing machine for faster results.
Use coordinating thread colors or contrasting threads to add visual interest. You may also hand embroider small accents such as flowers, a basket, or even initials for personalization.
At this stage, your appliqué block is complete and ready to be incorporated into a quilt, pillow, table runner, or any other project you wish.
Ideas for Using the Sunbonnet Sue Quilt Pattern
The finished Sunbonnet Sue appliqué pattern is a versatile piece that can be used in a wide variety of quilting and sewing projects. Let’s explore some creative ways to incorporate it.
One of the most common uses is in a baby quilt or children’s blanket. The design is sweet and soft, perfect for nursery décor. You can create a series of Sue blocks in different colors or outfits to tell a visual story.
Another idea is to use the Sunbonnet Sue design as the centerpiece of a wall hanging. Frame one or more blocks and hang them in a sewing room, child’s room, or hallway for a vintage touch.
If you’re feeling ambitious, use this pattern in a full-size quilt, alternating the appliqué blocks with traditional pieced blocks such as nine-patch or log cabin squares. This mix adds texture and variety to your quilt layout.
The Sunbonnet Sue motif is also charming when miniaturized for mug rugs, pot holders, or tote bag embellishments. It adds a handcrafted detail to everyday items, perfect for gifting or selling at craft fairs.
Seasonal versions of the pattern can be made using holiday fabrics—Sunbonnet Sue in a Halloween costume or Christmas outfit, for example. This keeps the design fresh and relevant year-round.
Finally, Sunbonnet Sue offers a meaningful opportunity to honor family heritage. Many quilters create heirloom quilts using this pattern as a tribute to grandmothers, mothers, or their own childhood memories.
Final Thoughts on Sunbonnet Sue and Quilt Tradition
The Sunbonnet Sue appliqué pattern continues to capture hearts with its simple design and nostalgic appeal. It’s a beautiful way to explore traditional quilting while expressing your creativity.
As you’ve learned in this tutorial, creating a quilt pattern using appliqué isn’t difficult once you have the right tools, fabrics, and a step-by-step guide. The cutting and assembly process is enjoyable and relaxing—a perfect weekend or evening craft project.
If you’re a beginner, start with a single block and take your time practicing your stitches. If you’re more experienced, challenge yourself by making a full quilt or adding detailed embroidery to each block.
Remember, your quilt doesn’t have to be perfect. Part of the charm of the Sunbonnet Sue design lies in its handcrafted look and personal style.
Be sure to save your pattern templates and fabric scraps for future projects. Once you master this design, you’ll find endless ways to reuse it and adapt it for all kinds of creative applications.
So grab your needle, thread, and fabric—your journey into the world of Sunbonnet Sue starts today!


