
Patchwork Chicken Quilt Pattern is a cheerful quilting project that combines traditional patchwork techniques with the charming shape of a country-inspired chicken. With colorful fabric pieces, simple geometric sections, and plenty of opportunities for personalization, this design can become a beautiful addition to a kitchen, farmhouse-style room, sewing space, or handmade gift collection. The finished chicken blocks can be arranged in rows, mixed with simple background blocks, or used individually for smaller projects. Whether you prefer bright scraps, classic country colors, or modern fabrics, a Patchwork Chicken Quilt Pattern can bring warmth and personality to a handmade quilt.
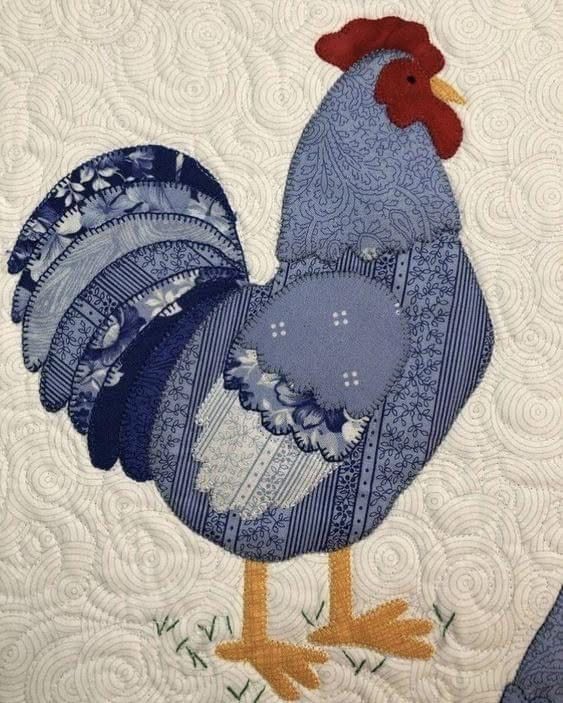
One of the most enjoyable features of a Patchwork Chicken Quilt Pattern is the way small fabric pieces gradually form a recognizable design. The chicken body may be created with squares, rectangles, triangles, or other simple patchwork units, while contrasting fabrics can define the wing, comb, beak, tail, and background. Although the finished block may look detailed, the construction becomes much easier when each section is prepared separately. Careful cutting, organized fabric placement, accurate seam allowances, and patient pressing are the main skills needed to create a neat result.
Making a chicken quilt pattern is also an excellent opportunity to use fabric scraps. Each bird can feature a different combination of prints and colors, creating a lively flock across the quilt top. One chicken might use red and yellow fabrics, while another combines blue, green, and floral prints. A consistent background can help connect the different blocks and create a balanced overall design. This guide explains the materials, fabric selection, cutting, block construction, assembly, quilting, finishing, creative ideas, and common questions involved in making a beautiful patchwork chicken quilt.
Choosing Fabrics and Preparing the Patchwork Chicken Quilt Pieces
The first step in making a Patchwork Chicken Quilt Pattern is choosing fabrics that clearly define the chicken shape. Good-quality quilting cotton is an excellent choice because it is stable, easy to cut, and comfortable to sew. Using fabrics with similar weights helps the individual pieces behave consistently during piecing, pressing, quilting, and washing.
Scrap fabrics are especially suitable for the chicken bodies. Small florals, checks, dots, stripes, and tonal prints can all create interesting combinations. If the body contains several fabrics, try to include enough contrast for the individual sections to remain visible. A completely random selection can work, but some color planning often produces a more balanced scrappy chicken quilt.
The background fabric plays an important role in the design. Cream, white, pale gray, soft blue, or another quiet color can help colorful chickens stand out. Dark backgrounds can also create a dramatic effect when the bird fabrics are light or bright. The main goal is creating enough contrast between the chicken and the surrounding area.
Small details such as the comb, beak, and legs can be made with contrasting fabrics. Red is a traditional choice for the comb, while yellow or orange works well for the beak. The wing can match the body or use a completely different print. These small areas are excellent places to use favorite scraps.
Basic supplies include fabric, coordinating thread, a sewing machine, rotary cutter, self-healing cutting mat, acrylic quilting rulers, pins or clips, an iron, and an ironing surface. A quarter-inch presser foot can help maintain consistent seams. A design board or small tray may also be useful for keeping the pieces of each block organized.
Before cutting fabric for the entire quilt, make one sample block. This allows you to test the color placement, seam allowance, pressing direction, and final dimensions. A successful sample can become a reference for the remaining patchwork chicken quilt blocks, helping you maintain consistent construction throughout the project.
Cutting and Sewing the Patchwork Chicken Quilt Blocks
Begin by pressing all fabrics before cutting. Wrinkles and folds can affect measurements, especially when working with small patchwork pieces. Use a sharp rotary cutter and reliable ruler, and cut only as many layers as you can control accurately.
Organize the pieces for each chicken quilt block before sewing. Place the body, wing, background, beak, comb, and other sections in their intended positions. If you are making many blocks with different fabrics, keep each set together in a separate container or on a small design board.
Arrange the complete block on a flat surface before beginning to sew. This visual preview helps identify pieces that may be turned in the wrong direction. It is especially important when working with triangle units or directional prints. Taking a quick photograph can provide a useful reference during assembly.
Sew the smallest units first. Depending on the design, this may include creating the beak section, comb, tail, or triangle units that shape the chicken body. Maintain a consistent quarter-inch seam allowance and avoid pulling the fabric through the sewing machine.
Combine the smaller units into larger sections. Press seams after each important stage so the block remains manageable. When possible, press neighboring seams in opposite directions so they can nest together. This can help create cleaner intersections when the sections are joined.
After completing the Patchwork Chicken Quilt Pattern block, check its measurements before trimming. Use a square quilting ruler to confirm that the edges are straight and the design remains centered. Trim only when necessary because excessive trimming can change the size and proportions of the block.
Arranging, Quilting, and Finishing the Chicken Quilt
When all the blocks are complete, place them on a design wall, clean floor, or large table. This is the best time to experiment with the layout of the Patchwork Chicken Quilt Pattern. Chickens can face the same direction, alternate directions, or appear in a playful mixed arrangement.
If every chicken uses different fabrics, distribute the colors throughout the quilt. Avoid placing all the darkest blocks in one corner or grouping similar prints together unless that is intentional. A balanced arrangement helps the viewer’s eye move naturally across the finished quilt.
Simple background blocks can be placed between the chickens to create more visual space. Sashing strips can also separate the blocks and give each bird its own frame. A consistent sashing color can help connect a wide variety of scrap fabrics.
Once the layout is finalized, organize the blocks into rows and label them if necessary. Sew the blocks and sashing together carefully, matching important intersections. Press the completed rows before joining them into the full chicken patchwork quilt top.
Prepare the quilt sandwich by layering the backing fabric, batting, and completed quilt top. Smooth all layers carefully and baste them securely. The quilting design can follow the outlines of the chickens, use simple straight lines, or feature an overall texture that covers the entire project.
After quilting, trim the outer edges and attach quilt binding. A solid binding can provide a quiet frame, while a colorful scrap binding can continue the playful style of the chicken blocks. Inspect the finished quilt carefully and remove any loose threads.
Creative Variations, Helpful Tips, Frequently Asked Questions, and Conclusion
A Patchwork Chicken Quilt Pattern is perfect for creative fabric combinations. A farmhouse-inspired version can use red, cream, brown, black, and muted prints. Small checks and traditional florals can add a warm country feeling to the finished design.
A modern version can use solid fabrics and bold contrast. Bright yellow, turquoise, coral, green, and navy can create a cheerful contemporary quilt. A simple white or gray background can make the colorful chickens especially noticeable.
For a true scrap quilt, make every chicken different. Use leftover pieces from previous projects and combine prints freely. Repeating one fabric in every block, such as the background or comb color, can help unify the scrappy chicken quilt pattern.
Individual blocks can also be used for smaller projects. One chicken block may become a pillow cover, wall hanging, tote bag panel, placemat, or decorative kitchen project. A row of chickens can create a playful table runner.
Consistent construction improves the final result. Check the seam allowance regularly, press carefully, and compare each completed block with the sample. If a unit is incorrect, fix it before adding more pieces. Small corrections are easier during construction than after the entire quilt top is assembled.
Most importantly, enjoy the personality of the project. Handmade chicken blocks do not need to look identical. Different colors, prints, and small variations can make the finished Patchwork Chicken Quilt Pattern feel lively and unique.
Conclusion
The Patchwork Chicken Quilt Pattern is a cheerful project that combines traditional quilting techniques with a playful country-inspired design. By choosing contrasting fabrics, cutting accurately, organizing small units, sewing with consistent seams, and arranging the completed blocks carefully, quilters can create a project filled with color and personality.
Throughout this guide, you learned about selecting fabrics, preparing scraps, constructing chicken quilt blocks, pressing seams, arranging the quilt top, adding sashing, preparing the quilt sandwich, quilting the layers, and completing the project with binding.

