
The Carpenter Star Quilt Pattern is one of the most admired and timeless quilt designs in the quilting world. Known for its bold geometric appearance and striking star shape, this quilt pattern has inspired generations of quilters to create beautiful handmade projects for their homes and loved ones. Whether you are making your very first quilt or adding another masterpiece to your collection, learning the Carpenter Star Quilt Pattern offers an enjoyable experience filled with creativity and precision. Its versatile layout makes it suitable for modern, traditional, rustic, and seasonal quilt designs, making it a favorite among quilting enthusiasts.
One of the reasons the Carpenter Star Quilt Pattern remains so popular is its incredible flexibility. By simply changing fabric colors, prints, or block sizes, you can create a quilt that feels completely unique. Bright colors produce cheerful and modern results, while earthy tones create a cozy farmhouse look. Holiday fabrics can transform the same pattern into a festive decoration, while soft florals bring elegance and charm. This adaptability makes the pattern perfect for quilters who love experimenting with fabric combinations without changing the basic block construction.
Another advantage of the Carpenter Star Quilt Pattern is that it teaches several important quilting skills while remaining approachable. As you assemble the quilt, you’ll become familiar with accurate cutting, careful piecing, matching seams, pressing techniques, and arranging blocks for maximum visual impact. These essential quilting techniques can be applied to countless future projects, making this pattern not only beautiful but also an excellent learning opportunity for beginners and experienced quilters alike.
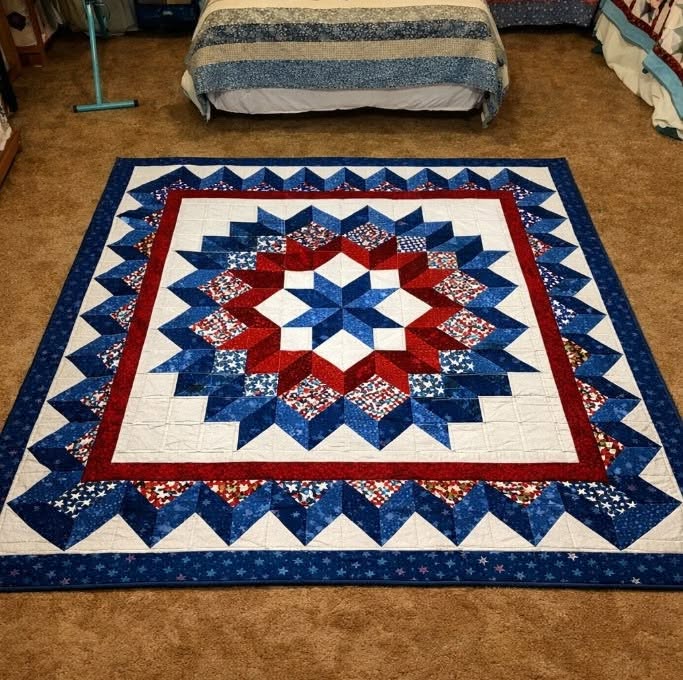
Understanding the Carpenter Star Quilt Pattern
The Carpenter Star Quilt Pattern is built around a large eight-pointed star created from multiple geometric units. Although the finished design appears complex, it is actually made by combining simple shapes with careful attention to accuracy. The result is a stunning star that instantly becomes the centerpiece of the quilt.
Most versions of this quilt pattern use half-square triangles, flying geese units, squares, and rectangles. These familiar quilting components work together to form the sharp points and balanced symmetry that define the Carpenter Star. Understanding how each unit contributes to the overall design makes construction much easier.
Color placement plays a major role in the final appearance. High-contrast fabrics help define the star points, while lower-contrast combinations create a softer, blended look. Planning your fabric arrangement before sewing allows you to visualize the finished design and make adjustments if needed.
Fabric selection is equally important. Solid fabrics emphasize the geometric shapes, while prints add movement and personality. Many quilters enjoy mixing subtle background prints with bold feature fabrics to create additional depth without overwhelming the overall design.
The finished size of a Carpenter Star Quilt Pattern can vary considerably. Some quilters create a single oversized star as a wall hanging or baby quilt, while others combine multiple blocks into queen or king-sized quilts. The same construction principles apply regardless of size.
Because of its balanced symmetry, this pattern remains attractive from every angle. The star naturally draws the eye toward the center, making it an excellent choice for quilts intended to become heirloom pieces or treasured family gifts.
Materials and Preparation for Success
Before beginning your Carpenter Star Quilt Pattern, take time to organize your materials. A rotary cutter, self-healing cutting mat, acrylic ruler, quilting pins or clips, quality thread, sewing machine, and ironing station all contribute to smoother construction and more accurate results.
Choosing quality quilting cotton is highly recommended. Stable fabrics are easier to cut and sew accurately, helping each unit fit together correctly. Washing and pressing fabric before cutting can also improve consistency throughout the project.
Accurate cutting is one of the most important steps in quilting. Even very small cutting errors can become noticeable once multiple blocks are joined together. Carefully measure every piece before cutting, and double-check dimensions as you work.
Creating a design layout before sewing helps prevent mistakes. Arrange your fabric pieces on a design wall or flat surface to ensure the colors form the desired star shape. Taking a photo of the layout can also help you remember the correct placement during assembly.
Maintaining an accurate quarter-inch seam allowance is essential for successful block construction. Consistent seam allowances allow all pieces to fit together properly and help preserve the sharp points that make the Carpenter Star Quilt Pattern so recognizable.
Pressing rather than ironing helps prevent distortion. Instead of sliding the iron across the fabric, gently lift and press each seam. This simple technique helps maintain accurate shapes and reduces stretching along the bias edges.
Step-by-Step Construction Process
Begin by cutting all fabric pieces according to your chosen block size. Keeping pieces organized in labeled containers or stacks makes assembly easier and reduces the chance of mixing similar-looking fabrics.
Construct the half-square triangles first if your pattern includes them. Draw diagonal guidelines when necessary and sew carefully along each marked line. Trim and press every unit before moving to the next step to maintain consistent sizing.
Next, assemble any flying geese units required for the design. Accurate trimming helps these units fit seamlessly into the surrounding sections. Taking time during this stage improves the overall appearance of the finished quilt.
Arrange all completed units into rows before sewing. This layout allows you to verify that every star point is correctly positioned. Small adjustments made now are much easier than correcting mistakes after the rows have been joined.
Sew the rows together slowly, matching seam intersections carefully. Using pins at important intersections helps maintain alignment and keeps the star points crisp. Many experienced quilters sew with the intersecting seams facing upward for greater control.
Once the quilt top is complete, inspect it carefully for any loose seams or minor imperfections. Correcting these small issues before quilting ensures a stronger and longer-lasting finished project that will remain beautiful for years.
Creative Ideas and Finishing Your Quilt
One of the greatest strengths of the Carpenter Star Quilt Pattern is its versatility. Traditional red, navy, and cream combinations create a timeless appearance, while modern palettes featuring teal, mustard, charcoal, or blush produce a contemporary style.
Scrap quilts work exceptionally well with this design. Using leftover fabric pieces gives every star unique personality while creating a colorful project that reflects your quilting journey. Careful color balance helps maintain the star’s visibility even with varied prints.
Borders can completely change the quilt’s appearance. Narrow borders create a clean and modern finish, while wider pieced borders add visual interest and increase the overall size. Cornerstones and complementary blocks provide additional design opportunities.
Quilting designs further enhance the finished project. Straight-line quilting emphasizes the geometric structure, while free-motion feathers, loops, swirls, or echo quilting add softness and texture. The quilting itself becomes part of the artistic presentation.
After quilting, trim the edges carefully before attaching the binding. Double-fold binding provides durability and a polished appearance. Hand-finished or machine-finished binding both produce beautiful results depending on your personal preference.
Finally, add a quilt label to record the maker’s name, completion date, and any meaningful message. These small details transform a beautiful handmade quilt into a cherished keepsake that future generations can appreciate.
FAQ
Is the Carpenter Star Quilt Pattern suitable for beginners?
Yes. While the finished design appears detailed, beginners who are comfortable with accurate cutting and basic piecing can successfully complete this pattern by working carefully and taking their time.
What fabrics work best for this quilt?
High-quality quilting cotton is the most popular choice because it is stable, easy to sew, and available in endless colors and prints that beautifully highlight the star design.
How can I make the star stand out?
Use high-contrast fabrics between the star and the background. Light backgrounds paired with dark star fabrics—or the reverse—create the strongest visual effect.
Can I make a large quilt using this pattern?
Absolutely. You can enlarge the block itself or combine multiple Carpenter Star Quilt Pattern blocks to create lap quilts, bed quilts, or even king-size quilts.
What quilting designs complement this pattern?
Straight-line quilting, echo quilting around the star, crosshatch designs, feathers, loops, and gentle free-motion patterns all pair beautifully with this classic quilt block.
How do I keep my points sharp?
Accurate cutting, maintaining a consistent quarter-inch seam allowance, careful pressing, and matching seam intersections are the keys to preserving crisp star points throughout the quilt.
Can I use scraps for this project?
Yes. Scrap fabrics create colorful and unique versions of the Carpenter Star Quilt Pattern. Organizing scraps by color value helps maintain a clear and balanced star design.
How should I care for the finished quilt?
Wash using a gentle cycle with mild detergent and cold water when needed. Air drying or using low heat helps preserve both the fabric and quilting stitches, keeping the quilt beautiful for many years.
Conclusion
The Carpenter Star Quilt Pattern continues to be one of the most beloved designs in quilting because it perfectly combines timeless beauty, geometric precision, and endless creative possibilities. From selecting fabrics and mastering accurate piecing to arranging colors and finishing with beautiful quilting, every step contributes to a project that is both rewarding to make and stunning to display. Whether you choose traditional fabrics, bold modern prints, or colorful scraps, this classic quilt pattern offers countless opportunities to express your creativity while building valuable quilting skills. We hope this guide has inspired you to begin your own Carpenter Star Quilt Pattern project with confidence. If you enjoyed this article, please leave your honest opinion in the comments and share your suggestions—we would love to hear about your quilting experience and ideas for future tutorials.

