
Starburst Quilt Tutorial is the perfect starting point for quilters who love bold geometric designs, radiant star motifs, and timeless patchwork techniques. The Starburst Quilt Tutorial combines precision piecing with creative fabric placement to produce a quilt that appears full of movement and light. Whether you are making a cozy throw, a decorative wall hanging, a bed quilt, or a thoughtful handmade gift, this project offers a rewarding sewing experience while helping you strengthen your quilting skills.
One of the reasons the Starburst Quilt Tutorial remains a favorite among quilting enthusiasts is its versatility. The same pattern can look completely different depending on the fabrics you choose. Bright solids create a modern, graphic appearance, while floral prints, batiks, reproduction fabrics, or soft pastels give the quilt an entirely different personality. Careful color placement allows the starburst effect to shine, making every finished quilt unique and visually striking.
In this complete Starburst Quilt Tutorial, you will learn every step needed to recreate the quilt shown in the photo using beginner-friendly techniques and professional quilting methods. From selecting fabrics and cutting accurate pieces to assembling the star units, joining the quilt blocks, quilting the layers, and adding the final binding, this guide explains each stage clearly. By following these instructions carefully, you can confidently create a beautiful quilt that combines classic craftsmanship with eye-catching design.
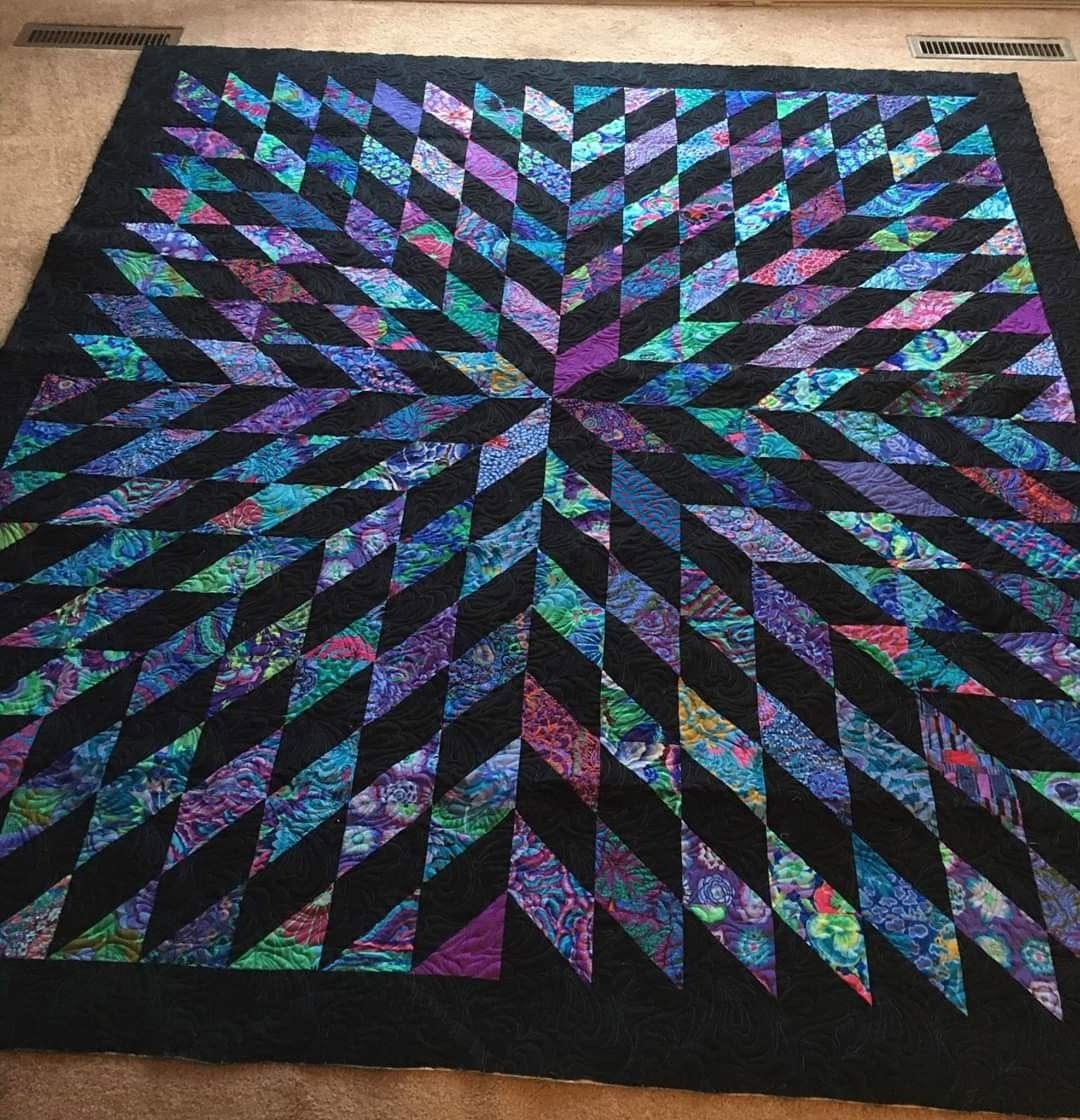
Prepare Your Materials for the Starburst Quilt Tutorial
Before starting the Starburst Quilt Tutorial, gather all the essential quilting supplies. You will need quilting cotton, rotary cutter, self-healing cutting mat, quilting ruler, sewing machine, quality polyester thread, iron, pressing mat, fabric clips or pins, batting, backing fabric, and binding fabric. Having everything prepared before sewing makes the process more organized and enjoyable.
Choose high-quality quilting cotton in fabrics that provide strong contrast. The starburst effect depends on clear differences between light, medium, and dark values, allowing the star points to stand out beautifully against the background.
Wash, dry, and press every fabric before cutting. Prewashing minimizes shrinkage and removes excess dye, while careful pressing creates smooth fabric that is much easier to measure accurately and sew precisely.
Using a rotary cutter and quilting ruler, cut every shape according to your chosen measurements. Accurate cutting is one of the most important parts of successful quilting because consistent pieces fit together cleanly during assembly.
Arrange all cut pieces on a design board before sewing. This allows you to preview the completed starburst layout, experiment with color placement, and make adjustments before stitching begins.
Group similar pieces together in labeled stacks to simplify construction. Organizing the units helps prevent mistakes, especially if you plan to make several blocks for a larger quilt.
Step-by-Step Guide to Sewing the Starburst Quilt Tutorial
Begin by sewing the smallest patchwork units first. Pair the corresponding fabric pieces with right sides together and stitch using a consistent quarter-inch seam allowance. Press each seam immediately after sewing to maintain accurate measurements.
Continue combining the smaller units into larger star sections. Match corners carefully and pin important intersections before stitching to create crisp star points and symmetrical block construction.
Assemble the completed star sections around the center of the block. Double-check the orientation of every piece before sewing because rotating even one section can alter the final appearance of the starburst design.
Join the completed rows together while carefully matching seam intersections. Taking your time during this stage results in cleaner lines and a much more professional-looking quilt block.
After assembling the entire block, press it carefully from the back using a hot iron. Proper pressing helps flatten seam allowances and prepares the block for trimming if necessary.
Square the finished block with a quilting ruler before moving on to additional blocks. Consistent sizing ensures that all the Starburst Quilt Tutorial blocks fit together smoothly during final assembly.
Professional Tips for Creating a Beautiful Starburst Quilt
Maintain an accurate quarter-inch seam allowance throughout the project. Consistency is one of the most important factors in achieving perfectly aligned quilt blocks.
Press your seams carefully rather than sliding the iron across the fabric. Lifting and lowering the iron preserves the shape of the pieces while preventing unwanted stretching along bias edges.
Use fabrics with clear value differences to maximize the dramatic starburst effect. Strong contrast naturally emphasizes the radiating design and makes the quilt visually dynamic.
Arrange completed blocks on a design wall before joining them together. Viewing the layout from a distance helps distribute colors evenly and creates a more balanced finished quilt.
Chain piece similar units together if making multiple blocks. This popular quilting technique increases efficiency, reduces thread waste, and helps maintain a steady sewing rhythm.
Take your time throughout every stage of construction. Accurate measuring, careful cutting, patient sewing, and regular pressing all contribute to a finished quilt that reflects professional craftsmanship.
Finishing the Quilt and Adding the Final Details
After completing all the Starburst Quilt Tutorial blocks, arrange them into your preferred quilt layout. Rotate individual blocks if desired to create secondary patterns and additional visual movement across the quilt top.
Sew the quilt top together one row at a time while carefully matching seam intersections. Pinning the joining points helps maintain accurate alignment and produces smooth transitions between neighboring blocks.
Prepare the quilt sandwich by layering the backing fabric, batting, and quilt top. Smooth every layer carefully before basting to eliminate wrinkles and prevent shifting during quilting.
Choose quilting designs that complement the starburst motif. Straight-line quilting creates a clean modern finish, while echo quilting, gentle curves, feathers, or radiating lines beautifully emphasize the movement of the stars.
Trim the quilt evenly after quilting has been completed. Prepare coordinating binding strips, sew them around the perimeter, and finish the binding using your preferred machine or hand-finishing technique.
Once your Starburst Quilt Tutorial is complete, gently wash and press the quilt if desired. The finished quilt will develop the soft texture and inviting appearance that make handmade quilts so treasured while beautifully showcasing the radiant starburst design.
Frequently Asked Questions
Is the Starburst Quilt Tutorial suitable for beginners?
Yes. The Starburst Quilt Tutorial is suitable for beginners who are comfortable with basic quilting skills such as accurate cutting, straight stitching, pressing seams, and assembling patchwork blocks.
What fabrics work best for this project?
High-quality quilting cotton is the preferred choice because it cuts accurately, presses beautifully, and is available in countless coordinating colors and prints.
How can I make the starburst effect stand out?
The most effective way is to use fabrics with strong contrast between light and dark values. Careful color placement naturally enhances the radiating star design.
Can I make the quilt larger?
Absolutely. Simply create additional blocks and arrange them into a larger layout suitable for baby quilts, throws, twin quilts, queen quilts, or king-size quilts.
Should I prewash my fabrics?
Many quilters prefer prewashing to reduce shrinkage and minimize color bleeding. Others enjoy the crispness of unwashed fabric. Both methods work when used consistently.
What quilting designs complement this pattern?
Straight-line quilting, echo quilting, radiating lines, feathers, loops, and gentle curves all pair beautifully with the geometric structure of the Starburst Quilt Tutorial.
Can I use fabric scraps?
Yes. Scrap fabrics work wonderfully for this project, especially when arranged carefully to maintain strong value contrast throughout the starburst blocks.
Is this quilt suitable as a handmade gift?
Definitely. A completed Starburst Quilt Tutorial makes a meaningful gift for birthdays, weddings, anniversaries, housewarmings, holidays, or any special occasion where a handmade keepsake is appreciated.
Conclusion
The Starburst Quilt Tutorial is a rewarding quilting project that combines classic patchwork techniques with bold geometric beauty. Throughout this tutorial, you learned how to prepare your quilting materials, accurately cut every fabric piece, assemble the radiant star units, organize the quilt layout, quilt the finished layers, and complete the project with durable binding and professional finishing techniques. Each step helps transform individual fabric pieces into a stunning quilt that celebrates both creativity and craftsmanship.
As you continue exploring the Starburst Quilt Tutorial, don’t hesitate to experiment with different color palettes, fabric collections, quilting motifs, and layout variations. Every completed quilt becomes a unique expression of your personal style while helping you strengthen your quilting skills with each new project. If you found this tutorial helpful, please leave your honest opinion and share your suggestions for future quilting tutorials. Your feedback is always appreciated and helps inspire even more creative patchwork projects for quilting enthusiasts around the world.

