
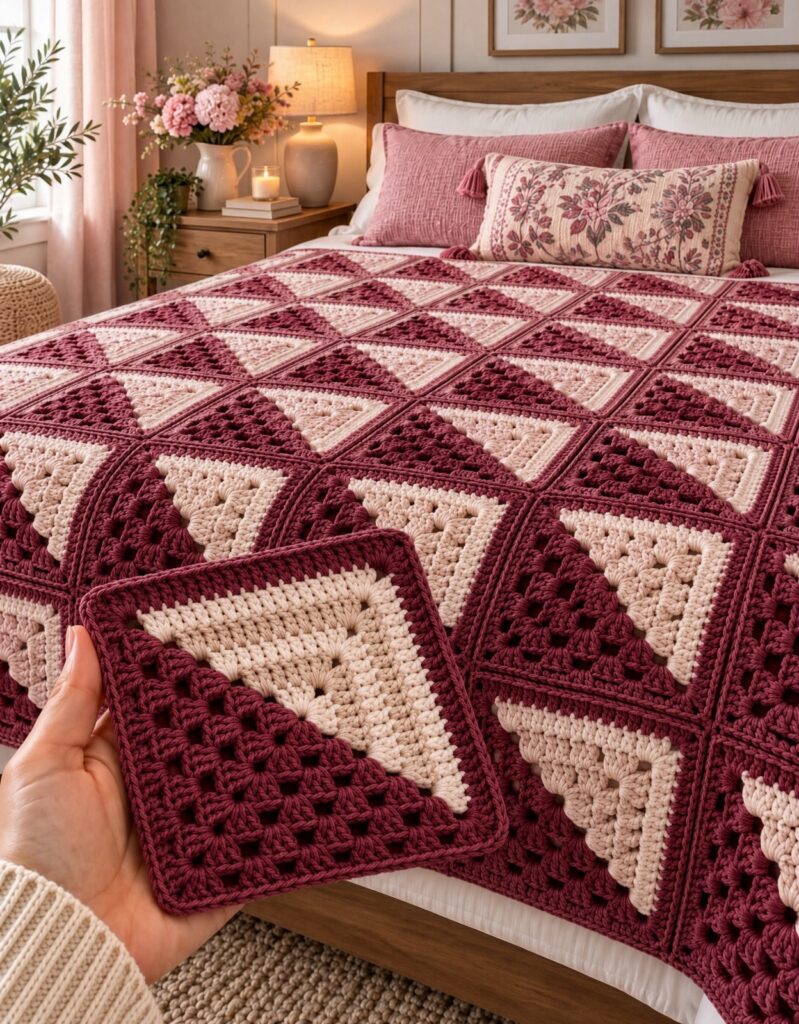
Crochet Geometric Weave Granny Square Pattern is a beautiful way to combine the timeless construction of a granny square with a bold geometric design that looks almost woven into the fabric. Inspired by the project shown in the reference image, this square uses two contrasting colors to create a striking diagonal division. A warm cream shade forms one triangular section, while a deep burgundy color forms the opposite section and continues around the outer border. When several finished squares are joined together, the alternating triangles create an impressive geometric crochet blanket filled with diamonds, diagonal lines, and repeating shapes.
The visual impact of this Crochet Geometric Weave Granny Square Pattern comes largely from color placement. Although the finished motif appears complicated at first glance, the design can be approached as a traditional square that is divided diagonally into contrasting sections. Textured clusters and strategically placed spaces give the fabric additional dimension, while a firm border defines each individual block. The reference blanket demonstrates how repeating the same square in different orientations can transform a relatively simple motif into a sophisticated bedspread with an almost quilt-like appearance.
This project is especially appealing for crocheters who enjoy modular blankets because each crochet granny square can be completed individually before the final assembly begins. That makes the project portable and easy to work on over multiple sessions. You can recreate the cream-and-burgundy combination shown in the image or experiment with your own palette. The tutorial below explains how to choose yarn, establish the two-color diagonal structure, create the textured sections, square the motif, join multiple blocks, and finish the blanket with a coordinated border.
Materials and Starting the Geometric Granny Square
For the Crochet Geometric Weave Granny Square Pattern, begin with two contrasting yarn colors. To reproduce the appearance of the reference project, choose a deep burgundy or wine shade for Color A and a warm cream or ivory for Color B. Strong contrast is important because it makes the diagonal division immediately visible when the squares are assembled.
A medium-weight yarn is a practical choice for this project because it provides enough structure to define the geometric shapes while remaining comfortable for a blanket. Cotton, acrylic, or a soft blended yarn can all work. If the finished project will be used regularly on a bed or sofa, consider choosing a yarn that is comfortable against the skin and suitable for your preferred care routine.
Select a crochet hook appropriate for your chosen yarn. Your yarn label provides a useful starting recommendation, but the finished fabric should guide your decision as well. The geometric granny square should be flexible enough for a blanket while still maintaining clearly defined edges. Very loose tension may cause the blocks to stretch during assembly.
You will also need scissors, a yarn needle, stitch markers, and a measuring tape. If you plan to create a large blanket, keeping a small notebook nearby is useful for recording the number of rounds, finished square dimensions, color placement, and total number of completed blocks.
Before making all the squares, create one complete sample. Measure it horizontally, vertically, and diagonally. This first motif becomes your reference square. Every additional crochet blanket square should be compared with it so the final blocks join together without excessive stretching or puckering.
The main stitches can include chain stitches, slip stitches, single crochet, double crochet, and granny clusters. In US crochet terminology, a traditional granny cluster commonly consists of three double crochet stitches worked into the same space. The exact texture can be varied, but keeping your stitch sequence consistent across every square is essential.
Crocheting the Two-Color Geometric Design
Begin the Crochet Geometric Weave Granny Square Pattern with a small foundation such as a magic ring or short chain joined into a ring. Establish the first corner and begin building the motif outward. Instead of using a single color throughout the round, plan the square so one diagonal half develops in cream while the opposite half develops in burgundy.
Work the cream section using compact groups of stitches and chain spaces. To create the slightly textured appearance suggested by the reference image, you can alternate groups of double crochet stitches with small chain spaces. Keep the increases concentrated at the appropriate outer points so the section expands evenly as the square becomes larger.
When you reach the diagonal transition, change to burgundy. Make the color change neatly by completing the final yarn-over of the previous stitch with the new color. This helps create a cleaner boundary between the two sections. Carrying yarn across large areas can create unnecessary bulk, so fastening off and rejoining may produce a neater result depending on your preferred method.
Continue building the burgundy section using the same structural principles. In the photographed project, this darker portion has a more traditional granny stitch texture, with visible clusters and small open spaces. Groups of double crochet stitches separated by chains are ideal for recreating this airy but substantial appearance.
As the motif grows, maintain a clear diagonal line between the two colors. Lay the square flat after each major round and check the geometry. If one side begins growing faster than the other, recount your stitches and corner spaces. Consistent increases are essential for keeping a crochet square pattern flat.
Continue until the motif reaches your desired dimensions. Finish the outermost round primarily in burgundy, as seen in the reference design, to create a strong frame around both color sections. This border visually contains the cream triangle and helps all the finished squares coordinate when they are eventually joined.
Creating the Woven Effect and Joining the Granny Squares
The geometric weave effect becomes much more obvious when several blocks are placed together. Before joining anything, make enough squares for a small test arrangement. Position four motifs together and rotate them in different directions. You will immediately see how the diagonal color divisions can form diamonds, hourglass shapes, zigzags, or larger triangles.
For an arrangement similar to the reference blanket, alternate the orientation of neighboring blocks. One cream triangle might point toward the upper right while the next points toward the lower left. When the squares meet, matching sections visually connect across the seams and create larger geometric shapes.
Once you find an arrangement you like, photograph it before moving the pieces. This simple step can save considerable frustration during assembly. A large crochet granny square blanket may contain dozens of nearly identical motifs, and it is easy to accidentally rotate one block while joining a row.
Before joining, consider gently blocking the individual squares if appropriate for your yarn. Blocking helps each motif reach consistent dimensions and can straighten slightly uneven edges. Follow the care instructions for your chosen fiber rather than using excessive heat or aggressive stretching.
The squares can be connected with slip stitch joining, single crochet joining, or a sewn mattress-style seam. A slip stitch join produces a relatively compact connection, while single crochet creates a more noticeable ridge. For a design like the reference blanket, a neat, understated seam allows the geometric color pattern to remain the main attraction.
Join the squares into horizontal rows first and then connect the completed rows. Frequently lay the growing blanket flat and check that the seams are not pulling. Consistent square dimensions and relaxed joining tension are important because an overly tight seam can cause the finished crochet geometric blanket to ripple.
Finishing the Blanket and Customizing the Pattern
After all the squares have been assembled, add a border around the entire blanket. A burgundy border similar to the outer edge of each motif creates continuity and gives the project a polished appearance. Begin with a foundation round of single crochet, distributing the stitches evenly around all four sides.
At each blanket corner, work enough stitches to turn comfortably without creating tension. Continue with additional rounds according to the border width you prefer. A simple combination of single crochet and double crochet can create a clean finish without distracting from the detailed geometric motifs.
For a more decorative edge, add a final round of small shells, picots, or another subtle textured stitch. However, the blocks already contain substantial visual texture, so a simple border can be particularly effective. The deep burgundy edging in the reference design helps frame the cream sections beautifully.
The Crochet Geometric Weave Granny Square Pattern can also be adapted to many different color combinations. Navy and white can create a crisp nautical appearance, black and cream can feel modern and dramatic, while sage and ivory offer a softer style. Terracotta and beige can create a warm earthy blanket.
You can also use the individual motifs for smaller projects. Four squares can become a cushion front, several blocks can form a table runner, and a small arrangement can become a baby blanket. A single geometric crochet square can even be incorporated into a tote bag or decorative wall hanging.
Finally, weave in every yarn end securely and inspect the joining seams. If appropriate for your fiber, give the finished blanket a final gentle blocking. This helps the squares settle into alignment and makes the repeating geometric pattern look even more impressive.
FAQ About the Crochet Geometric Weave Granny Square Pattern
Is the Crochet Geometric Weave Granny Square Pattern suitable for beginners?
The pattern is best for an adventurous beginner or intermediate crocheter. Basic stitches are relatively straightforward, but maintaining the diagonal color division requires careful counting and consistent color changes. Practicing one sample square before starting a full blanket is highly recommended.
What yarn works best for this geometric granny square?
Medium-weight cotton, acrylic, or blended yarn can all work well. Choose yarn with clear stitch definition if you want the textured clusters to remain highly visible. For a blanket, softness and washability are also useful considerations.
How many colors do I need?
Only two colors are necessary to reproduce the dramatic appearance shown in the reference project. However, you can use additional colors if you want every square to have a different combination.
How do I keep the diagonal line straight?
Count stitches carefully and make each color transition in the same relative position on every round. Regularly place the motif on a flat surface to check that the two sections are expanding evenly.
Why is my granny square curling?
Curling can result from overly tight tension, insufficient corner stitches, or an unsuitable hook size. Check your stitch count first. If the count is correct but the fabric remains very tight, consider adjusting your hook size or tension.
Should I block the squares before joining them?
Blocking can be very helpful, especially for a geometric design. Consistent dimensions make joining easier and improve the appearance of the final pattern. Always use a blocking method appropriate for your yarn fiber.
How can I make the geometric pattern more noticeable?
Choose two colors with strong contrast. Light cream against deep burgundy, as shown in the reference project, creates a particularly clear division. Rotating neighboring blocks strategically also creates larger shapes across the blanket.
What is the best way to join the granny squares?
Slip stitches, single crochet, and sewn seams can all work. Choose a method that provides enough flexibility without creating a bulky connection. An understated join is particularly effective when you want the geometric pattern to remain prominent.
Can I make a smaller project with this pattern?
Absolutely. The individual Crochet Geometric Weave Granny Square Pattern can be used for cushion covers, bags, table runners, baby blankets, wall décor, or other modular crochet projects.
How do I calculate how many squares I need for a blanket?
Measure one finished and blocked square, then decide on your desired blanket dimensions. Divide the desired width and length by the approximate square measurement. Remember that joining and the final border can slightly change the overall dimensions.
Conclusion
The Crochet Geometric Weave Granny Square Pattern demonstrates how a traditional crochet motif can become a sophisticated contemporary design through clever color placement. By dividing each square diagonally between two contrasting colors, adding textured granny-style stitches, and rotating the finished motifs during assembly, you can create larger diamonds and geometric shapes that seem to flow across the entire blanket.
Throughout this tutorial, you learned how to select contrasting yarn, establish the square, work granny clusters, manage two-color transitions, maintain the diagonal design, create a strong outer frame, arrange the finished blocks, join them into rows, and complete the blanket with a coordinated border. Careful counting and consistent tension are the most important elements for keeping the repeated geometry neat.

