
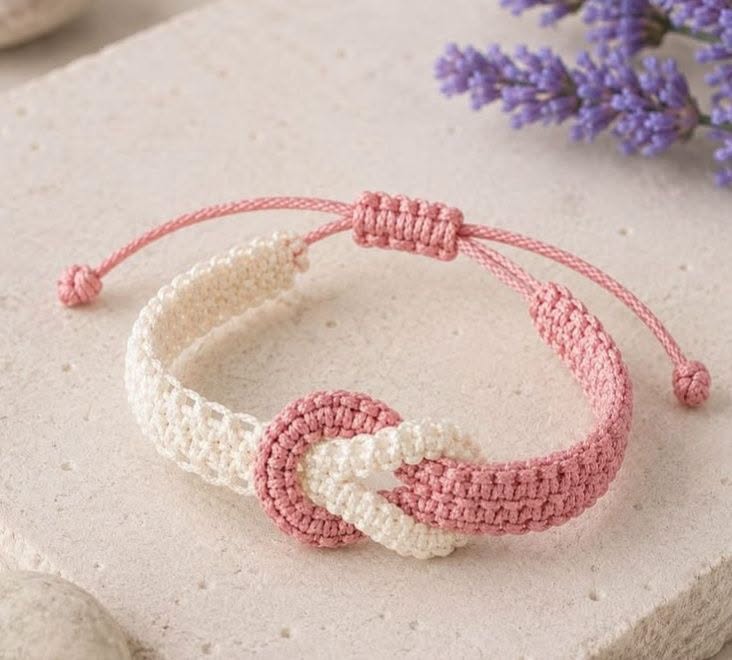
Crochet Infinity Bracelet Pattern is a beautiful handmade accessory that combines the delicate texture of crochet with the timeless symbolism of the infinity shape. This charming bracelet can be created with fine cotton thread in two complementary colors, forming two bands that appear to pass through one another at the center. The result is a lightweight piece of crochet jewelry that looks elegant without requiring complicated materials. The project shown in the photo uses a soft dusty pink paired with creamy white, creating a romantic and understated appearance. One of the most attractive details is the circular center connection, which visually transforms the two crocheted sections into an infinity bracelet. With patience and consistent stitches, this is a project that can become a lovely handmade accessory for everyday wear or gifting.
Making a Crochet Infinity Bracelet Pattern is also an excellent opportunity to practice working with fine yarn, maintaining even tension, shaping narrow crochet strips, and creating decorative finishing details. Unlike larger crochet projects, a bracelet requires only a small amount of thread, making it convenient for using leftover cotton from previous creations. The adjustable cord closure visible in the inspiration photo makes the bracelet practical because the finished size can accommodate different wrists. Although the exact stitch counts will depend on the thickness of your thread, hook size, and desired bracelet circumference, the basic construction is approachable. Instead of focusing only on exact numbers, this tutorial explains how to measure and adjust the pieces so the finished bracelet fits comfortably.
The central feature of this crochet bracelet pattern is the intertwined effect. One side is worked in one color and the opposite side in another, while the central rings create the recognizable infinity-inspired appearance. To recreate the look, you will need fine crochet cotton or similar smooth thread, a small crochet hook appropriate for your chosen fiber, scissors, a yarn needle, and matching cords for the adjustable closure. Stitch markers can also be useful when shaping the center. Choose thread that produces a firm fabric because jewelry benefits from stitches that hold their shape. Before beginning, make a small test section to determine whether your crochet tension creates a neat, compact texture similar to the bracelet shown.
Materials, Crochet Terms, and Preparation for the Infinity Bracelet
The first step in this Crochet Infinity Bracelet Pattern is selecting suitable thread. Mercerized cotton, fine crochet cotton, or another durable smooth fiber works particularly well because the bracelet needs enough structure to maintain its narrow shape. Two contrasting or coordinating colors emphasize the intertwined construction. Pink and cream create an appearance similar to the inspiration image, but combinations such as navy and white, beige and brown, lavender and ivory, or even two shades of the same color can produce beautiful results.
The term crochet infinity bracelet describes the visual concept of the finished accessory. An infinity symbol is traditionally represented by a continuous looping shape, and this project interprets that idea through intertwined crocheted components. Instead of simply adding an infinity charm, the crochet itself becomes part of the design. This gives the bracelet a handcrafted personality and makes the center detail the main decorative feature.
For stitches, basic crochet techniques are sufficient for creating a similar result. A foundation chain establishes the length, while single crochet can be used to create the compact bracelet bands. In US crochet terminology, single crochet means inserting the hook into the stitch, pulling up a loop, then yarn over and pulling through both loops. Its dense texture is especially useful for small accessories because it creates a stable fabric without large openings.
Before crocheting the full bracelet, measure the wrist that will wear it. Wrap a flexible measuring tape comfortably around the wrist without pulling tightly. Because the design includes an adjustable closure, the crocheted portion does not need to completely surround the wrist. Leave space at the back for the cords and sliding knot. This makes the finished handmade crochet bracelet easier to put on and remove.
Hook size plays an important role in the final appearance. Select a hook recommended for your thread, but consider going slightly smaller if the stitches look too loose. The goal is to produce compact rows similar to those visible in the photo. However, avoid crocheting so tightly that inserting the hook becomes difficult. Consistent tension is more important than trying to make every stitch extremely firm.
Finally, prepare two working sections, one for each color. Because thread thickness varies considerably between brands, it is more reliable to build the bracelet according to measurements rather than depend on a universal stitch count. Crochet a short sample, measure how many stitches and rows fit within one inch, and use that information to estimate your starting chain. This simple preparation can prevent the Crochet Infinity Bracelet Pattern from becoming too large or too small.
How to Crochet the Two Bracelet Bands Step by Step
Begin the first bracelet section with your pink or chosen primary color. Make a slip knot and crochet a foundation chain long enough to form approximately half of the decorative bracelet circumference, remembering that the center motif and adjustable closure will add additional length. Keep the chain relaxed and straight. An overly tight foundation chain can cause the finished band to curve unexpectedly.
Work single crochet stitches back across the foundation chain. Chain one at the beginning of the next row, turn your work, and continue crocheting evenly across. Repeat these rows until the band reaches the width you prefer. The inspiration bracelet has a relatively narrow profile, so you only need enough rows to create a comfortable strap rather than a wide cuff.
As you work, regularly place the crochet strip against your wrist or measurement guide. Small jewelry projects can change dimensions noticeably with only a few additional rows or stitches. The pink section in the photo appears smooth and dense, so focus on maintaining equal stitch height and avoiding accidental increases along the edges. Counting the stitches after each row can help keep both edges straight.
Create the second section using your cream or contrasting thread. Follow the same basic process so its width matches the first strip. Matching widths are important because they create visual balance when the two colors meet at the center. The lengths may need slight adjustment depending on how you construct the intertwined motif, so do not permanently secure every component until you have tested the overall fit.
The two-color crochet bracelet effect becomes much more noticeable when the colors have enough contrast. However, there is no requirement that the colors be dramatically different. A monochromatic version using pale and dark pink, for example, would emphasize texture while maintaining a subtle appearance. Whatever combination you choose, use threads of approximately the same weight to ensure both sections have similar thickness.
When both bands are finished, weave in unnecessary thread tails with a yarn needle while leaving the ends needed for assembly accessible. Lay the pieces flat and compare them side by side. Check that the edges are tidy and that neither band twists. At this stage, you should have two compact crocheted strips ready to be transformed into the characteristic center of the Crochet Infinity Bracelet Pattern.
Creating the Interlocking Infinity Center Detail
The center is what gives this Crochet Infinity Bracelet Pattern its distinctive personality. Looking closely at the inspiration design, the two colors appear to form rounded loops that interlock visually. You can reproduce this effect by shaping small crocheted rings or curved loops at the inner ends of the bracelet bands. The exact number of stitches is flexible because the ring diameter should remain proportional to the width of your straps.
To create a small ring, crochet a short chain and join it carefully into a circle with a slip stitch, making sure the chain has not twisted. Work compact stitches around the ring until it has a smooth, defined border. Another option is to crochet around a foundation loop. The important goal is to create a firm circular component that will not collapse when the bracelet is worn.
Make the corresponding loop in the contrasting color. Before permanently closing or attaching the second element, pass it through the first so the two pieces become interlocking crochet loops. This creates the visual illusion of continuous movement associated with the infinity symbol. Arrange the loops gently until both colors are visible and neither component is distorted.
Attach each loop securely to its corresponding bracelet band using the yarn needle and matching thread. Small, discreet stitches are ideal because the joins should blend into the crochet texture. Pass through several crochet loops rather than relying on a single strand of yarn. Jewelry receives frequent movement during wear, so careful assembly contributes significantly to durability.
After attaching the center, place the bracelet on a flat surface. The two straps should extend naturally in opposite directions, while the loops remain centered. If one side pulls more strongly than the other, adjust the attachment before securing the thread completely. This is also the best moment to compare the developing bracelet with the inspiration photo and refine the proportions.
The completed infinity crochet motif should look decorative while remaining flexible enough to rest comfortably against the wrist. Do not worry if your handmade version is not identical to the photograph. Differences in yarn, tension, hook size, and individual technique naturally produce variations. A handcrafted project gains character from these subtle differences, and customization is one of the greatest advantages of making crochet jewelry yourself.
Adding the Adjustable Closure and Finishing the Bracelet
Once the central motif is complete, you can create the adjustable closure visible at the back of the bracelet. Attach a strong cord to each outer end of the crocheted bands. The cord should coordinate with the bracelet colors and should be thin enough to slide easily through an adjustable knot while remaining strong enough for repeated use.
Overlap the two cord ends in opposite directions. Around the overlapping cords, create a sliding knot or macramé-style wrapped closure using another short piece of cord. Several snug wraps around both cords form a small barrel-shaped section similar to the pink closure shown in the photo. Secure the wrapping carefully while ensuring that the two main cords can still slide.
Test the adjustable bracelet closure before trimming anything. Pull the cord ends apart to reduce the bracelet opening, then slide the closure in the opposite direction to enlarge it. The movement should feel controlled rather than extremely loose. If the knot slides without resistance, tighten the wrapping slightly. If the cords cannot move, loosen the closure before securing it permanently.
Small stopper knots can then be added to the ends of both cords. These prevent the cords from accidentally slipping through the adjustable closure. The photograph shows compact decorative knots at the ends, which provide both function and a polished appearance. Trim excess cord neatly, leaving enough material that the knots cannot easily unravel.
Try on the completed crochet bracelet and check the comfort of every component. The center should sit relatively flat against the wrist, the crocheted bands should not twist, and the closure should provide enough adjustment for easy removal. If any thread ends remain visible, weave them carefully into nearby stitches and trim only after confirming that they are secure.
Your Crochet Infinity Bracelet Pattern is now complete. Once you understand the construction, it becomes easy to experiment with different color palettes, band widths, thread textures, and center sizes. You can create matching bracelets in several colors or personalize them as handmade gifts. The small amount of material required also makes this a practical project for turning leftover crochet thread into something attractive and wearable.
FAQ – Frequently Asked Questions About the Crochet Infinity Bracelet Pattern
Is the Crochet Infinity Bracelet Pattern suitable for beginners?
Yes. A beginner who understands foundation chains, single crochet, slip stitches, and basic joining techniques can attempt this project. The center loops and sliding closure may require a little extra patience, but working slowly and testing each component makes the process much easier.
What yarn is best for a crochet infinity bracelet?
Fine cotton thread is one of the best options because it produces defined stitches and a lightweight accessory. Smooth, durable fibers are generally preferable to very fluffy yarns because the stitch details remain easier to see.
What crochet stitch should I use for the bracelet bands?
Single crochet is an excellent choice because it creates a compact and durable fabric. Depending on your experience, other dense stitches can also be used, but the two bands should maintain similar thickness and flexibility.
How do I determine the correct bracelet size?
Measure the wrist and account for the central infinity detail plus the adjustable cord section. Rather than relying exclusively on a fixed number of stitches, test the project against the wrist as you work. This approach accommodates differences in yarn weight and individual crochet tension.
Can I make the bracelet in only one color?
Absolutely. Using two colors makes the intertwined design easier to recognize, but a single-color infinity bracelet can look elegant and minimalist. You could also use gradient thread or several coordinating shades for a different effect.
Why is my crochet bracelet curling?
Curling can happen when the foundation chain is too tight or when tension varies between rows. Try making the starting chain slightly more relaxed and maintain consistent tension throughout the band. Blocking the crochet lightly, when appropriate for your chosen fiber, can also help improve its shape.
Can I make this bracelet without an adjustable closure?
Yes. You can adapt the finishing method according to your preference. However, the sliding knot closure is particularly useful because it allows the bracelet opening to become larger when putting it on and smaller once positioned on the wrist.
How can I make the center loops stronger?
Use compact stitches, firm thread, and secure attachment points. When sewing the loops to the bracelet bands, pass through multiple stitches so the tension is distributed rather than concentrated on a single strand.
Conclusion
The Crochet Infinity Bracelet Pattern transforms basic crochet techniques into an elegant piece of handmade jewelry. Throughout this tutorial, you learned how to select fine thread, understand the role of single crochet, construct two narrow bracelet bands, create the interlocking infinity center, assemble the components, and finish everything with an adjustable sliding closure
The most important part of this project is maintaining consistent tension and adjusting the measurements to your own materials and wrist size. Once you master the basic construction, you can personalize your crochet infinity bracelet with different colors, dimensions, and finishing details while preserving the beautiful intertwined concept shown in the inspiration.

