
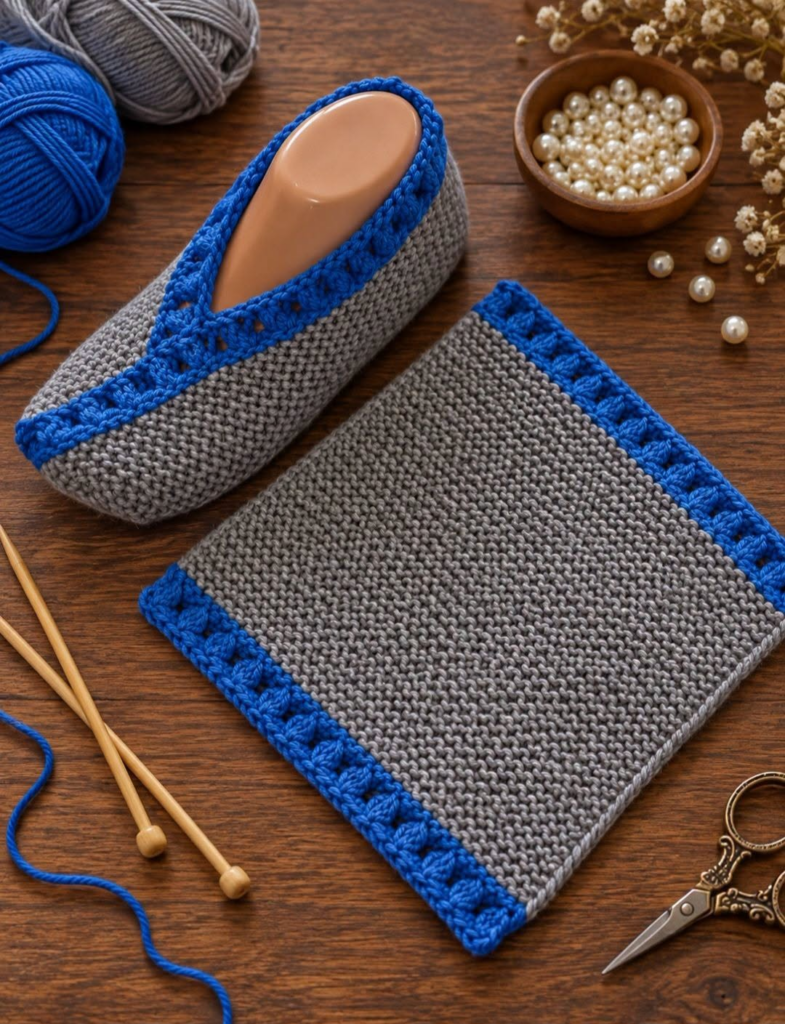
Simple Crochet Shoe – Pattern is a charming handmade project that combines comfort, practicality, and a beautiful decorative finish. The design shown in the reference image features a soft gray body paired with a vibrant blue border, creating a modern contrast that immediately draws attention. A simple crochet shoe like this can be made as a cozy house slipper, a thoughtful handmade gift, or an enjoyable weekend project for anyone who loves working with yarn. Although the finished shoe looks polished and detailed, its construction can be approached with basic crochet techniques and careful shaping.
One of the best things about this crochet shoe pattern is how easily it can be customized. You can change the yarn colors, adjust the length and width, make the sides taller, or simplify the decorative edging according to your preferences. The gray and blue combination in the pictured project is especially attractive because the neutral main color allows the brighter trim to stand out. However, cream and brown, pink and white, navy and beige, or even a single-color version can produce equally beautiful results. The important part is maintaining consistent tension so that both shoes have approximately the same shape and size.
This Simple Crochet Shoe – Pattern is also a useful project for practicing several essential crochet skills. You will work with foundation stitches, increases, decreases, shaping, joining, and decorative edging while learning how a flat or gradually shaped crochet piece becomes a wearable slipper. Since foot sizes and yarn thickness vary, the measurements should always be checked against the intended wearer instead of relying only on a fixed stitch count. The instructions below explain the construction process in an adaptable way, making this easy crochet shoe pattern suitable for crocheters who want to understand the shaping rather than simply memorize a sequence of numbers.
Materials and Preparation for the Simple Crochet Shoe Pattern
For this simple crochet shoe, choose a medium-weight yarn that feels comfortable against the skin while still providing enough structure to hold the slipper’s shape. A soft acrylic, cotton blend, or similar easy-care yarn works well. To recreate the appearance of the reference project, use gray as the main color and bright blue as the contrasting color. You will need more gray yarn because it forms most of the shoe, while a smaller amount of blue is sufficient for the decorative border.
Select a crochet hook that works well with your chosen yarn. The recommended hook size printed on the yarn label is a helpful starting point, but remember that a shoe benefits from a reasonably firm fabric. If your stitches feel very loose, going down one hook size may create a denser and more supportive result. Avoid making the fabric excessively tight, however, because the crochet slipper should still feel flexible and comfortable.
You will also need scissors, a yarn needle, and several stitch markers. Stitch markers are especially helpful when shaping the toe and keeping track of important points along the sides. A measuring tape is another essential tool because the finished length needs to correspond to the wearer’s foot. Measuring as you crochet is one of the easiest ways to prevent a finished slipper from becoming too short or too long.
Before beginning, make a small crochet gauge swatch with your main yarn. Gauge refers to the number of stitches and rows produced within a specific measurement. For a wearable project, gauge matters because two crocheters using identical yarn and hooks can still produce different sizes due to differences in tension. Your swatch does not have to be large, but it should give you a realistic idea of how your chosen yarn behaves.
The main body in the image has a compact, textured appearance. Single crochet is an excellent stitch for creating this effect because it produces a dense fabric with good structure. If you prefer another compact stitch, you can adapt the pattern, but remember that changing stitches can affect both width and length. Beginners will usually find single crochet easier to control during the shaping process.
Finally, measure the foot before starting the actual crochet shoe pattern. Record the length from heel to longest toe and the approximate width across the widest part of the foot. The crochet fabric may stretch slightly during use, so avoid making the shoe excessively loose. A comfortable, gently fitted shape usually gives a better result than a slipper that is considerably wider than the foot.
How to Crochet and Shape the Main Shoe
Begin the Simple Crochet Shoe – Pattern with the gray yarn. One practical method is to create the base from the center and work around a foundation chain, increasing around both ends to develop an elongated oval. Make the foundation chain shorter than the total foot length because the stitches and increases at each end will add additional length. Crochet around both sides of the chain rather than turning the work after the first side.
When you reach the end of the foundation chain, place multiple stitches into the final chain to curve smoothly around the toe. Continue crocheting along the opposite side of the foundation chain. At the heel end, work another group of increases. This creates the beginning of an oval crochet sole. Place stitch markers at the toe and heel so you can easily identify these shaping areas during the following rounds.
Continue working additional rounds while distributing increases around the curved toe and heel sections. The goal is to create a sole that lies reasonably flat without forming waves. If the fabric begins to ripple noticeably, you may be adding too many stitches. If it curls upward too soon, additional increases may be required. Compare the growing sole with the wearer’s foot as you work.
Once the sole reaches the desired dimensions, begin building the sides. Work one or more rounds without increases so that the fabric naturally starts turning upward. For a more defined transition, you can work through only one loop of the stitches on the first side round. This creates a subtle ridge between the sole and upper portion while encouraging the sides to stand vertically.
Continue crocheting evenly around the heel and sides while beginning to shape the front of the crochet slipper. The toe needs to gradually become narrower as the upper closes over the foot. This can be accomplished with carefully positioned decreases near the front. Instead of making many decreases in a single round, spread them over several rounds. Gradual shaping generally creates a smoother and more comfortable toe.
Try the developing slipper against the intended foot frequently. The heel should sit comfortably without excessive space, and the upper should gently follow the shape of the foot. When the opening reaches a comfortable size, fasten off the gray yarn. Weave in the tail securely with a yarn needle, taking care not to create a bulky knot inside the slipper.
Adding the Blue Decorative Crochet Border
The bright border is one of the most recognizable features of this Simple Crochet Shoe – Pattern. Join the blue yarn at the heel or another discreet point around the opening. Begin with a foundation round of evenly spaced stitches around the entire edge. This first round creates a stable base for the decorative design and also helps smooth any small irregularities along the opening.
When working the foundation border, pay attention to stitch spacing. Too many stitches can make the opening flare outward, while too few can pull the edge inward and make the shoe uncomfortable. The border should follow the existing shape naturally. If necessary, remove a few stitches and redo a section rather than accepting an uneven edge.
For a decorative effect inspired by the photograph, use small groups of taller stitches separated by short spaces. Double crochet clusters, small shells, or grouped double crochet stitches can create the textured blue border visible around the opening. A simple shell can be formed by placing several taller stitches into one base stitch, skipping a small number of stitches, and anchoring the motif with a shorter stitch.
Repeat the chosen decorative sequence around the opening while maintaining consistent spacing. Near the toe, check that the motifs follow the curve without becoming crowded. Minor adjustments may be necessary because the total number of stitches will depend on your shoe size, yarn, hook, and tension. Symmetry is more important here than forcing a decorative repeat into an unsuitable stitch count.
The blue trim can also be added along selected seams or edges if you want to emphasize the construction lines. In the reference design, the strong contrast between gray and blue gives the handmade crochet shoe a distinctive framed appearance. Keep the decorative stitches relatively compact so they complement the shoe instead of creating an oversized ruffle.
After completing the border, join neatly and fasten off. Use a yarn needle to weave the blue tail through several stitches on the wrong side. Repeat the entire construction process for the second shoe, frequently placing both pieces side by side. Matching the row count, dimensions, and decorative motifs will help you produce a balanced pair of crochet shoes.
Finishing, Sizing, and Customizing Your Crochet Shoes
Once both slippers are finished, inspect the overall shape carefully. Lay them next to each other and compare their length, width, heel height, and toe shape. Handmade pieces naturally have tiny differences, but significant variations can usually be corrected before all yarn ends are permanently secured. Gently reshape the fabric with your hands to help the stitches settle into position.
Next, weave in every remaining yarn tail. Run the needle through several nearby stitches, change direction, and pass through another section before trimming the excess. Secure finishing is particularly important in a crochet shoe pattern because slippers experience more movement and friction than many decorative crochet projects.
You can gently block the finished slippers if your yarn responds well to blocking. Always follow the care recommendations appropriate for your fiber. Rather than stretching the shoes aggressively, shape them to the desired dimensions and allow them to settle. The purpose is to even out the stitches and improve the overall presentation without making the slippers larger.
Customization is where this easy crochet shoe pattern becomes especially enjoyable. Use one solid color for a minimalist design, two contrasting shades like the photograph, or several coordinating colors for a playful result. You can also experiment with a narrower border, a simple single crochet edging, or a more pronounced shell trim. Small decorative details allow one basic construction method to produce many different styles.
For slippers intended for walking around the home, remember that ordinary yarn can be slippery on smooth flooring. Consider the intended surface and use appropriate precautions. The crochet instructions themselves create the textile shoe, but additional non-slip solutions should be selected according to the material and manufacturer’s directions if extra traction is needed.
Most importantly, make notes while completing your first shoe. Record the hook size, yarn type, foundation length, number of rounds, decrease placement, and number of border motifs. These notes become your personalized Simple Crochet Shoe – Pattern and make the second shoe much easier to reproduce. They are also extremely useful when you want to make another pair in a different size.
FAQ About the Simple Crochet Shoe – Pattern
Is the Simple Crochet Shoe – Pattern suitable for beginners?
Yes. A confident beginner who understands basic stitches can attempt this project. The most important skills are single crochet, increasing, decreasing, working in rounds, joining yarn, and weaving in ends. Beginners should work slowly during the shaping sections and use stitch markers to identify the toe and heel.
What is the best yarn for crochet shoes?
A medium-weight yarn with good stitch definition and reasonable durability is a practical choice. Cotton and cotton blends can provide structure, while many acrylic yarns offer softness and easy care. The ideal option depends on whether you prioritize softness, durability, warmth, or washability.
How do I make crochet slippers in different sizes?
Instead of relying entirely on a universal stitch count, use actual foot measurements. Adjust the foundation chain and continue increasing until the sole matches the necessary dimensions. The upper can then be shaped according to the width and depth of the foot. This measurement-based approach makes the crochet slipper pattern much more adaptable.
Why is my crochet shoe too loose?
A loose shoe may result from a hook that is too large, relaxed tension, too many increases, or an opening that has not been shaped enough. Compare the project with the foot throughout the process. It is much easier to correct sizing while crocheting than after the slipper is completely finished.
Why does my crochet sole curl or ripple?
Curling often indicates that the piece needs additional increases or that your tension is particularly tight. Rippling usually suggests too many increases. Because yarn and individual tension vary, adjust the increase rate gradually until the sole lies comfortably flat.
Can I use different colors for this pattern?
Absolutely. Color customization is one of the easiest ways to personalize a simple crochet shoe. The gray body and blue edging shown in the image create a striking contrast, but you could use neutral shades, pastels, bold colors, or even leftover yarn for the decorative border.
Can I replace the decorative border with a simpler edging?
Yes. If shell stitches or clusters feel too advanced, finish the opening with one or two rounds of single crochet or slip stitches. This creates a cleaner and more minimalist appearance while maintaining the essential structure of the shoe.
How can I make both crochet shoes the same size?
Count your stitches and rounds carefully and write down every shaping decision while making the first slipper. Measure both pieces regularly during construction. Using the same yarn, hook, tension, increase locations, and decrease sequence is the most reliable way to produce a matching pair.
How long does it take to make a pair of simple crochet shoes?
The time varies considerably according to experience, shoe size, yarn thickness, and decorative details. Experienced crocheters may complete the project relatively quickly, while beginners may prefer to spread the work over several sessions. Accuracy is more important than speed, particularly when creating two matching pieces.
Can the Simple Crochet Shoe – Pattern be customized with additional decorations?
Yes. Once you understand the basic construction, you can add small crochet flowers, bows, buttons used strictly as decoration, contrasting edging, or different stitch textures. Keep embellishments comfortable and securely attached, especially if the slippers will be worn frequently.
Conclusion
The Simple Crochet Shoe – Pattern is a creative way to transform basic crochet techniques into a comfortable and attractive handmade project. Starting with a carefully measured base, you can shape the sole, build the sides, decrease around the toe, and finish the opening with a beautiful contrasting border. The gray-and-blue design provides excellent inspiration while still leaving plenty of room for personal creativity.
Throughout this tutorial, we covered the importance of selecting suitable yarn, checking crochet gauge, measuring the foot, creating the crochet sole, shaping the upper, working decreases, and adding decorative edging. These techniques are valuable beyond this individual project and can help improve your confidence when making other wearable crochet pieces.

