
Crochet Pattern Diamond Lattice Lace Edging is a refined, elegant, and visually captivating technique that adds a delicate lace finish to any crochet project. Whether you are working on blankets, shawls, garments, or home décor items, learning the Diamond Lattice Lace Edging allows you to transform a simple edge into a sophisticated and artistic detail.
One of the most appealing aspects of the Crochet Pattern to Diamond Lattice Lace Edging is its balance between complexity and repetition. At first glance, the diamond shapes may look intricate, but once you understand the sequence, the pattern becomes rhythmic and enjoyable to work on.
Another reason why the Diamond Lattice Lace Edging is so popular is its adaptability. You can adjust the size of the diamonds, experiment with different yarn weights, and incorporate color changes to match your project. Whether you prefer a subtle, elegant finish or a bold decorative edge, this pattern can be customized to suit your vision.
Materials and Tools for Diamond Lattice Lace Edging
Before starting your Crochet Pattern to Diamond Lattice Lace Edging, it is important to gather the right materials.
Yarn choice plays a major role in how your lace edging will look. Cotton yarn is highly recommended because it provides excellent stitch definition, which helps highlight the diamond pattern. Bamboo or lightweight acrylic yarn can also be used if you prefer a softer and more flexible texture.
The yarn weight depends on your project. Fingering or sport weight yarn is ideal for delicate lace, while DK or worsted weight yarn creates a more prominent edging.
Choose a crochet hook that matches your yarn. For lace patterns, using a slightly larger hook than recommended can help create a more open and airy effect.
Other essential tools include scissors, a yarn needle for weaving in ends, stitch markers, and blocking tools such as pins and mats.
Preparing your materials in advance will make your Crochet Pattern to Diamond Lattice Lace Edging process smoother and more enjoyable.
Understanding the Basic Stitches
To successfully complete the Crochet Pattern to Diamond Lattice Lace Edging, you need to be familiar with several basic stitches.
Chain stitch (ch) is used to create loops and spacing.
Slip stitch (sl st) is used for joining and finishing.
Single crochet (sc) provides a stable base.
Double crochet (dc) is the primary stitch used in lace patterns.
Treble crochet (tr) may be used for taller, more open stitches.
You will also work with chain spaces and skipped stitches to form the lattice.
Understanding how these stitches interact is essential for creating clean and symmetrical diamonds.
Preparing the Base Edge
A clean and even base edge is crucial for a successful Crochet Pattern to Diamond Lattice Lace Edging.
Start by working a round of single crochet evenly around your project.
Make sure your stitches are evenly spaced to prevent puckering or stretching.
When working along sides, place stitches consistently to maintain balance.
At corners, add extra stitches—usually 2 or 3 in the same space—to keep the shape smooth.
Taking your time during this step will ensure your lace edging sits properly.
Creating the Foundation Row
The foundation row sets up the structure for the Diamond Lattice Lace Edging.
Attach your yarn to the edge using a slip stitch.
Chain a number of stitches that fits your pattern repeat, often in multiples of 4, 5, or 6.
Work double crochet stitches into the base row, skipping stitches between them to create spaces.
These spaces will form the framework for the diamond pattern.
Consistency in spacing is key to achieving a neat result.
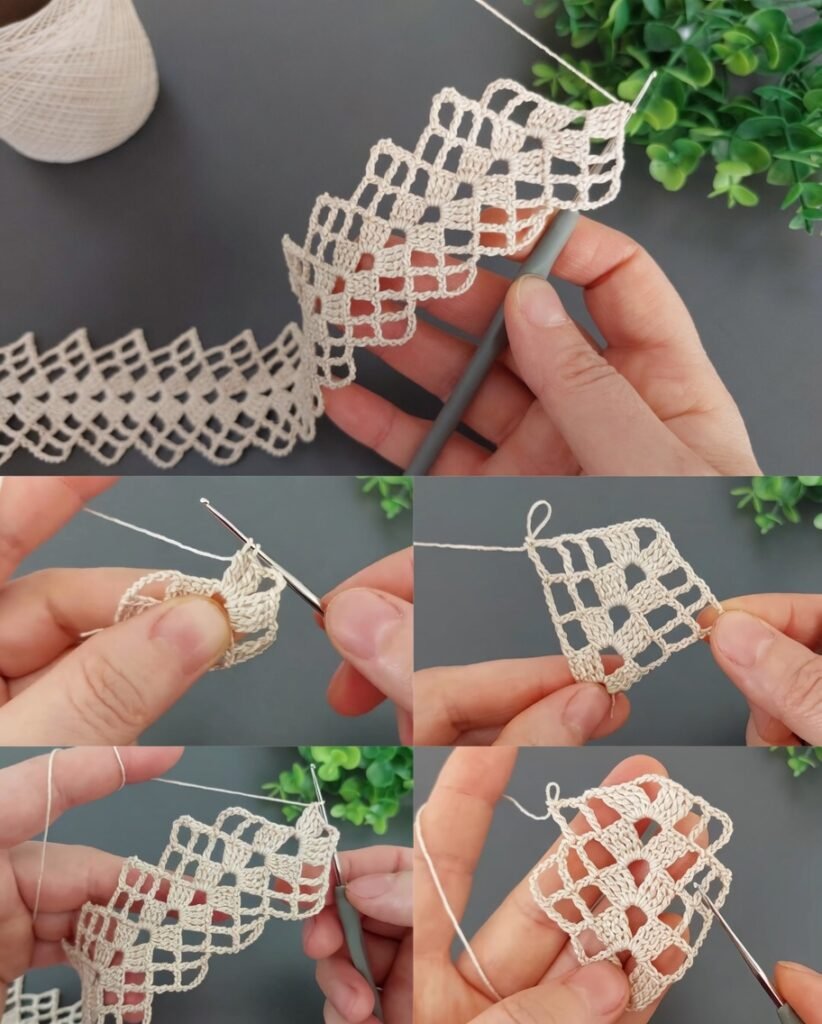
Forming the Diamond Lattice Pattern
The diamond shapes are the defining feature of the Crochet Pattern to Diamond Lattice Lace Edging.
Begin by creating chain arches over the spaces from the foundation row.
In the next row, anchor these arches with double crochet stitches into the center of each chain space.
On the following row, shift the placement of your stitches slightly to begin forming the diamond shape.
Continue alternating between creating arches and anchoring them.
As you repeat these rows, the diamond pattern will become more visible.
Maintaining consistent tension and stitch placement is essential for symmetry.
Building Multiple Rows of Lace
To expand your Crochet Pattern to Diamond Lattice Lace Edging, continue building additional rows.
Each row follows a similar structure, alternating between chains and double crochet stitches.
The diamonds will grow and become more defined with each row.
You can adjust the height of the edging by adding more rows.
Be sure to check your work frequently to ensure the pattern remains even.
Adding a Decorative Final Edge
Once your lattice is complete, you can add a finishing edge to enhance the design.
Picot stitches create a delicate, decorative border.
Shell stitches add softness and texture.
A simple single crochet or slip stitch border provides a clean and minimal finish.
Choose a finishing style that complements your project.
Blocking and Finishing Techniques
Blocking is an essential step for the Crochet Pattern to Diamond Lattice Lace Edging.
Lightly dampen your project and lay it flat on a blocking surface.
Use pins to shape the diamonds and ensure even spacing.
Allow the piece to dry completely.
Blocking helps open up the lace and gives it a professional appearance.
Creative Variations and Customization
The Crochet Pattern to Diamond Lattice Lace Edging offers many creative possibilities.
Use multiple colors to highlight the diamond shapes.
Adjust chain lengths to create larger or smaller diamonds.
Combine this edging with other lace patterns for unique designs.
Apply it to different projects such as blankets, shawls, garments, and home décor items.
These variations allow you to personalize your work.
Common Mistakes and How to Avoid Them
When working on the Crochet Pattern to Diamond Lattice Lace Edging, there are some common mistakes to watch for.
Uneven tension can distort the lace pattern.
Incorrect stitch counts can disrupt the diamond shapes.
Skipping too many or too few stitches can affect spacing.
Not preparing the base edge properly can lead to uneven results.
Rushing through the pattern can cause errors.
Taking your time and checking your work regularly will help you avoid these issues.
Tips for a Professional Finish
To achieve the best results with your Crochet Pattern to Diamond Lattice Lace Edging, follow these expert tips.
Practice the pattern on a small swatch before starting your project.
Maintain consistent tension throughout your work.
Use high-quality yarn for better stitch definition.
Count stitches carefully to ensure accuracy.
Block your finished edging for the best appearance.
These tips will help you create a polished and professional result.
FAQ About Diamond Lattice Lace Edging
Is the Crochet Pattern to Diamond Lattice Lace Edging beginner-friendly?
It is suitable for advanced beginners with some experience in lace patterns.
How long does it take to complete?
It depends on the size of the project, but typically a few hours to a day.
What yarn works best?
Cotton yarn is ideal for clear stitch definition.
Can I adjust the size of the diamonds?
Yes, by changing chain lengths and stitch placement.
Is blocking necessary?
Yes, it is highly recommended for lace patterns.
Conclusion
The Crochet Pattern to Diamond Lattice Lace Edging is a beautiful and sophisticated way to enhance any crochet project. It combines geometric elegance with delicate lacework, creating a timeless and versatile design.
By following this detailed guide, you can confidently create a stunning lace edging that showcases your crochet skills and adds a unique touch to your work. Whether you are finishing a blanket, shawl, or decorative item, this pattern offers endless possibilities for creativity

