
Crochet Cross – Pattern is a timeless, meaningful, and versatile crochet project that combines simplicity with deep symbolic significance. Whether you are creating a small keepsake, a decorative ornament, a bookmark, or a thoughtful handmade gift, learning the Crochet Cross – Pattern is both a creative and rewarding experience. This project allows you to practice essential crochet skills while producing something elegant and personal.
One of the most appealing aspects of the Crochet Cross – Pattern is its accessibility. Beginners can easily follow the structure using basic stitches, while experienced crocheters can explore more intricate variations, textures, and embellishments. This flexibility makes it a project that grows with your skill level.
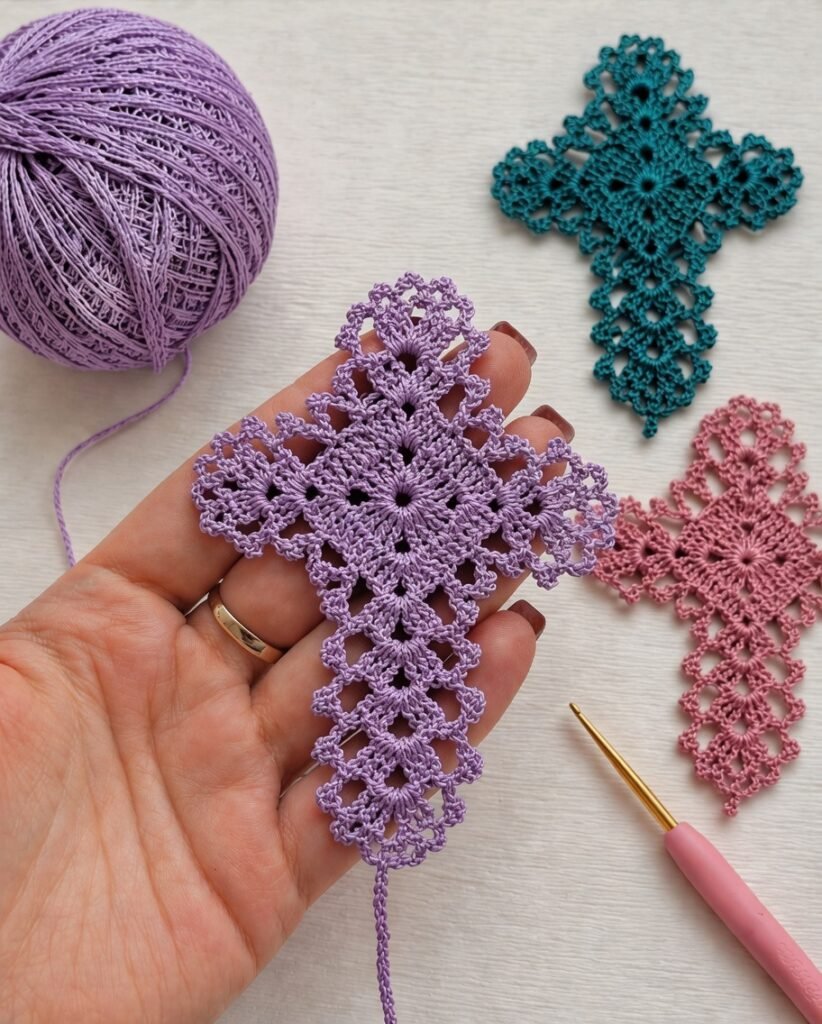
Another reason why the Crochet Cross – Pattern is so popular is its adaptability. You can create crosses in different sizes, from tiny appliqués to large decorative wall hangings. You can also experiment with different yarns, colors, and edging techniques to match your personal style or the intended purpose of the piece.
Materials and Tools for Crochet Cross Pattern
Before starting your Crochet Cross – Pattern, gathering the right materials is essential for achieving a polished and durable result.
Cotton yarn is highly recommended because it provides excellent stitch definition and structure. It helps the cross maintain its shape, especially for decorative or display purposes. Acrylic yarn is another option if you prefer a softer and slightly more flexible finish.
Color choice depends on your preference. Traditional colors such as white, cream, or beige create a classic and elegant look. However, you can also use pastel shades, bold colors, or even gradient yarn for a modern interpretation.
A crochet hook between 2.0 mm and 4.0 mm is typically ideal. Smaller hooks create tighter stitches, which are better for maintaining structure and detail.
Other essential tools include scissors, a yarn needle for weaving in ends, stitch markers for tracking your progress, and a measuring tape.
Optional materials include beads, ribbons, embroidery thread, or even metallic yarn for decorative accents.
Preparing your materials before starting your Crochet Cross – Pattern will make the process smoother and more enjoyable.
Understanding Basic Crochet Stitches
To successfully complete the Crochet Cross – Pattern, you should be comfortable with a few basic crochet stitches.
The chain stitch (ch) forms the foundation of most crochet projects.
Slip stitch (sl st) is used for joining rounds and finishing edges.
Single crochet (sc) creates a dense and firm fabric.
Half double crochet (hdc) provides a slightly taller stitch with a softer texture.
Double crochet (dc) adds height and flexibility.
Treble crochet (tr) can be used for decorative elements and larger designs.
Learning how to control tension and maintain consistent stitch size is just as important as knowing the stitches themselves.
Step 1: Creating the Foundation Chain
The first step in the Crochet Cross – Pattern is creating the foundation chain that forms the vertical base.
Begin with a slip knot and place it on your hook.
Chain a number of stitches depending on the desired length of your cross. For a medium-sized cross, chaining 25 to 30 stitches works well.
Make sure your chain is even and not too tight. A tight chain can distort the shape of the cross.
This chain will serve as the backbone of your project.
Step 2: Building the Vertical Section
The vertical section is the central part of the Crochet Cross – Pattern.
Work back along the chain using single crochet or double crochet stitches.
Continue crocheting rows until the vertical section reaches your desired thickness.
Keep your stitches consistent and evenly spaced.
You can add additional rows if you want a thicker cross.
Once finished, do not fasten off if you plan to continue directly to the horizontal section.
Step 3: Positioning the Horizontal Arm
The horizontal arm is what defines the classic shape of the Crochet Cross – Pattern.
Identify the midpoint of the vertical section.
Attach your yarn at this point if you have already fastened off.
Chain a set number of stitches to one side to create the first arm.
Turn and work back along the chain using your chosen stitch.
Repeat the process on the opposite side to create a symmetrical shape.
Ensure both arms are equal in length and aligned properly.
This step is crucial for achieving a balanced design.
Step 4: Strengthening the Structure
To improve the durability and appearance of your Crochet Cross – Pattern, it is important to reinforce the structure.
Work a round of single crochet around the entire cross.
At corners, add extra stitches to prevent curling and maintain smooth edges.
This border helps define the shape and gives the piece a clean, finished look.
Step 5: Adding Decorative Edging
Decorative edging can elevate your Crochet Cross – Pattern and make it more visually appealing.
You can add picot stitches along the edges for a delicate, lace-like finish.
Shell stitches can create a soft, rounded border.
You can also use contrasting yarn colors to highlight the edges.
Experiment with different edging techniques to find the style that best suits your project.
Step 6: Embellishing Your Crochet Cross
Adding embellishments is a great way to personalize your Crochet Cross – Pattern.
You can sew beads onto the center or along the arms.
Embroidery can be used to add patterns or small details.
Ribbons can be attached for hanging or decorative purposes.
You can also layer multiple crosses to create a dimensional effect.
These additions allow you to express your creativity and make each piece unique.
Step 7: Blocking and Shaping
Blocking is an important step in finishing your Crochet Cross – Pattern.
Lightly dampen your piece and lay it flat on a blocking surface.
Use pins to shape the cross and ensure all edges are straight.
Allow it to dry completely before removing the pins.
Blocking helps the stitches relax and improves the overall appearance.
Creative Uses for Crochet Cross Pattern
The Crochet Cross – Pattern can be used in a variety of creative ways.
Create bookmarks by making smaller versions.
Use them as appliqués on blankets, clothing, or bags.
Make wall hangings or decorative ornaments.
Incorporate them into jewelry such as necklaces or keychains.
Use them as thoughtful handmade gifts for special occasions.
These possibilities make the pattern incredibly versatile.
Common Mistakes and How to Avoid Them
When working on the Crochet Cross – Pattern, there are a few common mistakes to watch out for.
Uneven tension can cause the cross to look distorted.
Incorrect stitch counts can affect symmetry.
Skipping reinforcement steps can make the piece less durable.
Not blocking the final piece can result in uneven edges.
Rushing through the process can lead to errors.
Taking your time and checking your work regularly will help you avoid these issues.
Tips for a Professional Finish
To achieve the best results with your Crochet Cross – Pattern, follow these expert tips.
Maintain consistent tension throughout your work.
Use high-quality yarn for better stitch definition.
Count stitches carefully to ensure symmetry.
Practice the pattern before starting your final piece.
Pay attention to small details, as they make a big difference.
These tips will help you create a polished and professional-looking cross.
FAQ About Crochet Cross Pattern
Is the Crochet Cross – Pattern suitable for beginners?
Yes, it is beginner-friendly and uses basic stitches.
How long does it take to complete?
Most crosses can be completed in a few hours.
What yarn is best?
Cotton yarn is ideal for structure and durability.
Can I adjust the size?
Yes, by changing the number of chains and rows.
Is blocking necessary?
It is recommended for the best final result.
Conclusion
The Crochet Cross – Pattern is a beautiful, meaningful, and versatile project that allows you to create handmade pieces with both aesthetic and symbolic value. From constructing the base to adding decorative details, each step offers an opportunity to refine your crochet skills and express your creativity.
By following this detailed guide on the Crochet Cross – Pattern, you can confidently create pieces that are not only visually appealing but also personally meaningful. Whether you use them for decoration, gifts, or personal keepsakes, crochet crosses are timeless creations that can be cherished for years.

