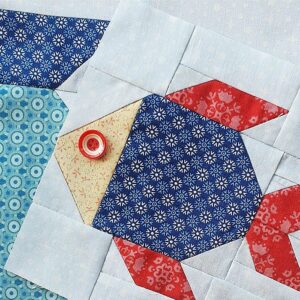
A Fish Quilt Pattern is a fantastic way to bring a touch of marine-inspired charm to your quilting projects. Whether you love the ocean, fishing, or simply enjoy unique quilt patterns, this design will add personality and style to your home decor. This project is suitable for quilters of all skill levels, and with the right fabric choices, you can make a visually stunning quilt that truly stands out.
Quilting is an art that allows for endless creativity, and a Fish Quilt Pattern offers plenty of opportunities to experiment with colors, shapes, and textures. You can use bold blues, greens, and aquatic prints to mimic the sea, or go for a more abstract look with geometric fish designs. This pattern is also a great way to use fabric scraps and mix different prints to create a unique effect.
In this article, we’ll provide a comprehensive step-by-step guide to making your own Fish Quilt Pattern, including fabric requirements, cutting measurements, sewing instructions, and finishing touches. Whether you’re making a small quilted wall hanging, a table runner, or a full-sized quilt, this guide will help you achieve a professional-looking result.

Choosing the Right Fabric and Tools
Selecting high-quality materials is essential for a successful quilt project. The fabrics and tools you choose will impact the durability and appearance of your finished Fish Quilt Pattern.
- Fabric Selection: Choose quilting cotton in ocean-inspired shades like blues, teals, and whites. You can also use fish-themed prints to enhance the marine feel.
- Fabric Measurements:
- Fish Body: (8) 5″ x 5″ squares (assorted colors or prints)
- Background Fabric: (16) 3″ x 3″ squares
- Fish Tail and Fins: (8) 2.5″ x 4.5″ rectangles
- Sashing Strips: (4) 2″ x 12″ strips
- Border Strips: (2) 3″ x 40″ and (2) 3″ x 18″
- Backing Fabric: 15″ x 45″
- Batting: 14″ x 44″
- Cutting the Fabric: Use a rotary cutter and quilting ruler to ensure precise cuts. Consistency in fabric size will help achieve a polished look.
- Additional Tools: Gather quilting pins, a sewing machine with a ¼” foot, an iron, and coordinating thread.
- Pre-Wash Your Fabric: This step prevents shrinkage and keeps colors from bleeding when the quilt is washed.
- Pressing Matters: Iron each piece before sewing to ensure smooth seams and better accuracy in stitching.
Constructing the Fish Blocks
The main feature of the Fish Quilt Pattern is the fish block, which consists of simple geometric shapes arranged to resemble a fish. Follow these steps to assemble each fish block.
- Creating the Fish Body: Take one 5″ x 5″ square and place it on your workspace. This will be the main body of your fish.
- Adding the Tail: Attach a 2.5″ x 4.5″ rectangle to one side of the fish body using a ¼” seam allowance. Press the seam open.
- Making the Fins: Take two 3″ x 3″ background squares and sew them diagonally across the corners of the fish body. Trim the excess and press the seams.
- Assembling the Fish: Join the tail and fin pieces to the fish body. Be sure to align edges properly for a clean look.
- Repeating the Process: Make as many fish blocks as needed for your quilt size, ensuring variation in colors and patterns for visual appeal.
- Laying Out the Blocks: Arrange your fish blocks in rows, alternating their direction to create a dynamic and fun effect.
Adding Borders and Quilting
Once the fish blocks are complete, it’s time to add the finishing details to your quilt pattern.
- Attaching Borders: Sew the shorter border strips to the sides of the quilt top first, then add the longer strips to the top and bottom.
- Creating the Quilt Sandwich: Layer your quilt top, batting, and backing fabric. Use safety pins or basting spray to hold everything in place.
- Choosing a Quilting Design: Opt for free-motion quilting, straight-line quilting, or a wave-like stitch to enhance the underwater theme.
- Quilting the Layers: Stitch through all layers, working from the center outward to prevent puckering.
- Trimming the Excess: After quilting, trim any excess batting and backing fabric to match the quilt top’s edges.
- Final Pressing: Press the entire quilt to remove wrinkles and set the stitches.
Binding and Finishing Touches
Binding gives the quilt a clean, professional finish while securing the edges.
- Cutting the Binding Strips: Cut (4) 2.5″ x WOF (width of fabric) strips for the quilt’s binding.
- Sewing the Binding: Join the strips, fold them lengthwise, and sew them to the quilt’s raw edges with a ¼” seam allowance.
- Mitering the Corners: Fold the binding neatly at each corner to create a crisp, polished edge.
- Hand-Stitching vs. Machine Binding: Attach the binding to the back of the quilt using hand stitching for a traditional look or machine stitching for efficiency.
- Adding Personal Touches: Consider adding embroidery details, applique, or decorative stitches to enhance the quilt’s look.
- Final Pressing and Display: Give your quilt a final press, then display it proudly or gift it to a loved one.
- PATTERN HERE
By following these steps, you can create a beautiful Fish Quilt Pattern that captures the essence of the ocean. This fun and creative quilt project is perfect for both beginners and experienced quilters looking to try something new. Happy quilting!


