
Spring Roses Quilt Pattern is a beautiful quilting project inspired by the freshness, color, and delicate beauty of a garden filled with blooming roses. Combining traditional patchwork techniques with floral-inspired fabric choices, this design can bring a romantic and welcoming feeling to any handmade quilt. The pattern works especially well with pink, blush, rose, cream, green, and soft neutral fabrics, although brighter colors can easily transform it into a more contemporary project. Whether you want to create a bed quilt, wall hanging, table topper, or meaningful handmade gift, this rose quilt pattern offers plenty of possibilities for personalization.
One of the most enjoyable aspects of the Spring Roses Quilt Pattern is choosing fabrics that create the impression of flowers opening across the quilt. Floral prints can be combined with coordinating solids and low-volume backgrounds to produce depth without making the composition feel overly busy. Darker rose shades can define the outer petals, medium pinks can form the central sections, and pale fabrics can provide highlights. Green fabrics may be incorporated as leaves or accent pieces, while cream or white backgrounds help the floral shapes stand out. The goal is not necessarily to reproduce a realistic rose, but to suggest its layered petals through thoughtful patchwork fabric placement.
Although floral quilt blocks can look complicated when finished, they are much easier to understand when divided into smaller sections. The Spring Roses Quilt Pattern can be approached by constructing individual units, arranging them into a symmetrical flower-inspired block, joining the blocks into rows, and finally completing the quilt with borders, batting, backing, quilting, and binding. Accuracy is important, but there is also room for creativity. The following tutorial explains the process in an adaptable way so you can select your preferred finished dimensions and use the techniques to create anything from a single decorative rose quilt block to a complete spring-inspired quilt.
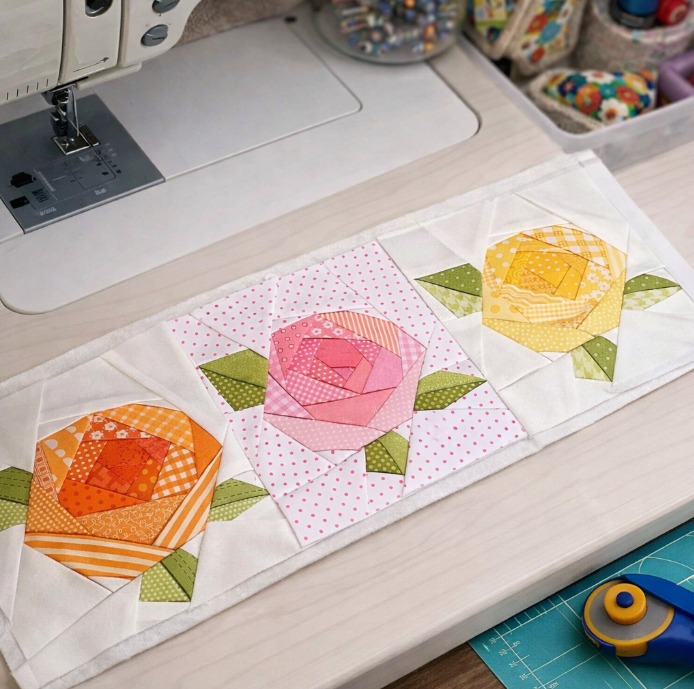
Choosing Fabrics and Preparing the Spring Roses Quilt Pattern
Begin your Spring Roses Quilt Pattern by developing a color palette. For a traditional spring garden appearance, combine several pinks with cream, white, soft green, and perhaps touches of lavender. Instead of using only one pink fabric, choose light, medium, and dark values. These differences in value help create the impression of individual petals and give the rose block greater visual depth.
Floral prints are particularly effective in this project. Small-scale prints can behave almost like textured solids when viewed from a distance, while larger rose prints can become focal points. If you have fabric featuring beautiful individual flowers, consider fussy cutting selected motifs so that a rose or floral arrangement appears intentionally positioned within a particular patch.
A light background fabric gives the floral sections visual breathing room. Cream, ivory, pale beige, or white can create a traditional spring appearance, while pale gray can produce a slightly more modern result. Low-volume prints are another attractive option because they provide subtle texture without competing with the rose shapes.
After selecting your fabrics, decide on the dimensions of the finished quilt block. You can create smaller blocks for a detailed quilt or larger blocks when you want the rose motifs to make a stronger visual statement. Once you choose the finished block size, calculate each component while allowing for your preferred quarter-inch seam allowance.
Wash or prepare fabrics according to your usual quilting routine, then press them before cutting. Smooth fabric makes accurate rotary cutting significantly easier. Use a cutting mat, acrylic ruler, and rotary cutter to prepare the squares, rectangles, and triangle components required for your chosen rose layout.
Before sewing, place all pieces for one Spring Roses Quilt Block on a flat surface or design board. Arrange the darkest fabrics where you want deeper shadows and the lighter fabrics where petals would naturally catch the light. Taking a photograph of the final arrangement can help you remember the orientation when you begin carrying pieces to the sewing machine.
How to Piece the Spring Roses Quilt Blocks
Start construction with the smaller units that form the rose. Depending on your chosen interpretation, these may include squares, rectangles, half-square triangles, and simple corner units. Working from smaller components toward larger sections makes it easier to maintain accurate alignment and prevents the block from becoming confusing.
A half-square triangle, commonly abbreviated as HST, is especially useful for creating angled petal shapes. Place two fabric squares right sides together and draw a diagonal line across the wrong side of the lighter square. Sew an equal distance on either side of that line, then cut along the marked diagonal. Open and press the two resulting units.
Trim each HST to the required unfinished measurement before assembling the block. Accurate trimming is one of the most important steps in creating clean rose quilt blocks. Check that the diagonal seam travels from corner to corner and that all four edges are square. Small inaccuracies become much more noticeable after several units are joined.
Arrange the prepared pieces from the center outward. A darker or medium rose-colored center can establish the heart of the flower, while progressively lighter or contrasting pieces can suggest overlapping petals. Alternatively, reverse the values and place lighter fabrics toward the center. Both approaches can work as long as there is enough contrast to reveal the design.
Sew neighboring pieces together using a consistent quarter-inch seam. Press each seam before adding another section. Depending on the construction, you can press seams toward the darker fabric or alternate directions so neighboring seams nest when joined. Avoid dragging the iron aggressively across bias edges because this can stretch triangle units.
Once the individual sections are complete, join them to create the full rose block. Match important intersections carefully and pin where necessary. After sewing the final seams, press the block and measure it in several directions. Square it carefully if needed, but avoid excessive trimming that could remove important seam allowances around the outer points.
Arranging and Assembling the Spring Roses Quilt
After completing one successful block, use it as the reference for the remaining Spring Roses Quilt Pattern. Make notes about fabric placement, cutting dimensions, seam direction, and any adjustments you made. Consistency becomes increasingly important when several identical or coordinating blocks will eventually be joined together.
You can repeat exactly the same color arrangement throughout the quilt for a coordinated appearance, or create a garden effect by changing the rose color in each block. Pink, coral, peach, lavender, burgundy, yellow, and cream flowers can all work beautifully together when they share a consistent background fabric.
Before sewing the blocks together, arrange all completed pieces on a design wall, floor, or other large clean surface. Step back and evaluate the distribution of colors. If several dark blocks are concentrated in one area, move them around until the overall floral quilt design feels balanced.
Decide whether the blocks will be joined directly or separated with quilt sashing. Directly joined blocks create a continuous garden of roses, while sashing gives each flower its own visual frame. Cream or white sashing can produce a light spring appearance, while green sashing can suggest foliage surrounding the flowers.
Sew the blocks into horizontal rows, carefully matching seams and intersections. Press each row before joining it to the next. When all rows are complete, sew them together systematically, checking the alignment as you work. Avoid pulling or stretching the fabric to force mismatched seams into position.
After assembling the central quilt top, consider adding one or more borders. A narrow inner border can visually contain the rose blocks, while a wider floral border can complete the garden-inspired theme. Measure through the center of the quilt when determining border lengths rather than simply sewing on an excessively long strip and trimming afterward.
Quilting, Binding, and Creative Finishing Ideas
Once the Spring Roses Quilt Pattern top is complete, prepare the quilt sandwich using backing fabric, batting, and the finished top. The backing and batting should extend beyond the quilt top on all sides. Smooth each layer carefully and baste them together using your preferred quilting method.
The quilting design can enhance the floral theme. Gentle curves, leaves, vines, or petal-inspired shapes can complement the roses, while simple straight-line quilting provides a clean contrast against the floral patchwork. Beginners may find straight or gently curved quilting easier to control than intricate free-motion designs.
If you want the pieced roses to remain the strongest visual element, use a subtle thread that blends with several fabrics. If you prefer the quilting itself to become part of the design, contrasting thread can emphasize the stitched texture. Always test the thread and stitch length on a fabric sample before quilting the entire project.
After quilting, trim the excess batting and backing so the edges are straight and square. Prepare the quilt binding by joining fabric strips into one continuous length. Fold and press the binding, then attach it evenly around the quilt, carefully forming neat corners.
The Spring Roses Quilt Pattern does not have to become a large bed quilt. One block can be transformed into a pillow front or wall hanging. Several blocks can create a table runner, and a compact arrangement can become a baby quilt or decorative throw. Adjusting the number of blocks allows the same basic pattern to serve many different purposes.
Finally, add a quilt label to the back if desired. Include information such as the maker’s name, year, recipient, or occasion. A handmade rose quilt may remain in a family for many years, and a small label preserves part of the story behind the project.
FAQ About the Spring Roses Quilt Pattern
Is the Spring Roses Quilt Pattern suitable for beginners?
Yes, especially if the design is constructed from basic patchwork units. Beginners should be comfortable with accurate cutting, a quarter-inch seam, pressing, and basic half-square triangles. Making one practice block before cutting an entire quilt is a helpful approach.
What colors work best for a rose quilt?
Pink, red, blush, coral, peach, lavender, cream, and burgundy are natural choices for roses, while green works beautifully for foliage-inspired accents. However, there are no strict rules. Blue, yellow, purple, or even multicolored scrap roses can create striking results.
What is the best background fabric for Spring Roses Quilt Blocks?
Light neutral backgrounds such as cream, white, ivory, or pale gray provide strong contrast and keep the floral sections visible. Low-volume prints can also work when their design is subtle enough not to compete with the roses.
Can I make the quilt with fabric scraps?
Absolutely. A scrap quilt version can be particularly beautiful because real flowers naturally contain subtle variations in color. Sort scraps into light, medium, and dark values before beginning so the rose shapes remain clearly visible.
What is fussy cutting in quilting?
Fussy cutting means intentionally positioning a specific printed motif before cutting the fabric. For example, you might center a printed rose inside a square rather than cutting randomly from the yardage.
How do I make accurate half-square triangles?
Start with accurately cut squares, sew consistently, press without stretching the bias seam, and trim every finished HST to the required unfinished dimensions. A quilting ruler with a diagonal guideline can make trimming much easier.
Why are my quilt blocks different sizes?
Differences can result from inconsistent seam allowances, inaccurate cutting, stretched bias edges, or excessive pressing. Check your quarter-inch seam before beginning multiple blocks and measure units throughout construction instead of waiting until the end.
Should I add sashing between the rose blocks?
Sashing is optional. It creates separation between individual flowers and can make each block more prominent. Without sashing, the rose blocks can visually flow together and create a denser garden effect.
How should I quilt a rose quilt?
Straight lines, gentle curves, leaves, vines, echo quilting, and free-motion floral patterns can all complement the design. Choose a method that matches your experience level and keeps the patchwork roses as visible as you want them to be.
Can I use the Spring Roses Quilt Pattern for smaller projects?
Yes. Individual blocks can become pillows, tote bag panels, placemats, wall hangings, or table toppers. A few blocks arranged in a row can also create a beautiful floral table runner.
Conclusion
The Spring Roses Quilt Pattern combines classic patchwork construction with the timeless beauty of flowers. By selecting fabrics with different values, building accurate geometric units, arranging the colors carefully, and assembling the blocks from the center outward, you can create roses that appear layered and full of movement.
Throughout this tutorial, you learned how to select coordinating fabrics, work with half-square triangles, use fussy cutting, maintain an accurate quarter-inch seam, assemble rose-inspired blocks, arrange a quilt top, add optional sashing and borders, and complete the project with quilting and binding. Each technique can also be applied to many other patchwork designs.

