
The Kitchen Window Block Pattern is a beautiful quilting project that combines traditional patchwork techniques with a charming geometric design inspired by the familiar structure of a window. With carefully arranged fabric pieces, clean seams, and thoughtful color placement, this block can create the impression of framed panes while adding warmth and personality to a handmade quilt. The pattern is especially appealing because it can look completely different depending on the fabrics you select. Bright floral prints can create a cheerful cottage-inspired appearance, while solids, neutrals, or modern geometric fabrics can give the same block a clean contemporary style. Whether you are planning a full quilt or simply want to practice a new block, this project provides an enjoyable way to develop your piecing skills.
Another advantage of The Kitchen Window Block Pattern is its versatility. Individual blocks can be repeated across a large quilt, combined with coordinating blocks, or used independently for smaller projects such as table toppers, cushion covers, wall hangings, placemats, and decorative runners. The window-like construction also makes the pattern ideal for showcasing favorite fabric prints. Each central section can act almost like a miniature picture frame, allowing floral motifs, novelty prints, scraps, or carefully fussy-cut designs to become the visual focus. By repeating specific colors in the surrounding strips, you can create consistency throughout the entire project without making every block identical.
Learning how to make a Kitchen Window quilt block is also useful for improving fundamental quilting techniques. Accurate cutting, consistent quarter-inch seams, careful pressing, matching intersections, and squaring completed blocks are all important parts of the process. These skills can be applied to countless future quilting projects. Although the exact measurements can be adjusted to suit the desired finished block size, the basic construction remains approachable: create the central window sections, surround them with contrasting strips or frames, assemble the individual units, and carefully join everything into a balanced square block. The following tutorial explains the process from preparation through final assembly.
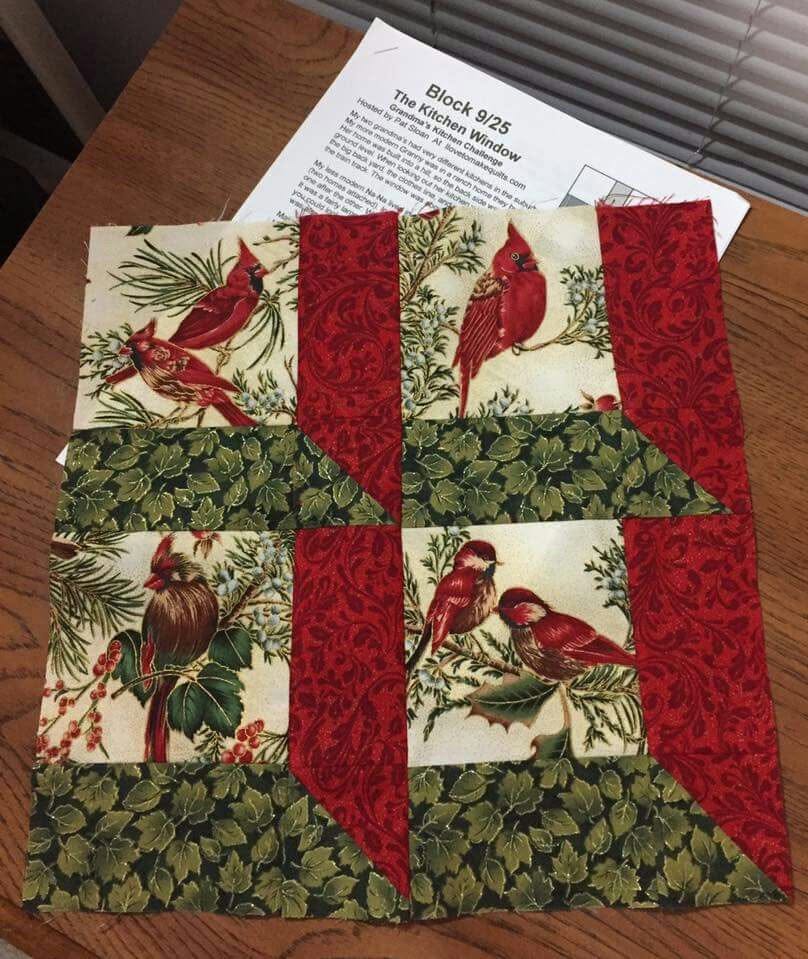
Materials and Fabric Preparation for The Kitchen Window Block Pattern
Begin The Kitchen Window Block Pattern by gathering quilting cotton in several coordinating colors or prints. You will generally need fabric for the main window sections, contrasting strips that create the frames, and optional background pieces. Quilting cotton is ideal because its stable weave makes accurate cutting and piecing much easier.
Choose your color palette before cutting. The visual effect becomes stronger when there is noticeable contrast between the central pieces and the strips surrounding them. For example, colorful printed centers paired with neutral frames can make each window appear clearly defined.
If you prefer a traditional kitchen-inspired appearance, consider floral prints, gingham-style designs, warm reds, soft blues, creams, yellows, or greens. A modern version could combine black, white, gray, and saturated solid colors. There is no single correct palette for a Kitchen Window Block, so use fabrics that suit your personal style.
Prepare a rotary cutter, acrylic quilting ruler, cutting mat, sewing machine, coordinating thread, pins or clips, and an iron. Accurate cutting tools are particularly important because even small differences between pieces can become noticeable when several units are joined together.
Cut the central squares or rectangles according to your desired block dimensions. Then prepare narrow strips for the window frames. If you are developing your own size variation, make one test unit before cutting all the fabric. This allows you to verify proportions and make adjustments without wasting material.
Once everything is cut, organize the pieces into groups for each block. Lay one complete block on your work surface before sewing. This quilt block layout gives you an opportunity to check color placement, fabric direction, and contrast while preventing pieces from becoming mixed during assembly.
How to Sew The Kitchen Window Block Pattern Step by Step
Start with one central fabric piece and the first frame strip. Place the fabrics right sides together and carefully align the raw edges. Sew using an accurate quarter-inch seam allowance, maintaining a steady speed so the seam remains straight from beginning to end.
Open the fabrics and press the seam carefully. Depending on the fabric colors and construction, you can press the seam toward the darker fabric or in the direction that creates less bulk. Avoid stretching the fabric while pressing because accurate dimensions are important for later assembly.
Attach the next frame strip to the appropriate side of the central section. Again, align the edges before sewing with a quarter-inch seam allowance. Continue building around the central piece until the framed window unit matches the intended layout.
Repeat this construction process for the remaining window sections. Consistency is essential. If every unit is assembled with the same seam allowance, the pieces will align much more easily when they are joined into the final Kitchen Window Block.
Arrange all completed units on a flat surface before connecting them. Rotate pieces if necessary until the window effect looks balanced. Pay attention to directional prints because flowers, animals, kitchen motifs, or other recognizable designs may look better when oriented consistently.
Join neighboring units into rows, pressing the seams carefully after each step. Then sew the rows together, matching important intersections with pins if necessary. Press the completed block and check its dimensions. The recognizable structure of The Kitchen Window Block Pattern should now be clearly visible.
Creating a Beautiful Quilt Layout With Kitchen Window Blocks
After completing several blocks, arrange them together before sewing the quilt top. This stage can completely change the personality of the finished project. Identical blocks arranged consistently create an orderly design, while rotating selected blocks can introduce additional movement.
Consider using the same framing fabric throughout all the blocks. This technique visually connects different center prints and can be especially useful for a scrap quilt. A consistent dark or neutral frame often makes colorful center fabrics look like individual views through a series of windows.
Alternatively, change the frame colors from block to block. This creates a more playful patchwork quilt and provides an excellent opportunity to use leftover fabric. Try repeating a limited palette so the overall composition remains cohesive even when individual blocks differ.
A design wall or large clean floor can help you evaluate the arrangement. Step away periodically and look at the quilt from a distance. This makes it easier to identify areas where similar colors have become unintentionally concentrated.
When you are satisfied with the arrangement, stack the blocks systematically by row. Labeling rows can prevent accidental changes to your carefully planned layout. Sew the blocks together using a consistent quarter-inch seam and match the intersections whenever possible.
Finally, join the completed rows to form the Kitchen Window quilt top. Press the seams after each row is attached. Check that the quilt remains square and that the outer edges are relatively straight before moving on to the quilting and finishing stages.
Quilting, Finishing, and Creative Ideas for The Kitchen Window Block Pattern
Once the quilt top is complete, prepare the backing and batting. Both should extend beyond the quilt top on every side. Place the backing wrong side up, position the batting over it, and place your Kitchen Window quilt top right side up.
Smooth all three layers carefully and baste them using your preferred method. Proper basting keeps the layers from shifting while quilting and reduces the chance of wrinkles appearing on the back.
Straight-line quilting is an excellent option for this geometric pattern. You can quilt along the window frames to emphasize their structure or create evenly spaced lines across the entire project. Gentle diagonal quilting can provide another attractive contrast to the rectangular patchwork.
If you prefer free-motion quilting, use simple curves or flowing motifs inside the window sections while keeping the frames more structured. The contrast between geometric piecing and softer quilting can add interesting texture without overwhelming the fabric design.
After quilting, trim away excess batting and backing. Prepare binding strips, join them into one continuous length, and attach the binding around the outer edge of the quilt. Carefully formed corners contribute greatly to a polished finished appearance.
The same Kitchen Window Block Pattern can also be adapted for smaller projects. A single block can become a decorative pillow front, several blocks can form a table runner, and a compact arrangement can create a wall hanging. This versatility makes the block useful far beyond traditional bed quilts.
FAQ About The Kitchen Window Block Pattern
Is The Kitchen Window Block Pattern suitable for beginners?
Yes. The design is approachable for beginners who are comfortable sewing straight seams. It also provides excellent practice with accurate cutting, quarter-inch seam allowances, pressing, and matching block intersections.
What fabric is best for a Kitchen Window Block?
Quilting cotton is generally the easiest option. It is stable, easy to press, and available in a huge variety of colors and prints.
Can I use fabric scraps for this pattern?
Absolutely. The Kitchen Window Block Pattern can be an excellent scrap-friendly project, especially when smaller pieces are used as the central window sections.
How can I make the window effect more noticeable?
Create strong contrast between the center fabrics and framing strips. Dark frames around lighter centers, or light frames around saturated prints, can clearly define the window structure.
Can I use different fabrics in every block?
Yes. You can make every center different while repeating the same frame fabric to visually connect the blocks. This is an effective approach for a colorful scrap quilt.
Why are my finished blocks different sizes?
Differences usually come from cutting inaccuracies or inconsistent seam allowances. Measure pieces carefully and maintain a reliable quarter-inch seam throughout construction.
Should I press the seams open or to one side?
Both methods can work. Pressing to alternating sides can help seams nest when blocks are joined, while pressing open may reduce bulk in certain areas. Choose the method that best suits your construction.
Can I make larger Kitchen Window Blocks?
Yes. The design can be resized by increasing the dimensions of the central pieces and surrounding strips proportionally. Make a test block first whenever changing measurements.
Do directional fabrics work with this pattern?
They can work beautifully, but plan their orientation before sewing. Arrange all pieces first so recognizable motifs face the direction you want in the completed quilt.
What quilting style works best for this pattern?
Straight-line quilting complements the geometric design particularly well. Stitching near the framed sections can emphasize the appearance of individual windows.
Can I add sashing between the blocks?
Yes. Sashing can provide additional separation and make every Kitchen Window Block stand out individually. Choose a color that complements rather than competes with the frame fabrics.
What projects can I make besides a full quilt?
You can use the blocks for cushion covers, placemats, table runners, wall hangings, mini quilts, tote bag panels, and many other decorative sewing projects.
Conclusion
The Kitchen Window Block Pattern is a versatile quilting design that proves how simple geometric pieces can create an impressive visual effect. By combining carefully selected center fabrics with contrasting frame strips, each block develops the appearance of a small window while still maintaining the warmth and character of traditional patchwork.
Throughout this tutorial, you learned the essential process of choosing fabrics, cutting the pieces, constructing individual window units, maintaining an accurate quarter-inch seam allowance, assembling blocks into rows, creating the quilt top, adding batting and backing, quilting the layers, and completing the project with binding. Careful measuring and consistent sewing are especially important because they help the repeated window shapes align neatly throughout the finished quilt.

