
Cleopatra Fan Quilt Pattern is an elegant quilting project that transforms carefully selected fabrics and graceful fan-shaped pieces into a striking design filled with movement and visual interest. Inspired by the timeless beauty of traditional fan quilt blocks, this pattern can become the centerpiece of a sophisticated bed quilt, wall hanging, table covering, or decorative throw. Although the curved shapes may initially look challenging, the construction becomes much easier when each section is prepared accurately and sewn patiently. With thoughtful fabric choices and careful pressing, quilters can create a polished project that looks wonderfully intricate.
One of the most attractive characteristics of the Cleopatra Fan Quilt Pattern is the way individual fabric segments come together to create flowing geometric forms. Each fan can showcase several coordinated prints, allowing you to work with dramatic contrasts, subtle gradients, scraps from previous projects, or a carefully planned color palette. The pattern is especially effective when the fan sections stand out against a calmer background fabric. This balance allows the curved design to remain the main visual feature while giving the entire quilt a harmonious and professionally finished appearance.
Making a Cleopatra Fan Quilt is also an excellent opportunity to develop useful quilting skills. Throughout the project, you can practice accurate cutting, consistent seam allowances, curved piecing, careful pressing, block assembly, quilting, and binding. The project can be adapted to different experience levels by starting with a small arrangement before moving to a full-size quilt. This tutorial explains the construction process step by step so you can understand how the individual fan units are prepared, joined, arranged, and transformed into a beautiful finished quilt.
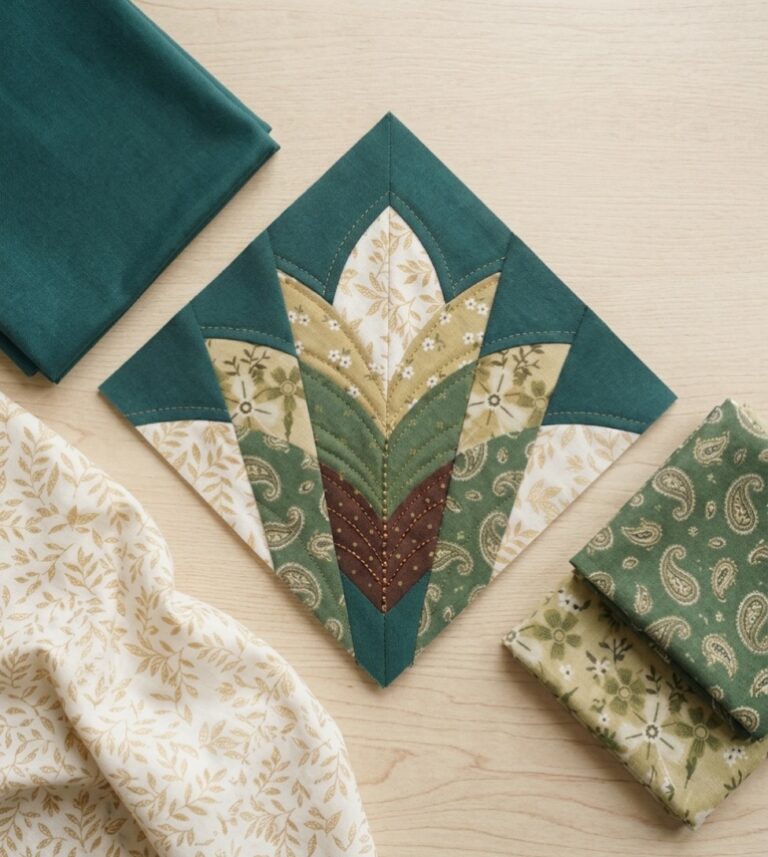
Materials, Fabric Selection, and Preparing the Cleopatra Fan Pieces
Begin your Cleopatra Fan Quilt Pattern by deciding how large you want the finished project to be. A small wall hanging requires relatively few blocks, while a throw or bed quilt requires a larger repeating arrangement. Planning the dimensions before cutting helps you estimate how many fan units you will need.
Choose quilting cotton for both the decorative fan pieces and the background. Quality cotton is easy to cut, sew, and press, and its stability is particularly helpful when working with curved pieces. Prewashing is optional, but all fabrics should be prepared consistently.
The fabric selection has a major influence on the final appearance. For a dramatic Cleopatra-inspired effect, consider jewel tones, rich blues, gold-inspired yellows, emerald greens, deep purples, and contrasting neutrals. For a softer quilt, combine pastels with a cream or white background.
Each fan is created from multiple wedge-shaped fabric sections. Depending on your preferred variation, these wedges can alternate between two colors or include several different fabrics. Repeating colors in a planned sequence helps create visual rhythm throughout the quilt.
Use a template designed for your chosen block dimensions to cut the fan wedges accurately. Place the template carefully on the fabric, respecting the grain whenever possible, and use a rotary cutter or fabric scissors to achieve clean edges. Accurate pieces make later assembly significantly easier.
Before sewing, arrange all the cut wedges on a flat surface. This simple step allows you to preview each Cleopatra Fan Quilt block and adjust the color placement. Organizing pieces into individual block groups can also prevent confusion once you begin sewing.
How to Sew the Cleopatra Fan Quilt Pattern Step by Step
Start with two neighboring fan wedges and place them right sides together. Carefully align the long edges and sew them using a consistent quarter-inch seam allowance. Accuracy at this stage helps prevent the finished fan from becoming distorted.
Open the two pieces and gently press the seam. Avoid pulling or stretching the fabric because some edges may contain bias grain. Pressing rather than aggressively moving the iron back and forth helps preserve the intended shape.
Add the next wedge by placing it right sides together with the assembled section. Align the edges, sew the seam, and press again. Continue adding wedges individually until the complete fan unit has been assembled.
After sewing all the wedges, examine the fan carefully. The outer curved edge should appear smooth, and the lower edges of the segments should meet neatly. Small variations can often be corrected during trimming, but major differences may indicate an inconsistent seam allowance.
The next stage is joining the pieced fan to its background section. Curved piecing requires patience, so mark the center points of both curved edges first. Match those center marks with right sides together, then align and pin or clip the remaining curve gradually.
Sew slowly around the curve without stretching either fabric layer. Stop periodically with the needle down if you need to adjust the fabric. After completing the seam, press carefully toward the background or according to the construction method you are using. Your Cleopatra Fan Quilt Pattern block should now begin showing its distinctive finished shape.
Assembling the Quilt Top and Creating a Balanced Fan Design
Once several blocks are complete, place them on a large flat surface or design wall. Do not immediately sew them together. Experimenting with different arrangements is one of the most important steps because block rotation can dramatically change the overall Cleopatra Fan Quilt design.
Try positioning the fans so they create circular formations, flowing waves, diagonal movement, or repeating decorative motifs. Taking a photograph of each possible layout can help you compare arrangements before making a final decision.
Pay attention to color distribution as you arrange the blocks. If several dark blocks appear together accidentally, one area of the quilt may feel visually heavier than the rest. Spread strong colors throughout the design unless intentional clustering is part of your plan.
When satisfied with the arrangement, organize the blocks into rows. Sew neighboring blocks right sides together using the same quarter-inch seam allowance used throughout the project. Pin important intersections when necessary to help the fan shapes align cleanly.
Press the row seams carefully. Alternating the direction of seam allowances between neighboring rows can help seams nest together when the rows are joined. This technique often improves alignment and reduces unnecessary bulk at intersections.
Join the completed rows one at a time until the entire quilt top is assembled. After the final row is attached, press the top and inspect its edges. Trim only when necessary, preserving the intended dimensions and avoiding excessive removal of fabric around the fan blocks.
Quilting, Binding, and Finishing the Cleopatra Fan Quilt
Before quilting, prepare your three layers: the finished quilt top, batting, and backing fabric. The backing and batting should extend slightly beyond the quilt top on every side. This extra material provides room for adjustments during the quilting process.
Lay the backing with the wrong side facing upward, position the batting over it, and place the Cleopatra Fan Quilt top right side up. Smooth each layer carefully to remove wrinkles. Baste the layers using your preferred method so they remain stable during quilting.
Your quilting design can emphasize the beautiful fan shapes. Stitching along or near the curved seams highlights the piecing, while gentle echo quilting can repeat the fan curves and add texture. A simple overall quilting design is another option if you want the fabric arrangement to remain the primary focus.
Work gradually from one section to another and frequently check the back of the quilt. Maintaining an even quilting rhythm helps prevent puckers and keeps the layers smooth. Beginners may find it helpful to practice their chosen quilting design on a small fabric sandwich first.
After quilting is complete, trim the excess backing and batting so the edges align neatly with the quilt top. Prepare the quilt binding by joining fabric strips, pressing them appropriately, and attaching the binding around the entire perimeter.
Finish the binding carefully, paying particular attention to the corners. Once the final stitches are complete, inspect the entire quilt for loose threads or unfinished areas. Your Cleopatra Fan Quilt Pattern has now developed from individual wedges into a complete handmade quilt filled with elegant curves and beautiful repetition.
FAQ About the Cleopatra Fan Quilt Pattern
Is the Cleopatra Fan Quilt Pattern suitable for beginners?
A confident beginner can make this quilt, although the curved construction may require some practice. Starting with a few test blocks is an excellent way to become comfortable with the technique before cutting fabric for an entire quilt.
What fabric works best for a Cleopatra Fan Quilt?
Quilting cotton is an excellent choice because it is stable, easy to cut, and available in countless colors and prints. Using fabrics of similar weight also makes piecing and pressing easier.
How many colors should I use in the fan sections?
There is no required number. Two contrasting fabrics can produce a bold graphic design, while multiple coordinating fabrics create a colorful and detailed appearance.
Can I make a scrap Cleopatra Fan Quilt?
Yes. The individual fan wedges make this an excellent project for using fabric scraps. Repeating a consistent background color can help unite a large variety of scrap fabrics.
How can I sew smoother curved seams?
Mark the center of both curved pieces, match those points first, and then gradually align the remaining edges. Sew slowly and avoid stretching the fabric while guiding it under the presser foot.
Why are my fan blocks becoming distorted?
Distortion can result from inaccurate cutting, inconsistent seam allowances, or stretching bias edges. Handle cut pieces gently and use pressing motions rather than moving the iron aggressively across the fabric.
Should I press seams open or to one side?
Either method may work depending on the construction and thickness of the fabric. Pressing seams to one side can make intersections easier to nest, while pressing open can reduce bulk in areas containing many seams.
Can I enlarge the Cleopatra Fan Quilt Pattern?
Yes. You can create a larger quilt by making additional blocks while keeping the original block dimensions. This is usually easier than enlarging individual templates because the proportions of the fan remain consistent.
What quilting design looks good with fan blocks?
Echo quilting around the curved shapes is particularly effective because it emphasizes the movement of the fans. Straight-line quilting or a simple all-over design can also provide beautiful results.
Can the pattern be used for smaller projects?
Absolutely. Individual Cleopatra Fan Quilt blocks can be adapted for wall hangings, table toppers, cushion covers, runners, and other decorative sewing projects.
How important is the quarter-inch seam allowance?
It is very important. Consistent seam allowances help individual wedges form the correct fan dimensions and allow completed blocks to align properly when assembling the quilt top.
How do I choose a background color?
Consider selecting a background that provides enough contrast with the fan fabrics. Light neutral backgrounds can make colorful fans stand out, while dark backgrounds can create a dramatic appearance with brighter fan segments.
Conclusion
The Cleopatra Fan Quilt Pattern combines traditional quilting techniques with elegant curved shapes to create a project that immediately attracts attention. Although the fan design may appear complicated at first, breaking the construction into individual stages makes the process much more approachable. Careful cutting, accurate quarter-inch seams, patient curved piecing, and thoughtful pressing are the foundations of a successful result.
Throughout this tutorial, you learned how to choose fabrics, prepare wedge-shaped pieces, construct the fan quilt blocks, add curved background sections, arrange the completed blocks, assemble the quilt top, create the quilt sandwich, quilt the layers, and finish everything with binding. Each stage contributes to the overall quality and durability of the finished project.

