
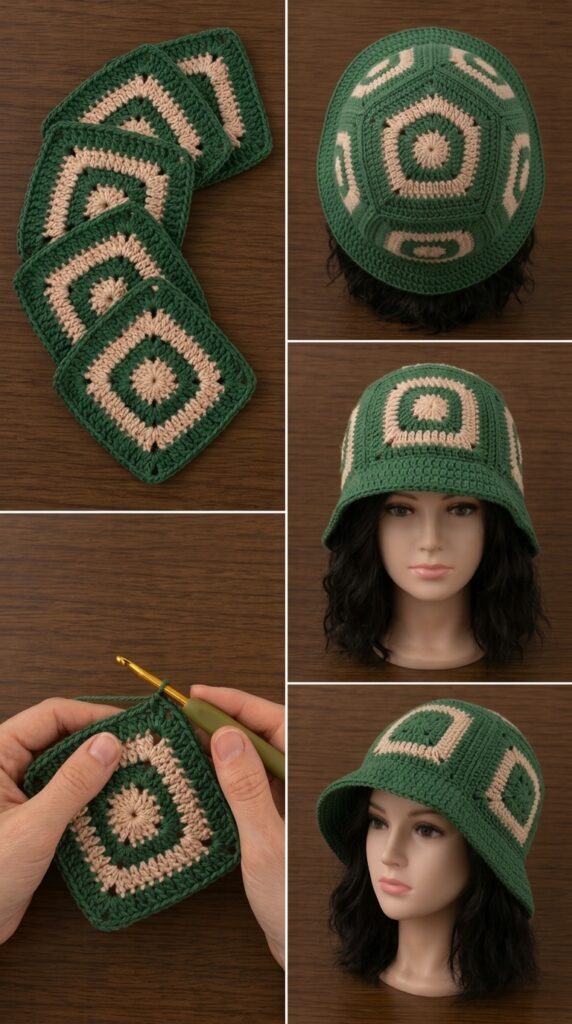
Crochet a Granny Square Bucket Hat Pattern and turn one of the most recognizable crochet motifs into a stylish, colorful, and practical handmade accessory. A granny square bucket hat combines traditional crochet techniques with the relaxed shape of a modern bucket hat, making it a wonderful project for crocheters who enjoy experimenting with colors and modular construction. Instead of creating the entire hat as one continuous piece, this design uses individual granny squares that are joined together and finished with a crocheted crown and brim. The result is a comfortable accessory with plenty of personality and a handmade appearance that works beautifully with casual outfits.
Learning how to crochet a granny square bucket hat pattern is also a great opportunity to practice fundamental crochet skills. Traditional granny squares are generally built with groups of double crochet stitches separated by chain spaces, which makes the motif repetitive and approachable once you understand the basic sequence. The squares can be worked in one color for a minimalist appearance or in several contrasting shades for a classic patchwork-inspired effect. Because each motif is created separately, this project is also convenient when you want something portable that can be worked on a little at a time.
Another advantage of the Crochet a Granny Square Bucket Hat Pattern is its flexibility. Head measurements vary, yarn behaves differently depending on fiber and thickness, and individual crochet tension can significantly affect the final size. For that reason, this tutorial focuses not only on stitch instructions but also on understanding measurements and construction. By learning how the squares, crown, and brim work together, you can adapt the crochet bucket hat pattern to fit more comfortably while creating your own combination of colors, textures, and finishing details.
Materials and Granny Square Crochet Basics
To begin your granny square bucket hat, choose a yarn that creates comfortable yet structured fabric. Medium-weight cotton or a cotton-blend yarn is an excellent option because it provides clear stitch definition and enough stability for the brim. Acrylic can also work, particularly if you want a softer hat. Whatever fiber you choose, try to use yarns of approximately the same weight when combining multiple colors so that all your squares remain consistent.
You will need a crochet hook appropriate for your yarn, scissors, a yarn needle, stitch markers, and a flexible measuring tape. The yarn label can provide a useful starting point for selecting your hook, but your personal tension matters as well. If the fabric feels excessively stiff, consider using a slightly larger hook. If the stitches are too loose and the hat lacks structure, a slightly smaller hook may produce a better result.
The traditional crochet granny square starts from the center and expands outward in rounds. A common construction uses groups of three double crochet stitches, often called granny clusters, separated by chain spaces. The corners require additional spacing and stitch groups so the motif remains square instead of becoming circular. Once you understand this repeating structure, creating several matching motifs becomes much easier.
For a basic square, begin with a small center ring. You can use a magic ring or create a short chain and join it with a slip stitch. Chain to establish the height of the first round, then work groups of three double crochet stitches around the center. Separate the groups with chain spaces and create four distinct corners. Join the round with a slip stitch before beginning the next round.
On subsequent rounds, work your granny clusters into the chain spaces rather than directly into every individual stitch. At each corner, place two clusters separated by a chain space. This corner construction allows the granny square pattern to expand evenly. Continue until your square reaches the dimensions required for the hat. Remember that even a small difference in square size becomes significant when several motifs are joined together.
Before making all your squares, measure the first finished motif. You can estimate how many squares are required by comparing their combined width with the intended head circumference. For example, if each finished square measures approximately 4 inches across, five squares would create roughly 20 inches before accounting for joining and stretch. Treat this only as an example because your actual measurements should determine the final construction.
How to Crochet and Join the Granny Squares
Once you are satisfied with the size of your first motif, crochet enough identical granny squares to create the band around the head. A common arrangement uses several squares positioned side by side, but the exact number depends entirely on square dimensions and the required hat circumference. Place the completed motifs in a row before joining them to make sure their combined measurement is appropriate.
Color planning can dramatically change the appearance of your crochet granny square bucket hat. For a traditional look, change colors on every round and repeat the same sequence across all motifs. For a playful patchwork design, use different color combinations while maintaining a shared border color. A consistent final round helps visually connect squares that have different centers.
When changing yarn colors, finish the previous color neatly and join the new shade at a corner or chain space. Leave enough yarn tail to weave in securely later. Avoid simply cutting the yarn very close to the fabric because the ends may work themselves loose over time. A yarn needle allows you to hide each tail within neighboring stitches for a cleaner finish.
After completing the required squares, arrange them in your preferred order. You can join crochet granny squares using slip stitches, single crochet, or a sewn seam with a yarn needle. Slip-stitch joins can produce a relatively flat connection, while single crochet creates a more visible textured ridge. Choose the method that complements the overall style you want.
Join the squares along their vertical sides until they form one long strip. Then connect the first and last squares to turn the strip into a circular band. Before continuing, carefully check the circumference. Place the band around the intended wearer’s head without stretching it excessively. It should feel comfortable and secure rather than tight.
Inspect all seams after joining. The upper and lower edges of the band should be relatively even because one will connect to the crown and the other will lead into the crochet hat brim. Small differences can often be corrected when working the first joining round, but major differences usually indicate that one or more squares have a different stitch count or size.
Creating the Crown and Shaping the Bucket Hat
The next stage of the Crochet a Granny Square Bucket Hat Pattern is forming the top. One straightforward method is to crochet a circular crown separately and then join it to the granny-square band. Begin with a magic ring and work a round of stitches into the center. Mark the beginning of each round so you can keep track of your increases.
Continue expanding the circle with evenly distributed increases. If you are using double crochet, increase at regular intervals so the crown stays flat. A circle that begins forming waves may have too many increases, while a crown that curves into a bowl prematurely may need additional increases. Check the fabric after every few rounds rather than waiting until the crown is complete.
The diameter of the crown influences the final hat size. Instead of following one fixed measurement for everyone, compare the crown circumference with the upper edge of your completed granny-square band. The two sections need compatible stitch counts or dimensions so they can be joined without significant puckering or stretching.
Once the crown reaches the correct diameter, position it above the granny square hat band. Use stitch markers to divide both pieces into equal sections. Matching these points before joining helps distribute the fabric evenly. Crochet the two pieces together with slip stitches or single crochet, or sew them together carefully with a yarn needle.
After joining, examine the overall shape. The crown should sit smoothly above the squares without a large amount of extra fabric. The granny-square section forms the sides of the bucket hat, while the circular top provides structure. If the crown appears slightly uneven, gentle shaping may help, but substantial puckering is usually a sign that the two pieces were not evenly matched.
Try the unfinished crochet bucket hat on before making the brim. This is the best stage to identify sizing problems because the brim has not yet been added. Check that the hat sits comfortably around the head and reaches the desired depth. If necessary, you can add a narrow round between the squares and brim to increase the depth slightly.
Crocheting the Brim and Finishing the Hat
To begin the brim, join your chosen yarn along the bottom edge of the granny-square band. Work one foundation round evenly around the entire hat. This round is important because it creates a clean transition from the square motifs to the bucket hat brim. Count your stitches and place a marker at the beginning of the round.
For the next rounds, introduce increases at regular intervals. These increases make the brim extend outward instead of continuing straight down. The exact frequency depends on your yarn, stitch choice, tension, and desired brim shape. Add increases gradually and place the hat on a flat surface periodically to evaluate the shape.
A classic crochet bucket hat pattern usually has a moderately structured brim rather than a very wide floppy edge. Continue working rounds until the brim reaches your preferred width. If it begins to ripple significantly, reduce the number of increases. If it curls inward too strongly, slightly more frequent increases may be necessary.
For additional structure, finish the final rounds with a compact stitch such as single crochet. A firm final edge helps define the brim and gives the hat a polished appearance. You can use the same color as the granny-square borders for visual continuity or choose a contrasting shade to add another decorative element.
After completing the final round, fasten off and weave in every remaining yarn end. Pay particular attention to the color-change points and joined seams. Trim excess yarn only after the tails have been securely woven through several neighboring stitches. Good finishing makes a significant difference in both appearance and durability.
Finally, gently shape your completed granny square bucket hat. Depending on the yarn fiber, appropriate blocking can help even the squares, smooth the seams, and improve the brim. Always follow care instructions suitable for the yarn you selected. Once finished, your handmade hat is ready to wear and can serve as inspiration for many future color combinations.
FAQ About Crochet a Granny Square Bucket Hat Pattern
Is a granny square bucket hat suitable for beginners?
Yes, especially for beginners who already know basic crochet stitches. The project uses repetitive motifs and provides useful practice with double crochet, chain stitches, slip stitches, joining techniques, increases, and working in rounds. Making one practice granny square before starting the hat can make the process easier.
How many granny squares do I need for a bucket hat?
There is no universal number because it depends on the size of each square and the required head circumference. Measure one finished square, calculate the combined width of several motifs, and compare that measurement with the intended wearer’s head.
What yarn is best for a granny square bucket hat?
Cotton and cotton-blend yarns are popular because they provide stitch definition and structure. Medium-weight yarn can make the project relatively quick while maintaining a substantial fabric. The most important consideration is using yarns of similar thickness throughout the project.
How do I make a granny square bucket hat bigger?
You can increase the size by making each square larger, using additional squares when the construction permits, adjusting the crown diameter, or changing yarn and hook size. Measuring throughout the project is more reliable than making random increases after assembly.
How do I make the brim stay flat?
Use evenly distributed increases and inspect the brim after every round. Too many increases can create ruffles, while too few may cause the brim to curl. Because crochet tension varies, the ideal increase frequency may require minor adjustments.
Can I make the entire hat with granny squares?
Yes, there are several possible construction styles. Some designs use granny squares for both the crown and sides, while others combine a circular crochet crown with a granny-square band. The latter can make it easier to create a smooth rounded top while preserving the classic square design around the sides.
Can I use leftover yarn for this crochet hat?
A granny square bucket hat is an excellent project for using small amounts of coordinating yarn. Make sure the yarns have similar thickness and care requirements. Using one consistent color for the outer round of every square can help unify a collection of different colors.
How can I make my granny squares look more even?
Maintain consistent tension, count your stitches, place the corner groups correctly, and check each motif against the first completed square. Gentle blocking can also improve the shape before joining the pieces.
Should I block granny squares before joining them?
Blocking can be helpful because it encourages the motifs to reach consistent dimensions and makes joining easier. Whether it is necessary depends on your yarn and how evenly your squares naturally lie.
How can I customize my Crochet a Granny Square Bucket Hat Pattern?
Experiment with color combinations, square sizes, border colors, brim widths, and joining methods. You can create vintage-inspired palettes, bright rainbow combinations, soft neutrals, or modern monochromatic versions while using the same basic granny square hat pattern.
Conclusion
Learning to Crochet a Granny Square Bucket Hat Pattern brings together two popular crochet ideas: the timeless granny square and the practical bucket hat. By creating individual motifs, joining them into a comfortable band, adding a properly sized crown, and finishing the project with an expanding brim, you can build a handmade accessory from simple crochet techniques.
Throughout this tutorial, you learned how to select suitable yarn, crochet consistent granny squares, understand granny clusters, join the motifs, measure the hat circumference, shape a circular crown, and crochet a structured brim. Paying attention to measurements and tension throughout these stages is the key to creating a hat that looks balanced and feels comfortable.
Once you understand the basic construction, this granny square bucket hat pattern offers almost endless opportunities for customization. Changing only the colors can completely transform the finished design, while different borders, joining techniques, and brim widths allow you to develop your own recognizable style.

