
Crochet Christmas Tree Pattern is a delightful holiday project that turns simple yarn and basic crochet stitches into a festive handmade decoration. Whether you want to decorate a Christmas tree, create a seasonal garland, personalize gift wrapping, or make small handmade presents, a crochet Christmas tree is an enjoyable project with plenty of room for creativity. The recognizable triangular shape can be created with basic increases and decreases, while different yarn colors and embellishments allow every finished tree to have its own personality. It is also a wonderful project for using small amounts of leftover green, brown, gold, red, or white yarn from your craft collection.
One of the most appealing features of this Crochet Christmas Tree Pattern is its versatility. You can make a small flat ornament, enlarge the pattern for a wall decoration, create several trees for a holiday garland, or crochet two matching pieces and join them to make a lightly stuffed ornament. Traditional green yarn creates the familiar evergreen appearance, but there are no strict rules. Cream, white, sage, emerald, pastel colors, and even metallic yarn accents can transform the same basic Christmas crochet pattern into something completely different. Small decorations can also be added after the tree itself is finished.
This tutorial focuses on creating an approachable crochet Christmas tree pattern for beginners while explaining why each part of the construction matters. Instead of relying exclusively on a fixed number of stitches, you will learn how increases create the widening tree shape, how the trunk is positioned, and how edging gives the finished piece a polished appearance. This makes the project easy to customize according to your preferred yarn and finished dimensions. With a hook, a few yarn colors, and some basic crochet knowledge, you can create a charming decoration that can return to your holiday collection year after year.
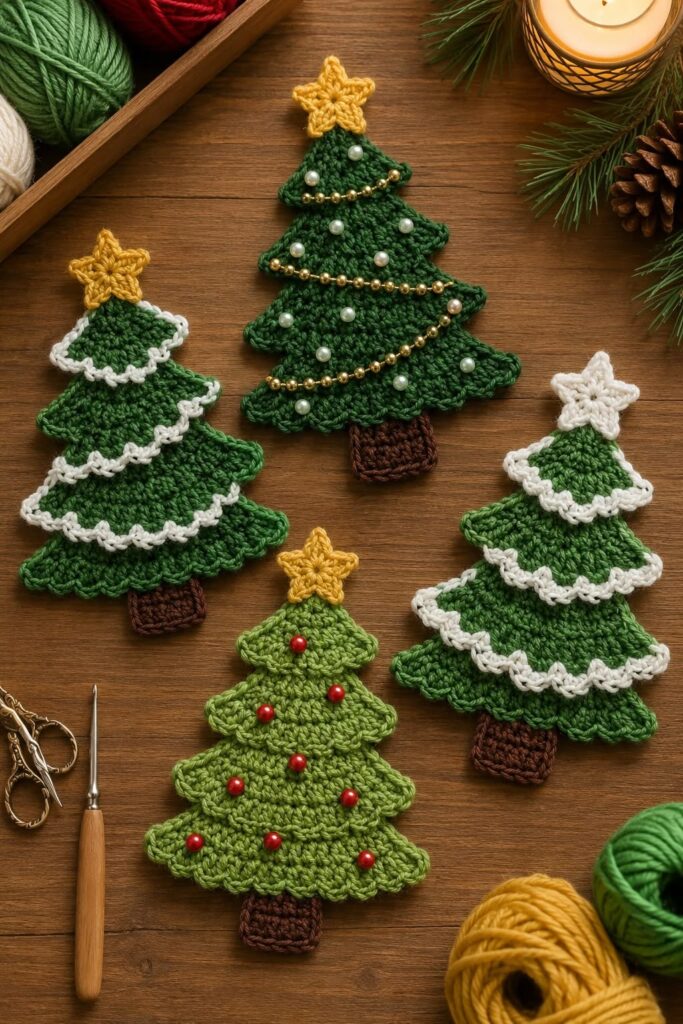
Materials and Basic Stitches for a Crochet Christmas Tree
Begin by selecting yarn for your crochet Christmas tree. Medium-weight yarn is an accessible choice for beginners because the stitches are easy to see and the project develops quickly. Green is the traditional main color, while a small amount of brown can be reserved for the trunk. You can also prepare red, gold, white, or other contrasting yarn if you plan to add decorative details later.
Choose a crochet hook that works comfortably with your yarn. The yarn label usually suggests an appropriate hook range, but your tension should also guide your choice. For a decorative tree, you generally want fabric that is firm enough to maintain its triangular shape without becoming excessively stiff. A slightly compact tension can give the finished crochet ornament a clean appearance.
Other useful supplies include scissors, a yarn needle, stitch markers, and a measuring tape. If the tree will become a hanging ornament, prepare additional yarn or cord for the hanging loop. Optional decorations might include small crocheted circles, embroidered details, bows, or a crocheted star. When making decorations for homes with small children or pets, securely attached yarn-based embellishments can be a practical choice.
The primary stitch for this easy crochet Christmas tree can be single crochet, abbreviated as sc in US crochet terminology. Single crochet creates a compact fabric that holds its shape particularly well. To make a single crochet, insert the hook into the designated stitch, yarn over, pull up a loop, yarn over again, and pull through both loops on your hook.
You should also understand crochet increases. An increase is created by working more than one stitch into the same stitch or designated space. In this project, strategically positioned increases gradually make each section wider, producing the characteristic triangular silhouette associated with a Christmas tree. Keeping the increases balanced on both sides helps maintain symmetry.
Before beginning the final piece, crochet a small practice swatch if you are unfamiliar with your yarn. This allows you to see whether the hook creates the texture you want. Gauge is less strict for a decorative ornament than for clothing, but consistent tension still matters because it helps the Christmas tree crochet pattern remain balanced and prevents one side from becoming noticeably different from the other.
How to Crochet the Christmas Tree Step by Step
Begin the Crochet Christmas Tree Pattern at the top of the tree. Make a slip knot and create a short foundation chain. Work your first small row of single crochet stitches, then turn the work. Starting with a narrow section establishes the pointed top of the tree. Keep the first rows neat because they determine the central alignment of the entire project.
On the following rows, begin increasing gradually at the edges. One simple approach is to work an additional stitch near the beginning and end of selected rows. These increases cause the piece to become wider as you move downward. Continue working single crochet rows between the increases, checking that the two sides develop at approximately the same angle.
To create a more recognizable evergreen silhouette, you can divide the tree into several visual tiers. After widening one section, create a slightly narrower transition and then begin widening again. This produces small branch-like steps along the sides instead of one perfectly straight triangle. The effect gives the crocheted Christmas tree more character without requiring complicated stitches.
Continue repeating the widening process until your tree reaches the desired height and width. For a small ornament, only a few inches may be necessary. For a garland or wall decoration, continue adding rows until the tree reaches your preferred dimensions. Because this crochet tree pattern is based on shaping rather than one mandatory size, it is easy to adapt.
When the green tree section is complete, fasten off and prepare the brown yarn. Identify the center stitches along the bottom edge. Attach the brown yarn and crochet a small rectangular section downward to form the Christmas tree trunk. Work several short rows, keeping the trunk centered beneath the main tree.
Fasten off the brown yarn and inspect the shape. Lay your tree on a flat surface and gently adjust the edges. The top should appear centered above the trunk, and the branches should extend relatively evenly on both sides. Do not worry about tiny differences because handmade crochet naturally contains subtle variations that contribute to its character.
Decorating and Finishing the Crochet Christmas Tree
With the basic tree finished, you can begin adding decorative details. One of the simplest options is to embroider tiny colorful stitches across the green section to represent Christmas ornaments. Use small amounts of red, yellow, white, blue, or gold yarn and distribute the decorations across the tree rather than concentrating them in one area.
Another possibility is to crochet tiny circles and sew them onto the tree. These miniature motifs create more texture than embroidery and can resemble traditional round ornaments. Keep them proportional to the tree so they do not cover the green background completely. For a very small crochet Christmas tree ornament, embroidered decorations may be easier than attaching separate pieces.
A star at the top creates a classic holiday finish. You can crochet a miniature crochet star, embroider a star shape directly onto the tree, or use contrasting yarn to create a simple decorative accent. Gold, yellow, cream, and white are all attractive options. Secure every yarn tail carefully on the back.
You can also add an edging around the tree. Join contrasting yarn at a discreet point and work single crochet or slip stitches around the outside. White edging can suggest snow along the branches, while gold or red creates a more festive border. When crocheting around corners, add enough stitches to allow the edging to turn smoothly without pulling the tree out of shape.
For a hanging decoration, create a loop at the top. You can chain a suitable length with your crochet hook and attach the end back to the tree, or use a separate strand of yarn. Check that the loop is securely attached before hanging the ornament. If you are making several pieces for a crochet Christmas garland, you can attach the completed trees to a longer crocheted chain.
Finally, weave in every remaining yarn end with a yarn needle. Depending on the fiber you selected, gentle blocking can help improve the shape. Follow the care recommendations for your yarn, reshape the branches and trunk, and allow the piece to settle completely. This finishing step can make a simple handmade Christmas decoration look much more polished.
Creative Ways to Customize Your Christmas Tree Pattern
Color is the easiest way to personalize this Crochet Christmas Tree Pattern. Traditional forest green creates a timeless result, while sage green offers a softer modern appearance. White can resemble a snowy tree, and combinations of green and cream can produce a cozy farmhouse-inspired design. You can even make an entire collection using different shades.
You can also experiment with texture. Instead of working every section entirely in single crochet, experienced crocheters can incorporate double crochet, bobble stitches, puff stitches, or simple shell details. Textured stitches can suggest layers of branches or decorative ornaments. When substituting stitches, remember that taller stitches may change the dimensions of the finished tree.
Another creative option is making a pair of identical trees and joining them around the edges. Leave a small opening, add a modest amount of stuffing, and close the remaining section. This creates a soft three-dimensional crochet Christmas tree ornament. Avoid overstuffing because too much filling can distort the triangular shape and make the edges uneven.
For a coordinated holiday display, crochet several trees in different sizes. A small, medium, and large set can be arranged together as seasonal décor. Alternatively, create multiple miniature trees and connect them along a chain for a Christmas crochet garland. Repeating the same color palette throughout the collection creates a cohesive look.
These trees can also be incorporated into handmade gift presentation. A small flat tree can be tied onto a wrapped present as a reusable decorative accent. You can coordinate the yarn with your wrapping colors or personalize each ornament for the recipient. After the gift is opened, the crochet decoration can be saved and used again.
Most importantly, write down any changes you make to the original crochet pattern. Record your yarn, hook size, number of rows, increase placement, finished dimensions, and decorative choices. These notes make it much easier to reproduce your favorite version later and create matching Christmas decorations in future seasons.
FAQ About the Crochet Christmas Tree Pattern
Is the Crochet Christmas Tree Pattern suitable for beginners?
Yes. This project can be beginner-friendly because the basic version relies primarily on single crochet, chains, increases, turning rows, and fastening off. Beginners can keep the decorations simple and add more advanced details after becoming comfortable with the basic construction.
What yarn should I use for a crochet Christmas tree?
Medium-weight cotton, acrylic, or blended yarn can all work well. Cotton tends to create excellent stitch definition and structure, while acrylic is widely available and comes in many colors. Choose a yarn according to the texture and appearance you want for your finished decoration.
What colors work best for a Christmas tree crochet pattern?
Green and brown provide the most traditional combination. Red, gold, white, and yellow are excellent accent colors. However, modern Christmas decorations often use cream, pink, blue, sage, or neutral shades, so you can easily adapt the project to your holiday color scheme.
How do I make my crochet Christmas tree larger?
Continue adding rows and increases until the tree reaches your desired dimensions. Remember to maintain balanced increases on both sides. If you dramatically enlarge the pattern, you may also want to make the trunk wider so it remains proportional to the tree.
How do I make the tree smaller?
Use fewer rows, thinner yarn, a smaller hook, or a combination of these adjustments. When making miniature ornaments, keep decorative elements simple so the design does not become overcrowded.
Why is my crochet tree curling?
Curling can happen because of tight tension, an unsuitable hook size, or uneven stitch counts. Check your tension and make sure you are not accidentally skipping stitches. Gentle blocking may help correct minor curling after the piece is finished.
Can I make this crochet Christmas tree three-dimensional?
Yes. Crochet two matching flat trees, place them together, and join around the edges. Add a small amount of suitable stuffing before closing the final opening. This creates a soft, dimensional holiday ornament.
Can I use leftover yarn for this project?
Absolutely. A crochet Christmas tree requires relatively small amounts of yarn, particularly when made as an ornament. It is an excellent project for using leftover yarn from previous crafts, especially small quantities of contrasting colors for decorations.
How can I turn the tree into a Christmas ornament?
Add a securely crocheted chain loop to the top after completing the tree. Make the loop long enough to fit comfortably over the intended branch. You can also add decorative edging before attaching the loop.
Can I make a garland with this Crochet Christmas Tree Pattern?
Yes. Crochet several small trees and attach them at evenly spaced intervals along a long chain or cord. Using repeating colors or alternating designs can create a beautiful handmade crochet Christmas garland for seasonal decorating.
Conclusion
The Crochet Christmas Tree Pattern is a simple and creative way to bring handmade charm into holiday decorating. By beginning with a narrow top, gradually increasing the width, shaping the branches, and adding a small trunk, you can create the recognizable Christmas tree silhouette using accessible crochet techniques.
Throughout this tutorial, you learned how to select yarn, work single crochet stitches, use increases for shaping, create the trunk, add decorative edging, and personalize the finished tree with colorful details. You also learned how the same basic pattern can become an ornament, garland element, gift decoration, or lightly stuffed seasonal piece.

