
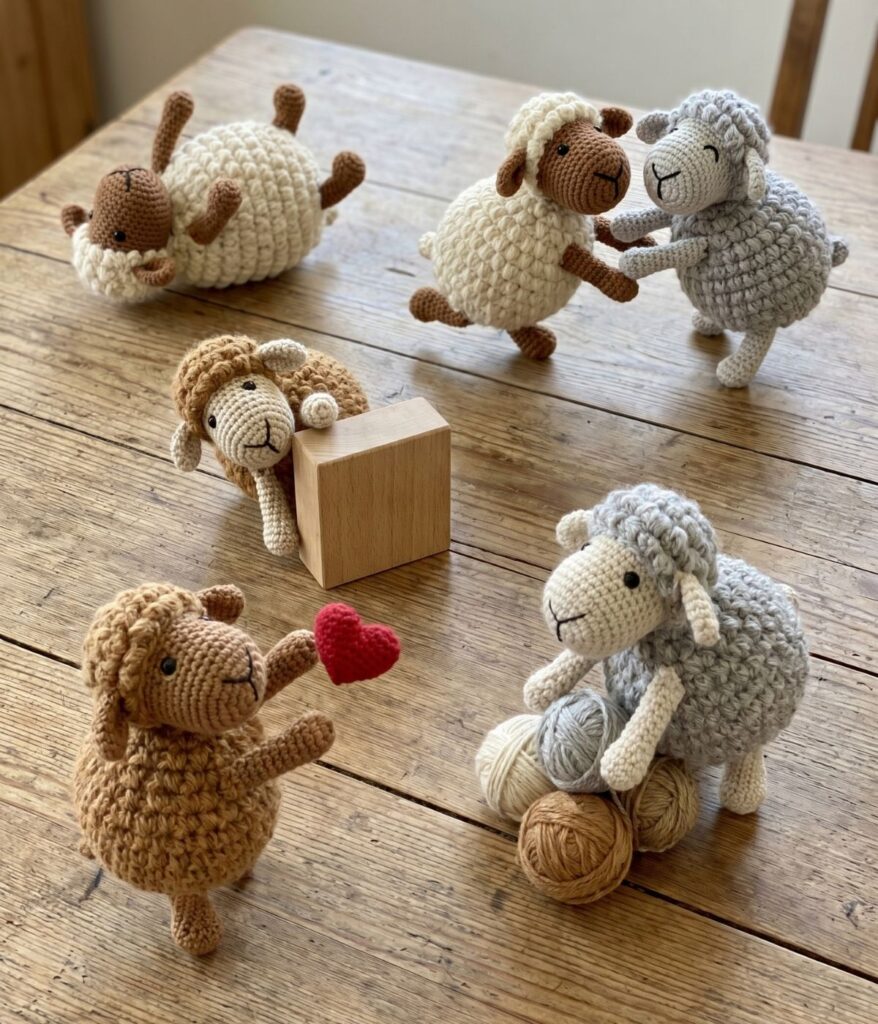
The Crochet Sheep Pattern is an adorable project that combines soft texture, simple shaping, and charming handmade details to create a little sheep full of personality. Whether you want to make a cuddly amigurumi animal, a nursery decoration, a handmade gift, or simply add another farm animal to your crochet collection, this project offers plenty of opportunities to experiment with yarn, stitches, and finishing techniques. The fluffy appearance of a sheep also makes it especially fun because different yarn textures can completely transform the finished result.
One of the most appealing things about a crochet sheep is how easily the design can be personalized. Traditional white or cream yarn paired with a beige, gray, or black face creates a recognizable farm-style sheep, while pastel colors can produce a playful version for children’s décor. You can also experiment with brown, natural wool shades, or even colorful leftover yarn. Small details such as the ears, legs, embroidered expression, and fluffy body give every finished sheep its own character.
This Crochet Sheep Pattern uses common amigurumi principles, including working in continuous rounds, increasing and decreasing stitches, stuffing the pieces, and assembling them securely. The instructions use standard US crochet terminology and can be adapted according to the yarn weight and hook size you prefer. Before starting, remember that your individual gauge and yarn choice will influence the finished dimensions, so consistency is more important than matching one exact size.
Materials and Basic Stitches for the Crochet Sheep Pattern
Begin by selecting the yarn for your sheep. A medium-weight cotton or acrylic yarn is an approachable choice, especially if you’re relatively new to amigurumi. Cream, ivory, or white works beautifully for the body, while beige, gray, brown, or black can be used for the face, ears, and legs.
For additional texture, you can use a soft fuzzy or boucle-style yarn for the body. However, textured yarn can make individual stitches more difficult to see. Beginners may find it easier to crochet the first sheep using smooth yarn before experimenting with fluffy fibers.
Choose a crochet hook slightly smaller than the size normally recommended for your yarn. Amigurumi fabric should be dense enough to prevent the stuffing from showing through the stitches. The exact hook size depends on your yarn and personal tension.
You will also need fiberfill stuffing, a yarn needle, stitch marker, scissors, and embroidery thread or yarn for facial details. If the finished sheep is intended as decoration for adults or older children, safety eyes may be an option. For an item intended for a baby or very young child, embroidered eyes are generally a better choice because they avoid detachable plastic pieces.
The main stitch used throughout this amigurumi sheep pattern is the single crochet. In US terminology, SC means single crochet. You will also need increases and invisible decreases. An increase usually means working two single crochet stitches into the same stitch, while a decrease combines two stitches into one.
A magic ring is useful for beginning rounded amigurumi pieces because it allows the center to close tightly. Place a stitch marker in the first stitch of each round and move it upward as you work. This makes counting considerably easier when crocheting in continuous spirals.
Crocheting the Head, Body, and Fluffy Texture
Start the body with your main sheep color. Create a magic ring and work six single crochet stitches into it. Pull the ring closed gently and place your stitch marker into the first stitch.
For the next round, work an increase into every stitch, giving you 12 stitches. Continue increasing evenly over the following rounds until the body reaches the desired width. A common amigurumi approach is to space the increases progressively farther apart in each round.
Once the body has reached the width you want, crochet several rounds without increasing. This creates the main middle section of your crochet sheep body. The number of straight rounds determines whether your sheep looks round and compact or slightly elongated.
To create a fluffy appearance with smooth yarn, you can add surface texture after completing the body. Small loops, bobble-style details, or textured surface stitches can suggest wool. Another option is simply to use a naturally textured yarn and keep the underlying construction straightforward.
Begin decreasing gradually when the body is long enough. Use invisible decreases whenever possible because they create a cleaner amigurumi surface. Start adding fiberfill before the opening becomes too small, distributing the stuffing evenly instead of inserting one large clump.
The head can be constructed using the same basic principle. Begin with a magic ring, increase gradually, crochet several even rounds, and then decrease to form the shape. Depending on your preferred style, you can make a rounded head or slightly elongate the muzzle area for a more recognizable sheep profile.
Stuff the head firmly enough to maintain its shape but avoid overstuffing. Excessive stuffing can stretch the crochet fabric and expose the fiberfill between stitches. Leave a sufficiently long yarn tail for sewing the head securely to the body.
Making the Ears, Legs, and Face
The ears give the Crochet Sheep Pattern much of its personality. For simple ears, create small oval or leaf-shaped pieces using the same yarn as the face. You can make them slightly floppy so they naturally rest at the sides of the head.
A basic ear can begin with a short foundation chain followed by stitches worked around both sides. Alternatively, small ears can be crocheted in rounds and flattened before attachment. Make two matching pieces and leave yarn tails for sewing.
For the legs, begin with the darker hoof color if desired. Work a small magic ring and crochet short cylindrical pieces. Change to the body or leg color partway through if you want contrasting hooves.
Make four legs of approximately equal length. Lightly stuff them if they’re large enough, but very small legs may not require stuffing. Before sewing, pin all four pieces temporarily to the body and place the sheep on a flat surface to check whether the positioning looks balanced.
Create the facial expression using embroidery. Small black stitches can form closed or open eyes, while a short line and tiny inverted Y-shape can suggest the nose and mouth. Keeping the expression simple often creates the sweetest result.
Position the ears symmetrically on both sides of the head and sew them securely. If desired, add a small tuft of textured yarn between the ears to create an extra fluffy forehead.
Finally, attach the head to the body using several secure stitches around the joining area. Check the alignment frequently while sewing. Once assembled, weave all yarn ends securely into the interior of the project.
Assembling and Personalizing Your Crochet Sheep
Before permanently attaching every piece, arrange the head, legs, and ears with pins or removable stitch markers. Looking at the sheep from the front, side, and back can help you identify placement adjustments before sewing.
Use a yarn needle and matching yarn for assembly. Sew through sturdy crochet stitches rather than only catching individual fibers. A securely assembled crochet sheep amigurumi will maintain its shape much better during handling.
If the sheep is intended primarily as decoration, you can add optional accessories. A tiny crocheted flower, bow, scarf, or bell-inspired embellishment can give the project extra personality. Keep detachable decorations away from projects intended for babies and very young children.
You can also create an entire flock by changing the yarn colors. Make one sheep in traditional cream, another in gray, and another in brown. Pastel versions can look particularly charming as nursery decorations.
The pattern can be adapted into different sizes simply by changing yarn weight and hook size, although proportions may need minor adjustments. Thicker yarn creates a larger, softer sheep, while lightweight yarn can produce a miniature version suitable for decorative applications.
Once everything is attached, gently shape the body with your hands and inspect all seams. Weave in remaining yarn tails securely. Your finished Crochet Sheep Pattern should now have a soft rounded body, expressive little face, floppy ears, and plenty of handmade charm.
Frequently Asked Questions About the Crochet Sheep Pattern
Is this Crochet Sheep Pattern suitable for beginners?
Yes. A crocheter who understands single crochet, increases, decreases, and working in rounds should be able to complete the project with patience.
What does SC mean in the pattern?
In standard US crochet terminology, SC means single crochet.
What is a magic ring?
A magic ring is an adjustable loop commonly used to begin amigurumi pieces. It allows you to tighten the center so there is little or no visible opening.
What yarn works best for a crochet sheep?
Cotton and acrylic are easy to work with, while boucle or fuzzy yarn can provide a more wool-like texture. Beginners may prefer smooth yarn because the stitches are easier to identify.
How can I make the sheep look fluffy?
Use textured yarn or add surface crochet, loops, or bobble-inspired texture to the body. You can also combine a smooth face with a fluffier body yarn.
How much stuffing should I use?
Add enough fiberfill to maintain the shape without stretching the crochet fabric. Insert small amounts gradually and distribute them evenly.
Can I use safety eyes?
Safety eyes are commonly used for decorative amigurumi, but embroidered facial features are preferable when making an item for babies or very young children because they eliminate detachable eye pieces.
Why can I see stuffing through my stitches?
Your hook may be too large for the yarn, your tension may be too loose, or the piece may be overstuffed. Try using a slightly smaller hook and adding less stuffing.
Can I make a larger crochet sheep?
Yes. Using thicker yarn and an appropriately sized hook is one easy way to increase the overall size. You may need to adjust the amount of stuffing and some proportions.
What other projects can I create from this idea?
The sheep motif can inspire keychains, nursery decorations, baby mobiles, farm-themed sets, ornaments, appliqués, and other handmade crochet projects.
Conclusion
The Crochet Sheep Pattern is a delightful project for practicing essential amigurumi skills while creating an animal with plenty of handmade personality. By working with basic single crochet stitches, gradual increases, invisible decreases, careful stuffing, and simple assembly techniques, you can transform a few balls of yarn into an adorable little sheep.
Fabric-like texture is replaced here by the wonderful possibilities of yarn. Smooth cotton creates crisp stitch definition, acrylic provides versatility, and fluffy yarn can recreate the soft appearance of sheep’s wool. Changing the face color, body texture, ears, or accessories means that no two sheep need to look exactly alike.

