
The Loop the Loop Quilt Block Pattern is a captivating patchwork design that transforms simple geometric fabric pieces into a block filled with movement, rhythm, and visual interest. Its repeating shapes seem to travel around the block, creating the impression of loops weaving through one another. This makes the design especially attractive for quilters who enjoy traditional piecing techniques but want a finished project with a dynamic and modern personality. Depending on your fabric choices, the same block can look playful, elegant, vintage, or wonderfully contemporary.
One of the greatest advantages of the Loop the Loop Quilt Block Pattern is its versatility. A carefully coordinated color palette can emphasize the continuous looping effect, while a scrappy selection can create a cheerful quilt filled with personality. Strong contrast between the background and the main loop fabrics is particularly effective because it allows the geometric structure to remain clearly visible. Quilters can also experiment with solids, small prints, batiks, tone-on-tone fabrics, or combinations of several fabric styles to achieve completely different results.
Although the finished design may initially appear complicated, the construction becomes much easier when you divide the block into smaller units and work methodically. Accurate cutting, a reliable ¼-inch seam allowance, careful pressing, and consistent block orientation are the foundations of a successful result. In this tutorial, we will explore fabric selection, preparation, piecing, block arrangement, and finishing techniques so you can confidently create a beautiful Loop the Loop Quilt Block for a full quilt or smaller patchwork project.
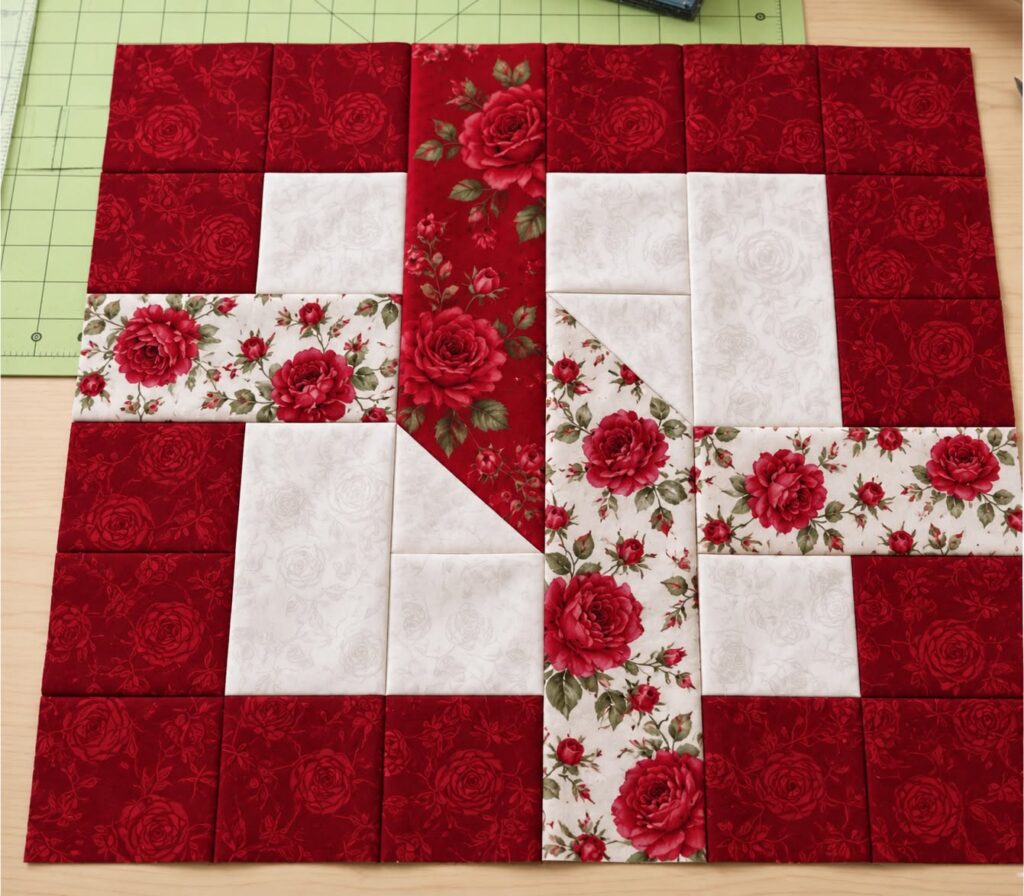
Choosing Fabrics and Preparing the Loop the Loop Quilt Block
Start your Loop the Loop Quilt Block Pattern by deciding how strongly you want the looping shapes to stand out. Contrast is one of the most important elements of this design. When the main fabrics are clearly different from the background, the eye can easily follow the repeated shapes around the block.
For a classic appearance, consider using a light neutral background such as white, cream, ivory, or pale gray with two or three stronger colors for the looping sections. Navy, red, green, burgundy, teal, and deep blue can all produce beautiful traditional combinations.
For a modern interpretation, try a dark background combined with bright solids. Black, charcoal, or navy backgrounds can make vivid colors appear especially dramatic. This approach can turn a traditional-looking block into a bold contemporary quilt.
A scrappy version is another excellent possibility. Choose small pieces from your fabric collection and organize them by color value. Even when many different prints are used, maintaining a clear difference between the background and loop fabrics will help preserve the overall design.
Quality 100% cotton quilting fabric is generally the easiest material to use. It holds its shape during cutting and piecing, presses neatly, and provides the stability needed for accurate patchwork construction.
Before cutting all the fabric for a large quilt, make one test block. This allows you to confirm the dimensions of your chosen version of the pattern, check your seam allowance, and evaluate whether your fabric combination provides enough contrast.
Cutting and Piecing the Loop the Loop Units
Accurate cutting is essential when constructing a geometric quilt block. Use a sharp rotary cutter, transparent quilting ruler, and self-healing cutting mat. Square the fabric edge before measuring individual pieces so every component begins accurately.
Because the exact cutting dimensions depend on the finished block size you choose, determine your desired dimensions before cutting. Larger blocks can create a bold graphic quilt, while smaller blocks produce a more detailed repeating design.
Organize the cut pieces according to their position within the block. If several fabrics are similar, labels can prevent confusion. Keeping each block’s components together is particularly useful when making multiple color variations.
Begin sewing the smaller units first. Many geometric blocks are easier to construct when individual squares, rectangles, or triangle-based sections are completed before being combined into larger rows. Follow the visual direction of the loop carefully as you work.
Maintain a consistent ¼-inch seam allowance. A seam that is only slightly too wide or narrow may seem insignificant on one unit, but those small differences accumulate as several pieces are joined together.
Press after completing each important construction stage. Avoid aggressively moving the iron across unfinished units because this can distort the fabric. Instead, gently press the seam into position. Accurate pressing helps the units remain square and makes later intersections much easier to match.
Assembling the Loop the Loop Quilt Block
Once the individual units are complete, arrange them on a flat surface before sewing them together. This step is extremely important because rotating a single unit can interrupt the continuous movement that gives the Loop the Loop Quilt Block Pattern its distinctive appearance.
Look at the arrangement from a short distance. Your eye should naturally travel around the block, following the repeated colors and shapes. If one section appears disconnected, check its orientation before continuing.
Begin joining neighboring units into rows or larger sections. Match important seam intersections and use pins or clips when necessary. Accurate intersections make the looping design appear clean and continuous.
If adjoining seams have been pressed in opposite directions, they can often be nested together. Place the units right sides together and gently move the seam allowances until you feel them lock into position. This technique can significantly improve matching points.
After assembling each row, measure it before continuing. If one row is noticeably longer or shorter than another, identify the cause instead of stretching the pieces to fit. Stretching can create waves and distortion in the finished block.
Join the completed rows carefully and give the block a final press. Measure the block vertically, horizontally, and diagonally when appropriate. A square, accurately constructed block will make assembling the complete quilt considerably easier.
Creating and Finishing a Loop the Loop Quilt
After making several blocks, place them together on a design wall or large clean surface. This is where the Loop the Loop Quilt Block Pattern becomes especially exciting because additional secondary patterns can appear when neighboring blocks interact.
Try rotating some blocks before deciding on the final arrangement. Depending on the color placement, different orientations may create circles, chains, diagonal pathways, or other unexpected geometric effects.
For a scrappy quilt, distribute dominant colors throughout the layout. Avoid concentrating all the darkest or brightest fabrics in one area unless you intentionally want to create a focal point.
When you’re satisfied with the arrangement, take a photograph for reference. Then join the blocks into rows, carefully matching intersections. Sew the rows together and press the completed quilt top.
Prepare your backing fabric and batting slightly larger than the quilt top. Layer the backing, batting, and quilt top to create the quilt sandwich, then baste thoroughly using your preferred technique.
Straight-line quilting can beautifully emphasize the geometric nature of the Loop the Loop design. Alternatively, gentle curves or free-motion quilting can provide contrast against the angular piecing. Finish by trimming the quilt, attaching binding, and giving your completed project a final inspection.
Frequently Asked Questions About the Loop the Loop Quilt Block Pattern
Is the Loop the Loop Quilt Block Pattern beginner-friendly?
The pattern can be suitable for confident beginners who understand basic patchwork construction. Accurate cutting and maintaining a consistent quarter-inch seam allowance are particularly important.
What fabrics work best for this quilt block?
High-quality quilting cotton is an excellent choice. Solids, blenders, small prints, batiks, and carefully selected scraps can all work beautifully.
How many colors should I use?
There is no strict requirement. Two contrasting colors plus a background can produce a clean design, while several coordinated colors create a more playful appearance.
Can I make a scrappy Loop the Loop Quilt?
Yes. This design can be an excellent scrap-friendly project. Organizing scraps by color and value will help maintain the recognizable looping effect.
How can I make the loop design stand out more clearly?
Increase the contrast between your background and primary fabrics. If all fabrics have similar values, the looping shapes may become difficult to distinguish.
Why is my finished block smaller than expected?
The most common reasons are slightly oversized seam allowances, inaccurate cutting, or excessive fabric loss during trimming. Test your quarter-inch seam before beginning multiple blocks.
Should every block use the same colors?
No. You can repeat the same palette for a coordinated quilt or make every block different for a colorful scrappy appearance.
What can I make besides a full quilt?
Individual blocks can be incorporated into pillow covers, table runners, placemats, tote bags, wall hangings, or other patchwork projects.
What quilting style complements this pattern?
Straight-line quilting reinforces its geometry, while curves and free-motion designs provide an attractive visual contrast. Both approaches can work well.
Can beginners make a smaller project first?
Absolutely. Making one block for a pillow or several blocks for a table runner is an excellent way to practice the construction before committing to a large quilt.
Conclusion
The Loop the Loop Quilt Block Pattern is an engaging design for quilters who enjoy combining traditional patchwork techniques with strong geometric movement. Its repeating shapes create the illusion of continuous loops, while different fabric combinations allow the same basic block to take on many personalities.
Successful construction begins with thoughtful fabric selection and continues through accurate cutting, consistent ¼-inch seams, careful pressing, and correct unit orientation. Taking time to create a test block can also help you refine your technique and confirm that your colors provide the contrast necessary to showcase the design.

