
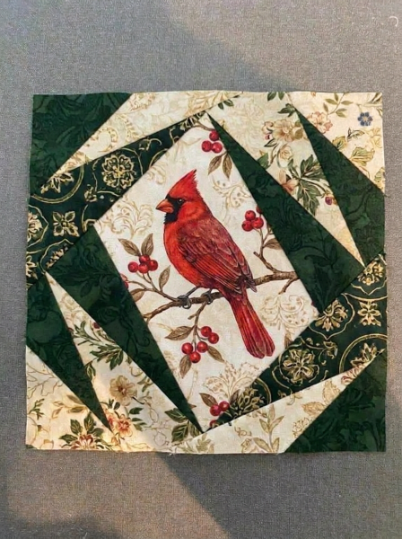
Twisted Picture Frame Quilt Block Pattern is an eye-catching patchwork design that combines the familiar appearance of a framed center square with angled pieces that create an illusion of rotation and movement. Instead of looking like a completely straight traditional frame, the surrounding sections appear to twist around the center, giving the block a dynamic geometric personality. This makes the design particularly interesting for quilts that showcase beautiful prints, novelty fabrics, fussy-cut motifs, florals, or colorful scraps. Depending on the fabrics you select, the finished block can look playful and bright, sophisticated and modern, or warm and traditional.
One of the most enjoyable features of the Twisted Picture Frame Quilt Block Pattern is the central area. Because this portion resembles a small picture surrounded by a fabric frame, it offers an ideal location for a favorite motif. A floral print can place a flower directly in the center, a novelty fabric can highlight a character or object, and a geometric print can add another layer of visual interest. Solid fabrics can also work beautifully, especially when the surrounding frame pieces provide strong contrast. The key is choosing fabrics that allow the center, frame, and background to remain visually distinct.
Although the Twisted Picture Frame Quilt Block may initially appear complicated, its construction becomes much easier when the block is divided into individual sections. Accurate cutting, consistent quarter-inch seam allowances, careful pressing, and correct orientation are more important than advanced sewing techniques. Throughout this tutorial, you will learn how to choose fabrics, prepare the center and frame pieces, create the twisted visual effect, assemble the sections accurately, arrange multiple blocks into a quilt, and complete the project with quilting and binding. Once you understand the basic structure, the pattern offers countless opportunities for creative variations.
Choosing Fabrics and Cutting the Twisted Picture Frame Pieces
Begin the Twisted Picture Frame Quilt Block Pattern by selecting quality quilting cotton. Stable woven cotton is particularly useful for geometric patchwork because it cuts cleanly, presses well, and makes accurate seam allowances easier to maintain.
Choose a fabric for the center square first. If you are using a printed fabric, consider fussy cutting the piece so an attractive motif appears exactly where you want it. Allow enough fabric around the motif for the required seam allowances.
Next, select fabrics for the surrounding frame. Strong contrast between the center and frame helps emphasize the picture-frame effect. You can use one consistent frame color or alternate several coordinated shades for additional movement.
Choose a background that contrasts with the frame. Light backgrounds can make saturated frame colors appear especially vibrant, while dark backgrounds can create a dramatic contemporary appearance. Low-volume prints are another attractive option.
Prepare a rotary cutter, self-healing cutting mat, acrylic quilting rulers, sewing machine, coordinating thread, pins or clips, and an iron. A square ruler is particularly helpful for checking the completed quilt block before final assembly.
Cut the center square and surrounding strips, rectangles, or angled units required for your chosen block dimensions. Since twisted-frame designs can be constructed in different ways, make one test block before cutting an entire quilt’s worth of fabric. This allows you to confirm the proportions and finished dimensions.
Sewing the Twisted Picture Frame Quilt Block Step by Step
Place the center square on your work surface and arrange the first frame pieces around it. Before sewing, study the direction of every piece carefully. The consistent orientation of these surrounding sections is what creates the recognizable twisted frame effect.
Begin attaching the frame pieces according to your selected construction sequence. Place the first piece right sides together with the center section, align the appropriate edges, and sew using an accurate quarter-inch seam allowance.
Press the seam carefully after stitching. Avoid pulling or stretching the fabric while pressing, particularly when the design includes angled or bias edges. Lift and lower the iron rather than aggressively moving it across the patchwork.
Continue adding the remaining frame sections around the center. Rotate the block as you work so each new piece follows the same directional progression. Keeping an unfinished reference block nearby can help prevent accidental rotations.
Once the inner frame is complete, add any additional contrasting sections required to strengthen the twisted appearance. Check the block after every major seam. The frame should appear to move consistently around the center rather than suddenly changing direction.
Finish the block by adding the outer background sections. Press it gently and measure the unfinished block from several directions. If trimming is necessary, remove only small amounts while preserving the required quarter-inch seam allowance around important points and edges.
Arranging Twisted Picture Frame Blocks Into a Quilt
After completing the first Twisted Picture Frame Quilt Block, make additional blocks using the same construction method. Chain piecing repeated sections can make the process faster when creating a larger quilt.
If you are working with several center prints, organize the blocks as you sew. Each center can feature a different fabric while the frame remains consistent, creating a unified quilt with many small focal points.
For a scrappy version, reverse the approach. Keep the center or background relatively consistent while using different scraps for the frames. This allows leftover fabrics to become the colorful focus of the Twisted Picture Frame Quilt Pattern.
When all blocks are complete, arrange them on a design wall, large table, or clean floor. Experiment with rotating individual blocks. Different orientations can create surprising secondary patterns where neighboring frame sections visually interact.
Consider whether you want to use quilt sashing between the blocks. Sashing separates each frame and emphasizes the individual picture-like appearance. Sewing blocks directly together, however, can create stronger continuous geometric movement across the quilt.
Once you are satisfied with the layout, photograph it for reference. Sew the blocks into rows, carefully matching intersections, and then join the rows together. Press the completed quilt top and add an optional border if you want additional space around the outer blocks.
Quilting, Binding, and Creative Picture Frame Variations
Prepare batting and backing slightly larger than the finished quilt top. Place the backing wrong side up, position the batting over it, and center the Twisted Picture Frame Quilt top with the right side facing upward.
Smooth all three layers carefully from the center toward the outside. Baste them securely using your preferred technique. Good basting helps prevent puckers and shifting as the quilt moves through the quilting process.
Straight-line quilting complements the geometric construction particularly well. You can quilt along the edges of the frame sections, create a diagonal grid, or use parallel lines that contrast with the apparent rotation of the patchwork.
Another option is echo quilting around the central squares. Repeating the square or frame outline emphasizes the focal fabric while adding texture. Keep the quilting balanced so it supports rather than overwhelms the twisted geometry.
After quilting is complete, trim away the excess batting and backing. Prepare binding strips and join them into a continuous length. Attach the quilt binding evenly around the perimeter, carefully forming neat corners before finishing the final join.
Use the basic pattern to explore creative variations. Try rainbow frames, monochromatic gradients, black-and-white combinations, vintage scraps, coordinated florals, or modern solids. You can even alternate the apparent direction of neighboring blocks to create additional optical effects.
FAQ About the Twisted Picture Frame Quilt Block Pattern
What is a Twisted Picture Frame Quilt Block?
A Twisted Picture Frame Quilt Block is a geometric patchwork design with a central square surrounded by pieces arranged to suggest a rotating or twisted frame.
Is this quilt block suitable for beginners?
Yes, particularly for confident beginners who can cut accurately and sew a consistent quarter-inch seam. Careful orientation of the pieces is one of the most important parts of the project.
What fabric works best for this pattern?
Quality quilting cotton is an excellent choice because it is stable, easy to cut, and responds well to pressing.
What is fussy cutting?
Fussy cutting means intentionally positioning a motif within the section you plan to cut. It allows a flower, character, animal, or other decorative element to appear prominently in the center of the block.
Can I use fabric scraps?
Absolutely. This pattern can be excellent for scraps because many of the frame sections can be created from relatively small fabric pieces.
How do I make the twisted effect more noticeable?
Use clear contrast between the frame and background and maintain consistent directional placement. Alternating light and dark values can strengthen the illusion of movement.
Why does one section of my frame look backward?
One piece may have been rotated or attached in the opposite orientation. Arrange the entire block before sewing and keep a reference layout nearby.
Why is my block not square?
Inaccurate cutting, inconsistent seam allowances, stretching angled edges, or improper pressing can distort the finished block.
Should I press seams open or to one side?
Both methods can work. Pressing to one side may help seams nest at certain intersections, while pressing open can reduce bulk. Choose the approach that best suits your construction.
Can every center square use a different fabric?
Yes. Using different center prints is a wonderful way to create an I-spy style quilt, novelty quilt, floral collection, or scrap quilt.
Can I add sashing between the blocks?
Yes. Sashing gives each block additional separation and can reinforce the appearance of individual framed pictures.
What happens if I rotate alternate blocks?
Rotating blocks can change the secondary pattern dramatically. You may create zigzags, pinwheel-like movement, or more complex geometric pathways across the quilt.
What quilting design works well with this pattern?
Straight-line quilting, echo quilting, diagonal grids, and simple geometric designs all complement the block effectively.
What can I make with one Twisted Picture Frame Block?
A single block can become a pillow front, mini quilt, wall hanging, table mat, tote bag panel, or centerpiece for another patchwork project.
Conclusion
The Twisted Picture Frame Quilt Block Pattern transforms a simple framed center into a dynamic geometric design through clever fabric placement and directional movement. The central square provides an excellent opportunity to showcase a favorite print, while the surrounding frame pieces create the visual twist that makes the block distinctive.
Throughout this tutorial, you learned how to choose quilting fabrics, prepare a focal center, use fussy cutting, organize frame pieces, maintain a consistent quarter-inch seam allowance, press accurately, preserve the direction of the twisted sections, assemble multiple blocks, create a quilt sandwich, quilt the layers, and complete the project with binding. Careful orientation and strong fabric contrast are especially important for producing a clear picture-frame illusion.

